One of the most frustrating things that can happen to a car owner is when the vehicle refuses to start. I’ve been there myself, and I know how stressful it can be. One day, I was getting ready to head out, only to find that my car wouldn’t start. I turned the key, and all I heard was a faint click. The lights were on, the battery seemed fine, but there was no engine turnover. After some troubleshooting, I realized it was the starter motor causing the issue. The starter motor is a vital component of your car’s engine system, and when it fails, your car won’t start. But don’t worry! Fixing a bad starter motor is not an impossible task. Let me walk you through how I diagnosed and repaired mine. Here’s what you need to know.

Firestone Complete Auto Care
1933 N Placentia Ave, Fullerton, CA 92831, USA
1. Recognizing the Symptoms of a Bad Starter Motor
The first step in fixing a bad starter motor is to identify the symptoms that indicate the starter is the culprit. A faulty starter motor doesn’t just stop working without warning—it usually shows signs that something is wrong. Here are a few key symptoms I noticed when my starter motor began to fail:
- Clicking Noise: When you turn the key and hear a clicking sound instead of the engine turning over, it often points to the starter motor or solenoid being faulty. In my case, I heard the click, but the engine didn’t crank.
- Slow Cranking: If your car starts slowly, or the engine turns over very sluggishly, it could be a sign of a weak or failing starter motor. This happens when the motor is struggling to engage with the flywheel properly.
- Engine Doesn’t Crank at All: In some cases, when the starter motor fails completely, the engine won’t even attempt to crank. This was the situation I found myself in—a complete failure to start.
- Smell of Burning: A burnt smell or even smoke coming from the starter motor can indicate that it’s overheating or that it’s been damaged by overuse. This can happen if the starter motor is stuck in the "on" position or if it’s been trying to start the engine repeatedly without success.
- Intermittent Starting Issues: Sometimes, the starter motor will work intermittently, meaning it will start the car some days but fail to do so on others. If you experience this, it’s a good idea to check the starter motor before it completely fails.
2. Diagnosing the Starter Motor Issue
Once you’ve recognized the symptoms, the next step is diagnosing the starter motor failure. I’ve always found that the best way to approach this is methodically. Here’s what I did to diagnose my bad starter motor:
Complete Auto Service of Ann Arbor
2890 Jackson Ave, Ann Arbor, MI 48103, USA
2.1 Check the Battery
Before you dive into diagnosing the starter motor itself, always check the battery. A weak or dead battery can mimic the symptoms of a faulty starter motor. If your car won’t start, and you notice the lights dimming or the battery light coming on, start by checking the battery’s voltage. You can use a multimeter to measure the voltage, or simply jump-start the car with jumper cables. If your car starts with the jumper cables, then the issue might be with the battery, not the starter motor.
2.2 Listen for the Click
As I mentioned earlier, if you hear a click but the engine doesn’t crank, it’s usually a sign that the starter motor or the solenoid is failing. In this case, I could hear a distinct clicking sound every time I turned the key, which made me confident that the starter was the issue.
2.3 Inspect the Starter Motor and Connections
Next, I took a look at the starter motor itself. Depending on your vehicle, the starter motor may be located near the front of the engine. It’s usually attached to the transmission. I checked the connections to make sure they were tight and clean. Loose or corroded connections can prevent the starter from working properly, so cleaning the terminals or tightening the connections might fix the issue.
2.4 Test the Starter Relay
Another step in diagnosing a bad starter motor is testing the starter relay. A faulty relay can prevent the starter motor from receiving power. I used a test light or multimeter to check the relay’s electrical circuit. If the relay wasn’t sending current to the starter motor, I knew that could be the problem.
3. Replacing the Starter Motor
Once I was certain the starter motor was the issue, I had to replace it. Replacing a starter motor can be a bit tricky, but with the right tools and some patience, it’s a doable task. Here’s the process I followed to replace my bad starter motor:
3.1 Gather the Necessary Tools
Before you start, you’ll need a few basic tools. Here’s what I used:
- Wrench set
- Screwdrivers
- Socket set
- Jack and jack stands
- Battery terminal puller
- New starter motor
3.2 Disconnect the Battery
Always start by disconnecting the battery. I removed the negative terminal to ensure I wouldn’t accidentally cause any short circuits while working on the electrical components. This step is crucial for your safety.
3.3 Raise the Car (If Necessary)
Depending on the location of your starter motor, you may need to raise the car to access it. I used a jack and jack stands to lift my car safely. Make sure you follow proper safety protocols and don’t attempt to lift the car without the necessary equipment.
3.4 Remove the Old Starter Motor
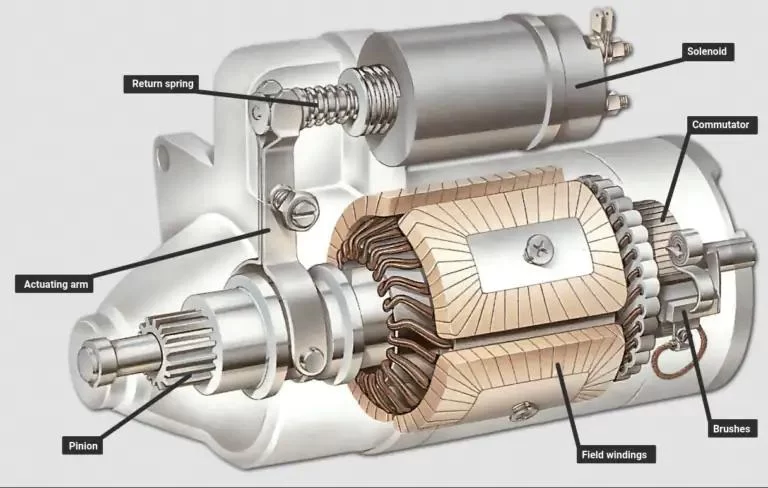
With the car raised and the battery disconnected, I located the starter motor and began removing the bolts that secured it. The starter motor is typically held in place by a couple of bolts. Once I removed them, I carefully disconnected the electrical connections, including the power wire and any smaller wires attached to the solenoid. The starter motor should then come free, though you may need to wiggle it a bit to get it out.
3.5 Install the New Starter Motor
Once I had the old starter motor out, I installed the new one in the reverse order. I connected the electrical wires to the new starter, ensuring the connections were tight and secure. I then bolted the starter motor into place, making sure it was firmly attached. After everything was secure, I lowered the car back to the ground.
3.6 Reconnect the Battery and Test
With the new starter motor installed, I reconnected the negative battery terminal and tried starting the car. To my relief, the engine cranked right up without any issues. The car was back to normal, and I was able to hit the road again!
4. When to Call for Help
While replacing a starter motor is something I was able to do myself, I understand that not everyone is comfortable working on their car’s electrical system. If you’re not sure how to replace a starter motor or if you run into problems during the repair, it’s always a good idea to seek professional help. A trusted mechanic can quickly diagnose and replace the starter motor for you, saving you time and potential frustration.
If you’re in a situation where your car is stuck and you can’t drive it to a mechanic, you may need to call a towing service. For quick and reliable towing, I recommend Rescue & Towing. They can tow your vehicle safely to a repair shop, where a professional can handle the starter motor issue.
Fixing a bad starter motor is a manageable task if you take the time to diagnose the issue correctly and follow the right steps. Whether you choose to repair it yourself or seek professional help, the important thing is to address the problem before it leaves you stranded. Don’t let a faulty starter motor ruin your day—take action and get your car back on the road!