How to Replace Your Car's Interior Dome Light Lens: A Step-by-Step Guide
Replacing your car’s interior dome light lens is a simple task that you can do on your own, saving both time and money. Whether your light lens is cracked, discolored, or simply worn out, replacing it can improve the appearance of your car's interior while ensuring that your lights are functioning properly. In this guide, we’ll walk you through the process of replacing your car's dome light lens with easy-to-follow steps and helpful tips.

Pick Your Part - Help Yourself
1232 Blinn Ave, Wilmington, CA 90744, USA
1. Why You Might Need to Replace Your Dome Light Lens
Before diving into the steps for replacing your car’s interior dome light lens, it's important to understand why this maintenance is necessary. Over time, the lens may become damaged due to accidental impacts, wear and tear, or exposure to the sun's UV rays. Cracks, discoloration, or a dull lens can affect the brightness of your dome light and may also impact the overall aesthetic of your car's interior. Furthermore, a broken or faulty lens might prevent the light from functioning correctly, leaving you with a dim or non-working light, which is especially inconvenient during nighttime driving or when getting in and out of your vehicle.

Pick Your Part - Greer
13054 E Wade Hampton Blvd, Greer, SC 29651, USA
2. Materials and Tools Needed for the Job
Replacing a dome light lens requires just a few basic tools and materials, most of which you may already have at home. Here's a quick list of what you’ll need:
- Replacement dome light lens: You’ll need to find the correct replacement lens for your car model. These can often be found at auto parts stores or online.
- Screwdriver or trim removal tool: Some car models require a screwdriver to remove the light fixture, while others may have clips that can be removed with a trim removal tool.
- Gloves: It’s always a good idea to wear gloves to avoid touching the new lens with dirty hands or potentially breaking the lens with rough handling.
- Cleaning supplies: To ensure the lens is installed correctly, clean any dirt or debris from the light fixture and surrounding area before replacing the lens.
3. Step-by-Step Guide to Replacing the Dome Light Lens
Follow these steps to replace your car's interior dome light lens with ease:
Step 1: Turn Off the Power
Before you begin, make sure to turn off the car’s electrical system by switching off the car’s ignition. In some vehicles, the dome light may continue to receive power when the car is off, so it’s best to avoid any potential electrical issues during the process.
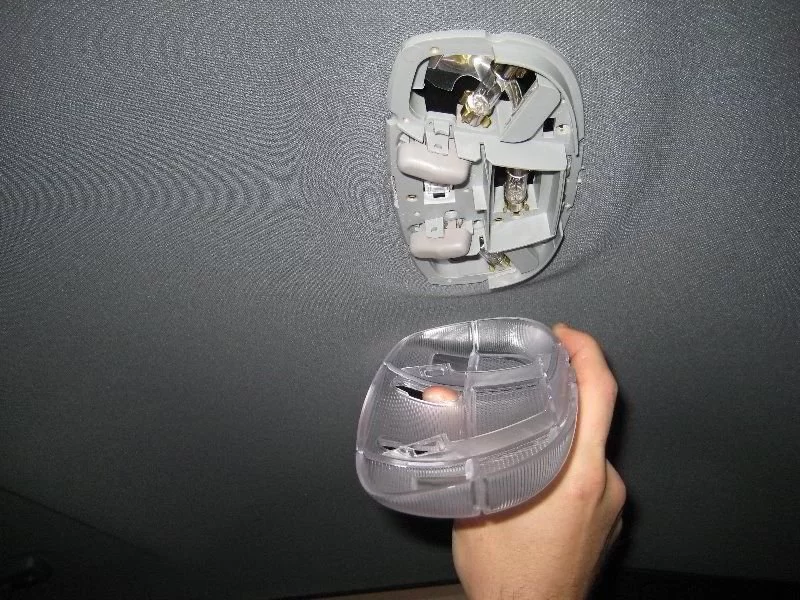
Step 2: Remove the Old Lens
Once the power is off, gently remove the old dome light lens. Depending on your car model, this could involve either unscrewing the lens cover or using a trim removal tool to pop it off. If your car’s light fixture is held in place by screws, use a screwdriver to remove them before gently lifting off the lens. Be careful not to break the lens if it's cracked or brittle.
Step 3: Clean the Light Fixture
Once the old lens is removed, take the time to clean the light fixture. Use a soft cloth and a mild cleaning solution to remove any dust, dirt, or grime that may have built up. This will help ensure that the new lens fits securely and that the light will shine brightly through a clean surface.
Step 4: Install the New Lens
Now, take your replacement dome light lens and carefully align it with the fixture. Gently press the new lens into place. If your vehicle has screws to secure the lens, replace them and tighten carefully, but don’t overtighten to avoid damaging the lens or the fixture.
Step 5: Test the Dome Light
Once the new lens is securely in place, turn on the car’s electrical system and test the dome light to make sure it is working properly. If the light is not turning on, check to make sure that the bulb is properly seated and that the electrical connections are intact.
4. Tips for Maintaining Your Dome Light Lens
To ensure your new dome light lens stays in good condition, here are a few maintenance tips:
- Regular cleaning: Clean the lens occasionally with a microfiber cloth to remove dust and prevent buildup that could block the light.
- Avoid harsh chemicals: When cleaning, avoid using harsh chemicals that could cause the lens to discolor or crack. Stick to gentle, non-abrasive cleaners.
- Protect from UV damage: If your car is parked outside often, consider using a sunshade to reduce UV exposure, which can cause the lens to yellow over time.
5. Common Issues with Dome Light Lenses
While replacing a dome light lens is a straightforward task, there are a few common issues you might encounter:
- Loose or wobbly lens: If the lens doesn’t fit snugly, it may be the wrong size for your car. Double-check the part number and ensure you have the correct replacement lens.
- Broken light fixture: If the light fixture itself is damaged, simply replacing the lens won’t fix the problem. In this case, you’ll need to replace the entire light fixture.
- Non-functioning light bulb: If the dome light isn’t turning on after lens replacement, the issue may be with the bulb rather than the lens. In such cases, replacing the light bulb could resolve the issue.
Replacing a car's interior dome light lens is an easy DIY task that can significantly improve the look and functionality of your vehicle's lighting system. For more automotive maintenance tips and quality replacement parts, be sure to check out Rescue & Towing for the best selection of products and services tailored to your needs.