How to Replace a Car's Ignition Coil Pack Wire: A Step-by-Step Guide
- 1. Importance of the Ignition Coil Pack
- 2. Symptoms of a Bad Ignition Coil Pack Wire
- 3. Tools You'll Need to Replace the Ignition Coil Pack Wire
- 4. Step-by-Step Guide to Replacing the Ignition Coil Pack Wire
- 5. Tips for a Successful Replacement
- 6. When to Seek Professional Help
1. Importance of the Ignition Coil Pack
The ignition coil pack is a vital component in your car’s ignition system. It converts the battery’s low voltage into the high voltage needed to create a spark in the spark plugs. This spark is essential for igniting the fuel in the engine, allowing the car to start and run smoothly. Over time, the ignition coil pack wire can wear out or become damaged, leading to performance issues. Replacing a faulty ignition coil pack wire can improve engine performance and prevent further damage to your vehicle's ignition system.

Firestone Complete Auto Care
1933 N Placentia Ave, Fullerton, CA 92831, USA
2. Symptoms of a Bad Ignition Coil Pack Wire
A damaged or faulty ignition coil pack wire can cause a variety of issues that affect your vehicle's performance. Some common symptoms include:
- Engine Misfires: If the coil pack wire is damaged, it may cause one or more cylinders to misfire, leading to a rough engine idle or lack of power while driving.
- Check Engine Light: A malfunctioning ignition coil pack wire often triggers the check engine light, which can be detected by an onboard diagnostic (OBD) scanner.
- Reduced Fuel Efficiency: Faulty wires can lead to improper fuel combustion, reducing the overall fuel efficiency of your car.
- Difficulty Starting the Engine: If the wire is worn out, it may cause intermittent starting problems or complete failure to start the engine.
3. Tools You'll Need to Replace the Ignition Coil Pack Wire
Before starting the replacement process, make sure you have the following tools:
- Socket Wrench Set: You’ll need a socket wrench to remove the bolts holding the ignition coil pack in place.
- Screwdriver: A flathead or Phillips screwdriver may be required for loosening or removing certain components.
- Replacement Ignition Coil Pack Wire: Make sure you purchase the correct replacement wire for your vehicle’s make and model.
- Rubber Gloves: Wearing gloves can help protect your hands from dirt and grease during the replacement process.
- Flashlight: A flashlight may come in handy for accessing hard-to-reach areas in your engine bay.
4. Step-by-Step Guide to Replacing the Ignition Coil Pack Wire
Replacing the ignition coil pack wire is a straightforward process, but it does require a bit of patience. Follow these steps to replace the wire:

Complete Auto Service of Ann Arbor
2890 Jackson Ave, Ann Arbor, MI 48103, USA
1. Disconnect the Battery
Before starting any repair, it’s important to disconnect the car's battery to avoid any electrical shocks. Use a wrench to remove the negative terminal from the battery.
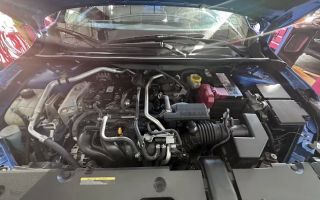
2. Locate the Ignition Coil Pack
Open the hood of your vehicle and locate the ignition coil pack. It’s typically positioned near the top of the engine, connected to the spark plugs. Refer to your vehicle’s manual if you're unsure about its location.
3. Remove the Ignition Coil Pack
Using your socket wrench, remove the bolts or screws that hold the ignition coil pack in place. Gently pull the coil pack away from the engine to expose the ignition coil pack wire.
4. Disconnect the Old Wire
Carefully disconnect the old ignition coil pack wire from the coil and the spark plug. Take note of how the wire is connected to help with the installation of the new wire.
5. Install the New Ignition Coil Pack Wire
Connect the new ignition coil pack wire to the coil and spark plug. Ensure that the wire is properly secured and that there are no loose connections. Double-check that everything is correctly aligned and connected before proceeding.
6. Reassemble and Test
Once the new wire is installed, replace the ignition coil pack and tighten the screws or bolts to secure it. Reconnect the battery and start the engine. Check for any signs of misfires or engine trouble. If the car starts smoothly and runs without issues, you've successfully replaced the ignition coil pack wire.
5. Tips for a Successful Replacement
To ensure a smooth and successful ignition coil pack wire replacement, consider the following tips:
- Work in a Clean Environment: Make sure your engine is cool and clean before starting the replacement process to avoid dirt getting into sensitive components.
- Be Gentle with Connections: Be careful not to damage the wire connections when removing or installing the wire to avoid any issues down the line.
- Consult Your Manual: Always refer to your vehicle’s manual for specific instructions regarding the ignition system, as different vehicles may have slightly different setups.
6. When to Seek Professional Help
If you're not comfortable replacing the ignition coil pack wire yourself, or if you encounter any difficulties during the process, it’s a good idea to seek professional help. A mechanic can diagnose and fix any underlying issues with the ignition system that might be causing performance problems. In some cases, the problem may be more complex than just the coil pack wire, requiring additional repairs.
If you need high-quality replacement parts or assistance with automotive repairs, consider checking out Rescue & Towing, where you'll find top-notch products and expert services to help with your car's maintenance needs.