How to Detect and Fix Oil Leaks — Gaskets, Seals, Oil Pan, and Common Leak Sources
- 1. Understanding Oil Leaks in Your Vehicle
- 2. Common Causes of Oil Leaks
- 3. How to Detect an Oil Leak
- 4. Fixing Oil Leaks: Step-by-Step Guide
- 5. Real-Life Case Study: Fixing an Oil Leak
- 6. Recommendations for Oil Leak Repair
1. Understanding Oil Leaks in Your Vehicle
Oil leaks are a common issue that many vehicle owners face. Whether you're driving an older car or a newer model, oil leaks can happen for various reasons, such as wear and tear on engine components. An oil leak occurs when oil escapes from the engine due to a crack, faulty gasket, seal, or oil pan. If left unaddressed, an oil leak can lead to low oil levels, which can cause engine damage and poor vehicle performance.
Identifying and fixing oil leaks early can save you time and money on repairs. In this article, we’ll explore the common causes of oil leaks and how to detect and fix them, including issues with gaskets, seals, and oil pans.
Costco Tire Center
43621 Pacific Commons Blvd, Fremont, CA 94538, USA
2. Common Causes of Oil Leaks
There are several reasons why oil may leak from your vehicle. Some of the most common causes include:

Auto Service Center
6353 Ventura Blvd, Ventura, CA 93003, USA
Gasket Failure
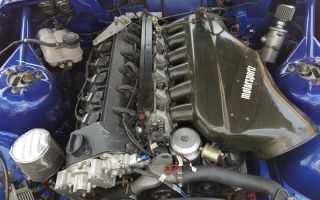
The engine's gaskets are responsible for sealing various parts of the engine to prevent oil leaks. Over time, gaskets can deteriorate due to heat, pressure, or age, leading to oil leaks. Common gaskets that can fail include the valve cover gasket, oil pan gasket, and timing cover gasket.
Seal Damage
Seals are used to close off openings around moving parts in the engine. If seals become cracked or damaged, they can allow oil to escape. Common seals that can wear out and cause oil leaks include the crankshaft seal and camshaft seal.
Oil Pan Issues
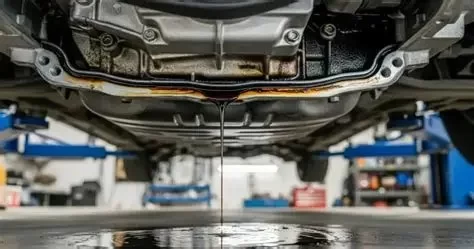
The oil pan holds the oil in the engine, and if it becomes cracked or damaged, it can lead to oil leaks. A damaged oil pan can be caused by an accident, corrosion, or even simply the result of frequent driving over rough roads or obstacles.
Loose or Damaged Oil Drain Plug
A loose or damaged oil drain plug is another common cause of oil leaks. Over time, the drain plug can wear out, and if it's not properly tightened during an oil change, it can cause oil to leak out.
3. How to Detect an Oil Leak
Detecting an oil leak early is essential to avoid engine damage. Here are some common signs that your vehicle might have an oil leak:
Visual Inspection
The most obvious way to detect an oil leak is by performing a visual inspection. Look under your vehicle for any visible signs of oil puddles or stains. Check the areas around the engine, including the oil pan, gaskets, and seals, for any oil residue.
Low Oil Levels
If you notice that your oil levels are consistently low despite regular oil changes, it could be a sign of an oil leak. Make sure to check your oil level frequently, and top it off if necessary, to prevent engine damage.
Oil Smell or Burning Oil
If you smell burning oil while driving, it may be an indication that oil is leaking onto hot engine parts, such as the exhaust manifold. This can lead to unpleasant smells and potential fire hazards.
Oil Spots on the Driveway
Another clear indicator of an oil leak is the presence of oil spots on your driveway or parking spot. Oil leaks tend to leave brown or black stains that are easy to spot.
4. Fixing Oil Leaks: Step-by-Step Guide
Once you've identified an oil leak, the next step is to fix it. Depending on the source of the leak, the repair process can vary. Below are the general steps involved in fixing oil leaks:
Step 1: Clean the Area
Before you begin repairs, it's important to clean the area around the leak. Use a degreaser to remove any oil residue, which will help you clearly see the leak source and assess the damage more effectively.
Step 2: Tighten or Replace the Drain Plug
If the leak is coming from the oil drain plug, first try tightening it to see if that resolves the issue. If the plug is damaged or stripped, you'll need to replace it with a new one.
Step 3: Replace Faulty Gaskets or Seals
If the leak is caused by a faulty gasket or seal, you'll need to replace the damaged part. This may require removing parts of the engine, such as the valve cover or oil pan. It's recommended to replace gaskets or seals with high-quality replacements to ensure a proper seal.
Step 4: Replace or Repair the Oil Pan
If the oil pan is cracked or damaged, it may need to be replaced or repaired. In some cases, a simple patch may fix the issue, but in more severe cases, you may need to replace the oil pan entirely.
5. Real-Life Case Study: Fixing an Oil Leak
John, a car owner, noticed that his vehicle was leaving oil spots in his driveway. After checking the oil level regularly, he realized that it was dropping faster than usual. He decided to take a closer look and found that the oil was leaking from a damaged valve cover gasket. John replaced the gasket, cleaned up the oil spills, and tightened the oil drain plug. After making these repairs, the oil leak was fixed, and the vehicle ran smoothly again.
This case shows how identifying the source of an oil leak and addressing it promptly can save you from more costly repairs down the road.
6. Recommendations for Oil Leak Repair
If you're dealing with an oil leak, it's important to address it as soon as possible. Whether you're handling a small gasket issue or a more complex oil pan repair, ensuring the problem is fixed will prolong the life of your vehicle's engine. For professional assistance and high-quality repair tools, visit Rescue & Towing, where you can find expert services and the best products for oil leak repair.
Remember to regularly check your vehicle for oil leaks, and take action before the problem becomes more severe.