Not long ago, I was in a situation that many of us dread—my car wouldn’t start. I turned the key, and instead of the usual engine roar, all I heard was a faint clicking sound. A sinking feeling hit me as I realized it was probably the battery. Over the years, I’d dealt with a few battery issues, but this time, it seemed like it might be more serious. I immediately started wondering what to do and how to fix my car with a bad battery. After a little research and hands-on experience, I’m going to share what I learned. Hopefully, this guide will help you save time and money if you ever find yourself in a similar situation.

Firestone Complete Auto Care
1933 N Placentia Ave, Fullerton, CA 92831, USA
1. Diagnosing the Problem with a Dead or Weak Battery
The first thing I needed to do was diagnose the issue. A bad car battery can manifest in several ways, and identifying the exact cause of the problem is key to finding the right solution. Here are the steps I took to troubleshoot the problem and confirm that the battery was the cause of the issue.

Complete Auto Service of Ann Arbor
2890 Jackson Ave, Ann Arbor, MI 48103, USA
1.1 Check the Dashboard Warning Lights
When I tried to start the car, I noticed that the dashboard lights were dim, and the usual "Check Engine" light was flashing. This was a good clue. Most cars are equipped with a battery warning light that will appear on the dashboard if there’s an issue with the battery or the charging system. If this light is on, there’s a high chance that the problem is related to the battery or alternator. However, a flashing "Check Engine" light might indicate more complex issues, so I knew I needed to dig a little deeper.
1.2 Listen for Clicking Sounds
Another common symptom of a bad battery is a clicking sound when you turn the key. This happens because the battery doesn’t have enough power to turn the engine over fully. When I heard the clicking sound, it confirmed that the battery was struggling to supply enough juice to start the car. In this case, the battery was either dead or too weak to power the car's electrical system properly.
1.3 Try Jump-Starting the Car
One of the simplest tests for a dead battery is to jump-start the car. I borrowed a set of jumper cables and a second vehicle to see if the car would start. If the car starts with a jump, then it's almost certainly a dead battery. I was able to get the car running after a few attempts, which told me that the battery was the issue. However, it didn’t necessarily mean the battery was the only problem—it could also be an issue with the alternator, which isn’t charging the battery properly.
2. Troubleshooting the Battery vs. Alternator
At this point, I wasn’t entirely sure whether it was the battery itself or the alternator causing the problem. Here’s how I figured out which component was at fault:
2.1 Testing the Battery Voltage
With the car running after the jump-start, I used a multimeter to check the battery voltage. A healthy, fully charged car battery should show around 12.6 volts when the car is off and between 13.7 to 14.7 volts when the engine is running. The reading I got was 11.9 volts when the car was off, and 12.3 volts when the car was running. Since the voltage didn’t rise much when the engine was running, I suspected that the alternator might not be charging the battery properly. This could mean the alternator was failing, but it also confirmed that the battery wasn’t getting the charge it needed.
2.2 Inspecting the Alternator
To rule out the alternator, I performed another simple test. While the car was running, I disconnected the negative terminal of the battery. Normally, the engine should keep running, powered by the alternator. But when I did this, the car sputtered and died immediately. This told me that the alternator was indeed not charging the battery, which confirmed that the issue was with the alternator and not the battery itself. However, since the battery was clearly drained, I still needed to replace it to restore the car to full working order.
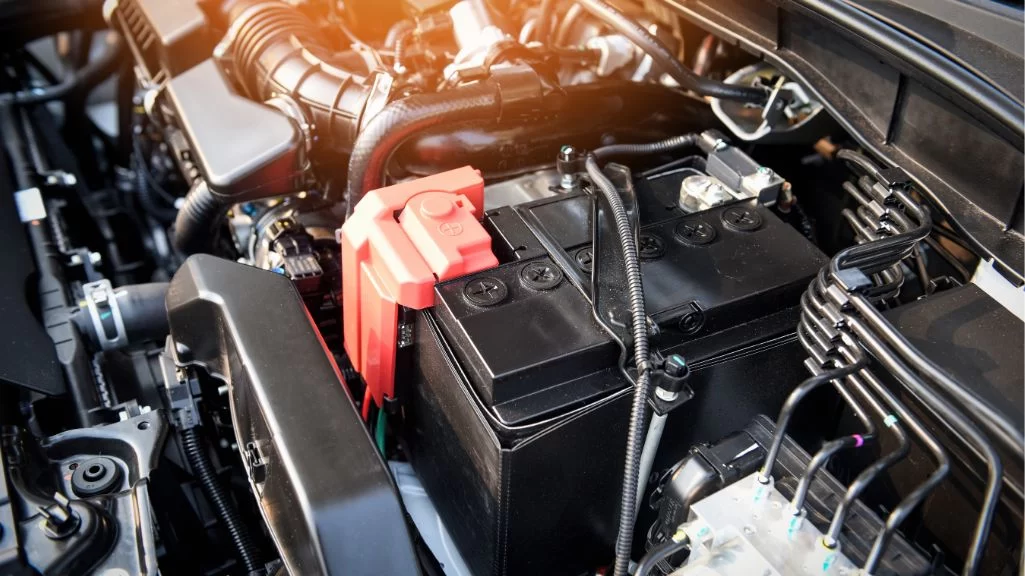
3. Replacing the Bad Battery
With the diagnosis complete, I moved on to replacing the battery. Replacing a car battery is a relatively straightforward task, but it does require a few basic tools and safety precautions. Here's how I went about it:
3.1 Gather the Necessary Tools
Before getting started, I made sure I had the right tools on hand. I used a basic socket set, a wrench, gloves, and a multimeter (for checking the battery’s voltage). I also had safety glasses on to protect my eyes from any potential acid spills.
3.2 Turn Off the Engine and Prepare for Battery Removal
The first step in replacing a bad battery is to turn off the engine and ensure the car is in "Park" (or "Neutral" for a manual transmission). Then, I disconnected the negative terminal first, as this prevents any risk of short-circuiting the electrical system. I used a wrench to loosen the bolt holding the negative cable to the battery terminal and then moved the cable away from the battery.
3.3 Disconnect the Positive Terminal
Next, I disconnected the positive terminal in the same manner. Once both terminals were disconnected, I removed the securing bracket or bolts that held the battery in place. With the battery loose, I carefully lifted it out of the car. Batteries can be heavy, so I made sure to lift with my legs and not my back.
3.4 Install the New Battery
Now that the old battery was out, I placed the new battery into the battery tray, making sure it was positioned in the same way as the old one. I reattached the securing bracket to hold the battery in place, then began reconnecting the terminals. I started with the positive terminal first, tightening the bolt securely, and followed by the negative terminal. It’s important to make sure both terminals are tight to ensure a good electrical connection.
3.5 Check the Voltage
Once the new battery was in place and connected, I used a multimeter to check the battery voltage. A healthy new battery should show around 12.6 volts when the car is off. I also started the car and checked the voltage again. With the engine running, the voltage should read between 13.7 and 14.7 volts, confirming that the alternator was properly charging the battery.
3.6 Test the Car
After making sure everything was in place and functioning properly, I started the car again. This time, there were no strange noises, and the car started right up without hesitation. I also checked the dashboard for any warning lights, and none were illuminated. I took the car for a short drive to make sure everything was working as it should.
4. When to Seek Professional Help
While replacing a car battery is usually a straightforward process, some issues may require professional help. If you're not comfortable with diagnosing the problem yourself or if the issue seems more complex (such as an alternator failure), it's always a good idea to seek assistance from a professional mechanic. If you need help with a tow to a trusted mechanic, I recommend contacting a reliable towing service like Rescue & Towing, who can provide the support you need.
In some cases, a car may have multiple issues—perhaps both the battery and alternator need attention. If you’ve replaced the battery and the car still struggles to start or if the electrical systems are malfunctioning, it's best to have a professional technician inspect the entire charging system to avoid further complications.
Fixing a car with a bad battery doesn’t have to be a daunting task. With the right tools and a little know-how, you can handle it yourself. Just make sure to stay safe and take your time, and you'll have your car up and running again in no time.