Tire Puncture Repair for Cars in Cold Weather: Detailed DIY Guide

Published on Mar 13, 2025
Tire Puncture Repair for Cars in Cold Weather: Detailed DIY Guide

How to Repair Tire Punctures in Cold Weather: A Comprehensive Guide

When the chill of winter sets in, dealing with car tire punctures can quickly turn from an annoying inconvenience into a serious problem. Having the right knowledge and tools on hand can save you a lot of stress, especially in the middle of a freezing cold day. I’ve had my fair share of tire punctures over the years, and repairing them in the cold weather has taught me a lot about what works and what doesn’t. In this article, I’ll take you through the steps, tips, and tricks to repair a tire puncture efficiently when temperatures drop.

1. Understanding the Challenges of Tire Punctures in Cold Weather

Before jumping into the repair process, it's important to understand why cold weather presents a unique challenge when dealing with tire punctures. Low temperatures affect tire performance and repair materials in several ways. The rubber in your tire becomes less pliable in colder temperatures, which means it can crack or become brittle more easily. Moreover, tire sealants or patching materials also tend to stiffen or lose their effectiveness when it's extremely cold. On top of that, if you happen to get a puncture in subzero temperatures, the air inside your tire will contract, lowering the pressure. This can make the puncture even harder to locate or assess until you have the right tools and conditions to properly examine it. If you’re in an area with snow or ice, trying to work on a flat tire outdoors becomes an entirely different challenge, with limited visibility and more risk of injury.

2. Essential Tools and Materials for Cold-Weather Tire Puncture Repair

Before attempting to repair a punctured tire, it’s critical to gather the right tools and materials. Cold weather can complicate repairs, so having everything on hand will make the job much easier. Here's what I always make sure to have when preparing for a tire repair in winter: Tire Repair Kit – This is the most essential item. A tire repair kit typically contains tire plugs, a reamer tool, an insertion tool, rubber cement, and sometimes a patch. Look for a kit that has items designed for the colder months, as some materials are more suited for low temperatures. Portable Air Compressor – A small air compressor is useful for reinflating your tire after patching it. It’s especially helpful if you're stranded in a remote area where there’s no access to a gas station. Tire Jack – You’ll need a reliable jack to lift your car, especially if the puncture is on the side of the tire facing the ground. Wheel Wrench – A sturdy wrench is necessary to remove the wheel lugs before taking the tire off for repair. Gloves – When dealing with cold temperatures, your hands will feel the freeze fast, so having a good pair of insulated gloves will make the job more bearable. Tire Pressure Gauge – Ensuring your tire is inflated to the proper PSI is key, even after a repair. Cold weather can cause air pressure to drop significantly.

3. Step-by-Step Guide to Repairing a Punctured Tire in Cold Weather

Now, let’s go through the repair process. It might sound daunting, but it’s really not as difficult as it seems once you get the hang of it.

Step 1: Secure Your Vehicle

The first thing you need to do is to ensure that your car is in a safe location. If you’re on the side of a busy road, pull over to the safest spot possible, away from traffic. Put on your hazard lights and, if you have them, set up emergency flares or a reflective warning triangle to alert other drivers. If the road is icy, be sure to place the car in "Park" mode and apply the parking brake. In cold weather, road conditions can be unpredictable, and your car could easily roll if it’s not properly secured.

Step 2: Inspect the Tire

Next, you’ll want to inspect the tire. Since it’s cold, it might be more difficult to see the puncture clearly, so it’s essential to check the tire thoroughly. I always look for any visible nails, screws, or other objects embedded in the tire. If you don’t find anything obvious, you can use a soapy water solution to spot small leaks. Spray the soapy water onto the tire’s surface, and watch for bubbles to form around the puncture site. Once you’ve located the puncture, mark it so you can focus on that area while working. It's crucial to ensure that the puncture is not on the sidewall of the tire, as that would require a more complicated repair or, in some cases, a tire replacement.

Step 3: Remove the Tire

To ensure you can properly work on the puncture, it’s often necessary to remove the tire from the vehicle. If the tire is too low on air, it may be difficult to remove or even work on while it’s still attached. Use your car's jack to lift the vehicle. Before doing so, loosen the wheel lugs slightly (don’t fully remove them) to make it easier when the tire is lifted off the ground. Once the car is elevated, completely remove the lugs, take the tire off, and place it flat on a stable surface.

Step 4: Prepare the Tire for Repair

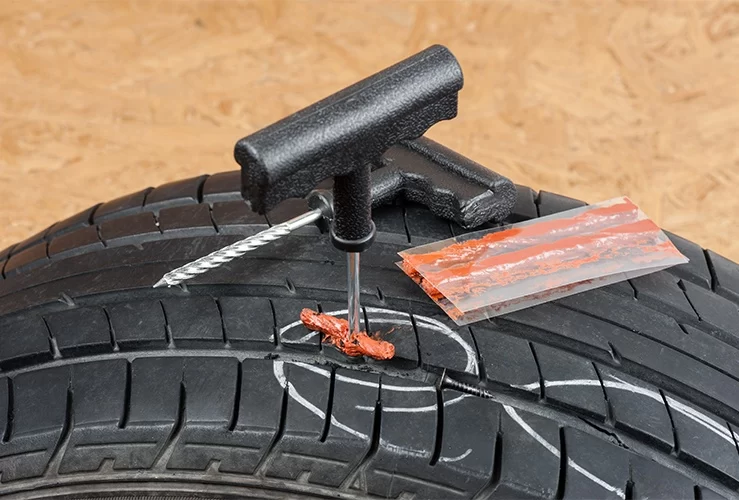
Now that the tire is off the car, it’s time to prepare it for the repair. Use the reamer tool from your repair kit to clean and enlarge the puncture hole. This will allow the tire plug to fit better and create a stronger seal. Be sure to rotate the tool in and out while applying gentle pressure to ensure that the hole is smooth and wide enough. Once the hole is properly prepared, apply a small amount of rubber cement to the puncture area. The cold can cause the cement to harden faster than usual, so be quick with this step.

Step 5: Insert the Plug

Next, take the tire plug from your repair kit and insert it into the insertion tool. Then, push the plug into the puncture hole, making sure it’s inserted far enough to seal the hole. Once the plug is in, remove the insertion tool, leaving the plug behind. The plug should remain securely in the tire. If necessary, trim off the excess portion of the plug to ensure it doesn’t interfere with the tire’s tread.

Step 6: Reinflate the Tire

Once the plug is in place, use the portable air compressor to reinflate the tire. It’s important to check the tire pressure and ensure it’s at the recommended level. In cold weather, tire pressure can drop quickly, so keep an eye on it and recheck the tire every few miles to ensure it holds.

Step 7: Reinstall the Tire

Now, you’re ready to reinstall the tire. Place the tire back on the vehicle and hand-tighten the wheel lugs onto the bolts. Once the car is lowered, use the wrench to fully tighten the lugs in a crisscross pattern. This ensures the tire is securely attached to the vehicle.

4. Additional Tips for Tire Maintenance in Cold Weather

In cold weather, tire maintenance is more critical than ever. Here are a few additional tips I’ve learned over the years that can help prevent tire issues and improve overall safety: Check Tire Pressure Regularly – Cold temperatures cause tire pressure to drop. Make it a habit to check your tire pressure every week, especially during the winter months. Use Winter Tires – Winter tires are specifically designed to perform better in cold and snowy conditions. If you live in an area with heavy snowfall, investing in a set of winter tires can greatly improve safety. Avoid Sudden Braking – In icy conditions, sudden braking can cause your tires to lose traction and lead to accidents. Drive carefully and allow for extra stopping distance on slick roads. Regularly Inspect Tires for Damage – Even if you don’t have a puncture, it’s important to check your tires for wear and tear. Look for cracks, bald spots, or bulges, which could be exacerbated by cold weather. By following these steps and maintaining your tires in colder weather, you can minimize the risk of a puncture and keep your car running safely throughout the season.

Auto Repair Shops Near Me

Recommended

How to Handle Roadside Emergencies in the Rain: Essential Safety Tips and Strategies

How to Handle Roadside Emergencies in the Rain: Essential Safety Tips and Strategies

Discover how to handle roadside emergencies in the rain safely and effectively. Learn practical safety tips, real-life examples, and when to seek professional roadside assistance during rainy conditions.

May 30, 2025
Tips for Driving After a Breakdown: How to Stay Safe and Confident on the Road

Tips for Driving After a Breakdown: How to Stay Safe and Confident on the Road

Explore essential tips for driving after a breakdown to ensure safety and confidence on the road. Learn expert advice and real-life insights for smooth post-breakdown driving experiences.

May 30, 2025
How to Jump Start a Car Without Cables Safely and Effectively

How to Jump Start a Car Without Cables Safely and Effectively

Learn how to jump start a car without cables with safe and effective methods. Discover practical emergency car start tips and alternative solutions for jump starting without jumper cables.

May 30, 2025
How to Get Roadside Help Without a Smartphone: Practical Tips and Alternatives

How to Get Roadside Help Without a Smartphone: Practical Tips and Alternatives

Discover effective ways to get roadside help without a smartphone. Learn practical alternatives for emergency roadside assistance and tips for staying safe on the road. Find trusted services with Rescue & Towing.

May 30, 2025
Tips for Avoiding Common Towing Mistakes to Ensure Safe and Smooth Towing

Tips for Avoiding Common Towing Mistakes to Ensure Safe and Smooth Towing

Explore essential tips for avoiding common towing mistakes. Learn practical advice and real-life stories to ensure safe, efficient towing and prevent costly errors during your towing experience.

May 30, 2025
How to Maintain Your Car to Prevent Breakdowns: Essential Tips for Every Driver

How to Maintain Your Car to Prevent Breakdowns: Essential Tips for Every Driver

Learn how to maintain your car to prevent breakdowns with practical tips and expert advice. Discover the importance of regular checkups and proactive care to keep your vehicle running smoothly.

May 30, 2025
Car repair estimate