How to Replace Your Car's Side Marker Light Bulbs
1. Understanding the Importance of Side Marker Lights
Side marker lights may seem like minor components on your vehicle, but they play a crucial role in road safety. These small lights, typically located on the sides of your car near the front and rear fenders, help other drivers see your vehicle from different angles, especially in low-light or nighttime conditions. When these bulbs burn out, it can reduce your car’s visibility, increasing the risk of accidents. That’s why knowing how to replace your car’s side marker light bulbs is an essential maintenance skill every driver should have.
Many drivers overlook side marker lights until they fail completely. However, replacing them promptly not only keeps your vehicle compliant with traffic laws but also ensures maximum visibility and safety for you and others on the road.

United Towing Service Inc.
26170 Adams Ave, Murrieta, CA 92562, USA
2. Signs That Your Side Marker Bulbs Need Replacement
Before diving into the replacement process, it’s important to recognize when your side marker bulbs need attention. Here are some common indicators:
- Dim or flickering light: A bulb that starts dimming or flickering is a clear sign it’s about to burn out.
- Completely dead light: If the bulb no longer illuminates when your lights are on, it’s time for a replacement.
- Dashboard warning: Some modern cars feature lighting system indicators that notify you when a bulb fails.
It’s a good practice to inspect your vehicle’s exterior lights periodically, especially before long drives or during the winter months when daylight hours are shorter. This quick check can prevent unnecessary safety risks and potential fines.

Costco Gas Station
3705 Hampton Rd, Oceanside, NY 11572, USA
3. Tools and Materials You’ll Need
Replacing your side marker light bulbs doesn’t require professional tools — most car owners can do it themselves with a few basic supplies. Here’s what you’ll need:
- Replacement side marker bulbs (check your car’s manual for the correct type)
- Flathead screwdriver or trim removal tool
- Clean gloves (to prevent oil transfer to the bulbs)
- Microfiber cloth
When choosing replacement bulbs, consider upgrading to long-lasting LED bulbs. They’re more energy-efficient, brighter, and tend to last much longer than traditional halogen bulbs.
4. Step-by-Step Guide to Replacing Side Marker Light Bulbs
Follow these detailed steps to replace your car’s side marker bulbs safely and effectively:
Step 1 - Turn Off Your Vehicle
Before working on your car’s electrical system, make sure the vehicle is turned off and the keys are removed from the ignition. This prevents accidental shocks and protects your car’s circuits.
Step 2 - Locate the Side Marker Housing
The side marker light is usually integrated into the front or rear fender area. Depending on your car’s make and model, you might access it from the exterior or behind the wheel well. Check your owner’s manual for specific instructions related to your vehicle.
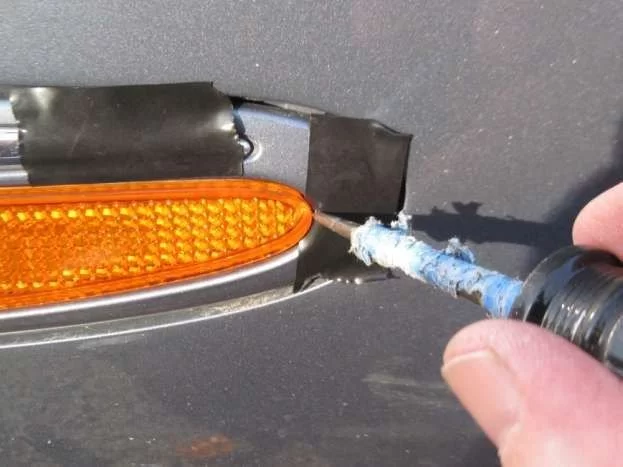
Step 3 - Remove the Light Assembly
Use a flathead screwdriver or trim removal tool to gently pry the light housing out of its slot. Be careful not to scratch your car’s paint. In some vehicles, you may need to remove screws or clips before you can pull the assembly free.
Step 4 - Disconnect the Bulb Socket
Once the assembly is out, locate the bulb socket at the back. Twist the socket counterclockwise to release it from the housing. Then, gently pull the old bulb straight out from the socket.
Step 5 - Install the New Bulb
Take your new bulb and insert it into the socket. Avoid touching the glass part with your fingers, as oils from your skin can shorten its lifespan. If necessary, use a clean cloth or gloves during this step.
Step 6 - Test the New Light
Before reinstalling the assembly, turn on your vehicle’s lights to make sure the new bulb works properly. If it doesn’t light up, double-check the connection and ensure the bulb is seated correctly.
Step 7 - Reinstall the Assembly
Once the bulb is confirmed to be working, reattach the socket to the housing and carefully push or screw the assembly back into place. Make sure it fits snugly and evenly with the body panel.
5. Common Mistakes to Avoid
Even though replacing side marker bulbs is a straightforward process, small mistakes can lead to issues down the line. Here are some common pitfalls to watch out for:
- Forgetting to test the bulb: Always test the new bulb before reinstalling the assembly to avoid doing double work.
- Using the wrong bulb type: Double-check your vehicle’s specifications to ensure compatibility. The wrong bulb may not fit or could cause electrical problems.
- Overtightening screws: If your light assembly is secured with screws, avoid overtightening, as this can crack the plastic housing.
6. Real-Life Example: A Quick Fix That Prevented a Traffic Stop
One evening, a driver named Mike noticed his side marker lights were dim while driving home through a poorly lit rural area. He didn’t think much of it until he was pulled over by a highway patrol officer for having a non-functioning side light. After the incident, Mike replaced his car’s side marker bulbs himself using simple tools from his garage. The entire process took less than 15 minutes, and the difference was immediately noticeable. His car looked brighter, and he avoided potential fines in the future.
Stories like Mike’s highlight how small maintenance tasks like replacing side marker bulbs can make a big difference in safety and compliance. These fixes are simple, affordable, and can save you from unnecessary trouble.
7. When to Seek Professional Help
While replacing side marker light bulbs is an easy DIY task, some vehicles have more complex lighting assemblies that may require professional help. If you find it difficult to access the light housing or if your new bulbs don’t work even after installation, it’s best to consult an expert. A professional technician can diagnose wiring or socket issues quickly and safely.
At Rescue & Towing, our team can assist with all your vehicle maintenance needs, from light bulb replacements to full electrical diagnostics. Whether you’re on the road or at home, you can count on our experts to keep your car in top condition.