- 1-why-interior-map-lights-matter-for-daily-driving
- 2-signs-your-map-lights-need-replacement
- 3-tools-and-preparation-before-starting-the-repair
- 4-step-by-step-guide-on-how-to-replace-your-car-interior-map-lights
- 5-common-challenges-drivers-face-during-replacement
- 6-real-experiences-from-car-owners
- 7-why-rescue-and-towing-is-a-reliable-resource
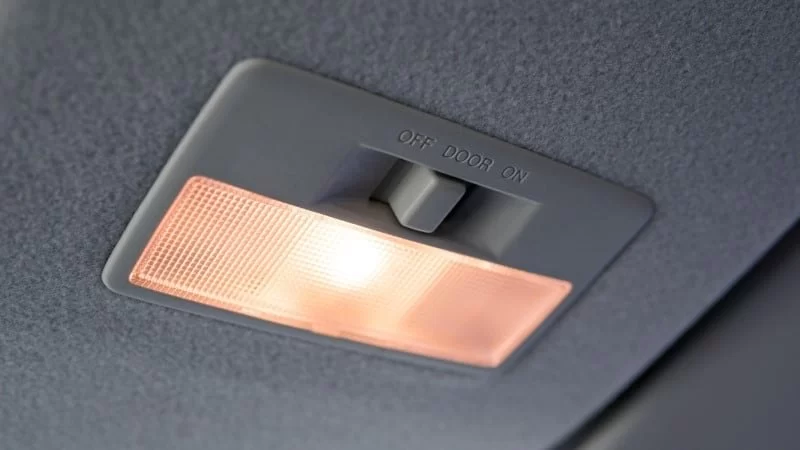
1. Why Interior Map Lights Matter for Daily Driving
Most drivers don’t think about how to replace your car's interior map lights until the moment they reach for something at night and realize the cabin is completely dark. These small lights play a big role—helping you read directions, find dropped items, or navigate in the early morning hours without turning on harsh overhead lights.

Pick Your Part - Help Yourself
1232 Blinn Ave, Wilmington, CA 90744, USA
1.1 Subtle Features That Improve Safety
Interior map lights offer controlled illumination that doesn’t disrupt visibility while driving. When functioning properly, they keep distractions low and convenience high.

Pick Your Part - Greer
13054 E Wade Hampton Blvd, Greer, SC 29651, USA
1.2 How Good Lighting Enhances the Driving Experience
From organizing road-trip essentials to checking your navigation, bright and reliable map lights improve both comfort and practicality during journeys.
2. Signs Your Map Lights Need Replacement
Before learning how to replace your car's interior map lights, it helps to recognize the early signs of failure. Some symptoms are more subtle than others.
2.1 Flickering or Weak Light Output
Flickering often suggests the bulb is nearing the end of its life, or the connector is loose.
2.2 Lights Not Responding to the Switch
If the switch works but the light doesn’t turn on, the bulb is likely burnt out and needs replacing.
2.3 Unusual Smell or Heat
Overheating bulbs can become a safety concern. If you smell burning or feel unusual heat, replacement is urgent.
3. Tools and Preparation Before Starting the Repair
The right preparation ensures a smooth process. Replacing your map lights is simple when you gather what you need ahead of time.
3.1 Common Tools Needed
A plastic trim tool, replacement bulb, microfiber cloth, and optional gloves to avoid smudges.
3.2 Choosing the Right Bulbs
LED bulbs are popular for their bright light and long life. Checking your vehicle’s manual for the correct size prevents mismatched parts.
3.3 Safety Precautions
Always turn off the car and interior lights before working. Disconnecting the battery is optional but adds an extra layer of safety.
4. Step-by-Step Guide on How to Replace Your Car Interior Map Lights
This section breaks down how to replace your car's interior map lights into simple, clear steps that any driver can follow.
4.1 Removing the Lens Cover
Use a plastic pry tool to gently lift the lens cover from one corner. Applying even pressure prevents cracks or scratches.
4.2 Taking Out the Old Bulb
Most bulbs simply pull out, but some twist slightly before releasing. Allow the bulb to cool if it was recently used.
4.3 Installing the New Bulb
Insert the new bulb firmly into the socket. If using LEDs, ensure correct polarity—flip the bulb if it doesn’t light up.
4.4 Testing Before Reassembly
Turn on the interior switch to confirm the new bulb works properly. This step prevents re-opening the lens cover later.
4.5 Securing the Lens Cover
Snap the cover back into place gently. Make sure all edges click in securely.
5. Common Challenges Drivers Face During Replacement
Even simple DIY repairs come with small challenges. Knowing what to expect helps you avoid frustration.
5.1 Tight or Fragile Lens Covers
Some manuals don’t show the exact pry points, leaving owners guessing. Taking your time reduces the risk of breaking the plastic.
5.2 Hard-to-Reach Bulbs
In some vehicles, the bulb sits deep inside the housing. A small tool or careful angle adjustment usually solves the issue.
5.3 Mismatched or Dim Bulbs
Using incorrect wattage or size results in poor performance. Checking specifications beforehand saves time.
6. Real Experiences From Car Owners
Case: The Weekend Road-Trip Fix – A family prepping for a long drive realized their map lights failed the night before leaving. With quick online guidance, they replaced the bulbs in under 10 minutes, making the early-morning drive easier and safer.
Case: The DIY Beginner – A college student repairing his first car worried about damaging the lens cover. After using a simple trim tool, he completed the replacement smoothly and upgraded to LEDs for better visibility.
Case: The Unexpected Failure – On a cold winter morning, a driver noticed the map lights wouldn't turn on. Upon inspection, the bulb had cracked due to temperature changes. A quick replacement solved the issue instantly.
7. Why Rescue & Towing Is a Reliable Resource
For anyone learning how to replace your car's interior map lights, having access to the right tools and reliable lighting products makes the job easier. Rescue & Towing offers dependable automotive essentials, from replacement LED kits to trim tools, all designed to work with a wide range of vehicles.
Their selections help car owners avoid low-quality parts and ensure safe, long-lasting performance. Whether you're upgrading interior lights or tackling other small repairs, their platform provides expert-approved products and trustworthy service.