How to Replace a Car Battery Without Professional Help: A Step-by-Step Guide
Replacing a car battery might seem like a job only a professional mechanic can handle, but after experiencing my own car battery failure on a cold morning, I quickly realized it’s something that can easily be done with a bit of preparation and the right tools. If you're in a similar situation, with your car refusing to start and you suspect it’s the battery, don’t rush into calling a tow truck or spending extra money on professional help. With a few simple steps, you can replace the car battery yourself and save both time and money.

Pick Your Part - Help Yourself
1232 Blinn Ave, Wilmington, CA 90744, USA
1. Identifying the Need for a New Battery
The first thing I did when my car wouldn’t start was to check for signs of a battery issue. Often, a dead or dying battery gives specific indicators. For example, if you turn the key and the car is making a clicking sound, but the engine doesn't start, or if the headlights are dim or flickering, this could be a clear sign that your battery is failing.
Another telltale sign of a bad battery is if your car has trouble starting in cold weather. When the battery is weak, it’s more difficult to generate enough power to turn over the engine in cold conditions. I also noticed that my car's electrical accessories, such as the radio and dashboard lights, weren’t functioning as they should. These are all symptoms of a battery that needs replacing.
If you've identified these symptoms, it’s time to replace the battery. Fortunately, with the right tools and a little patience, this can be a straightforward task that saves you the hassle and expense of a mechanic visit.

NTB-National Tire & Battery
6315 Prentiss School Dr, Canal Winchester, OH 43110, USA
2. Gathering the Necessary Tools
Replacing a car battery is not a complicated task, but it does require a few essential tools. The good news is that these are likely things you already have in your garage or tool kit. Here's what you’ll need:
- Wrench Set: A set of wrenches, usually a 10mm wrench, is required to remove the battery terminals and bracket that holds the battery in place.
- Gloves: Wearing gloves is important to protect your hands from the battery acid and any corrosion that may be present.
- Safety Glasses: You should also protect your eyes to avoid any splashes from battery acid when working on the battery.
- Battery Terminal Cleaner: A battery terminal cleaner or a wire brush is useful for cleaning any corrosion around the battery terminals before you install the new battery.
- New Car Battery: Of course, you’ll need to purchase a new battery. It’s essential to ensure that you get the correct size and type for your car’s make and model. You can either check your car’s manual or ask an associate at an auto parts store for assistance.
- Flashlight: If you’re working in a dark area or at night, having a flashlight handy will make the job easier.
Once you have all the tools ready, you’re set to begin the replacement process. In my case, I was fortunate to have a well-lit, dry garage to work in, which made the process much more comfortable.
3. Safety First: Preparing to Replace the Battery
Before you start working on your car battery, safety should be your top priority. I can’t stress enough how important it is to ensure that the car is in a stable position and turned off completely before proceeding. Here’s what I did to prepare:
- Turn off the Engine: Double-check that the car is off, and the key is removed from the ignition. You don’t want any electrical power running through the car’s system while you’re working.
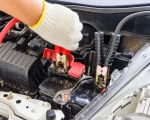
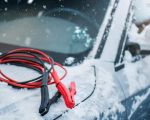
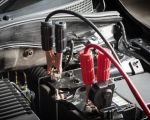
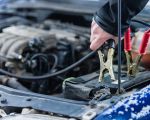
- Disconnect the Negative Terminal First: I always start by disconnecting the negative terminal of the battery, which is typically marked with a minus sign (-) or a black cover. This prevents any accidental sparks while working on the battery.
- Wear Protective Gear: Make sure to wear gloves and safety glasses to protect yourself from any battery acid or corrosion, as these can cause burns or other injuries.
Once you’ve prepared the car, it’s time to remove the old battery.
4. Removing the Old Battery
The first step in removing the old battery is to loosen the clamp that holds it in place. I used a wrench to loosen the bolts on the battery bracket. Be sure to keep track of any screws or bolts, as they’ll be used again when securing the new battery.
After removing the bracket, the next step is to disconnect the battery terminals. As mentioned earlier, you should always disconnect the negative terminal first to avoid any electrical mishaps. Once the negative terminal is off, you can move on to the positive terminal (marked with a plus sign (+) or red cover). The positive terminal is typically more easily removed, but always handle it with care to avoid any accidental shorts.
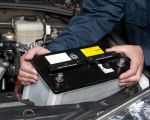
With the terminals disconnected, I carefully lifted the old battery out of its compartment. Some batteries can be quite heavy, so take caution when handling it. If you’re having trouble lifting the battery out, gently wiggle it free—just make sure not to damage any surrounding components.
5. Installing the New Battery
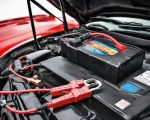
With the old battery removed, it’s time to install the new one. Before placing the new battery in the compartment, I took a moment to clean the battery tray and the battery terminals using a wire brush and battery terminal cleaner. This helps remove any corrosion and ensures a clean connection for the new battery.
Next, I carefully placed the new battery into the compartment, ensuring that it was seated properly. Just like with the old battery, it’s important to ensure that the positive and negative terminals align with the correct cables. Once the battery is in place, I reattached the battery bracket and tightened it using the wrench.
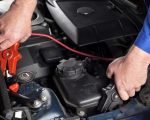
Now, I reconnected the positive terminal first, followed by the negative terminal. Tighten the terminals securely, but be careful not to over-tighten, as this can damage the terminals. Once the connections are secure, I gave the battery a quick check to make sure everything was properly in place.
6. Testing the New Battery
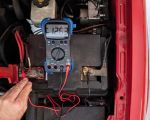
After the new battery was installed, it was time to test it. I turned the key in the ignition and was relieved to hear the engine starting without hesitation. The headlights, radio, and all electrical accessories worked as expected, confirming that the battery was functioning properly.
I also checked the battery voltage with a multimeter, which showed a healthy reading, indicating that the new battery was properly connected and operating as it should. If you don’t have a multimeter, you can always take your car to a local auto parts store, where they can check the voltage for you.
7. Properly Disposing of the Old Battery
After successfully replacing the battery, I made sure to dispose of the old one properly. Car batteries contain hazardous materials, and throwing them away in the regular trash can be harmful to the environment. Many auto parts stores offer battery recycling services, and I took mine to one of these locations. Some stores even offer a small refund or credit for returning an old battery.
If you're ever in need of roadside assistance or a tow due to a car battery issue or any other car trouble, [Rescue & Towing](https://www.chucklesrescue.com) is a reliable service to consider. Their experienced team is available 24/7 to assist you with any roadside emergencies.