How to Replace a Flat Tire When You Have Limited Space
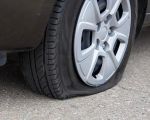
Having a flat tire is never a pleasant experience, especially when you're dealing with limited space. Whether you're parked on the side of a busy road, in a tight parking lot, or in an area with little room to maneuver, replacing a tire in such conditions can be stressful. I’ve been in this situation myself, and I learned some important lessons along the way. In this article, I’m going to share with you how to replace a flat tire when space is tight, and how you can make the process as safe and efficient as possible.
MR. TIRE INC.
2078 New York Ave, Huntington Station, NY 11746, USA
1. Assessing the Situation: Finding the Right Spot
The first thing I learned when trying to replace a flat tire in a tight space is how crucial it is to find a safe spot. Even when you’re working with limited space, you need to ensure that you’re not endangering yourself or others around you. The location of your vehicle can significantly affect how much room you have to work.
For example, one time I had a flat in a crowded parking lot, and there was barely enough space between my car and the one next to me. My first instinct was to just get to work and replace the tire, but then I realized that the lack of space could cause some safety hazards. Here’s what I did:
- Ensure the Vehicle is on Stable Ground: If possible, move your car to a flat, stable surface. In my case, I had to wait for a moment when the lot cleared up to give myself some extra space. Make sure the ground is level, so the car doesn’t shift when you lift it with the jack.
- Turn on Hazard Lights: If you’re in a situation where you’re near traffic or parked in a public space, always turn on your hazard lights to warn other drivers of your situation. This ensures your safety as well as the safety of those around you.
- Ensure You Have Enough Space to Move: Even in tight areas, it’s important to ensure you have enough space to move the tools and work effectively. I always double-check that there’s enough room for the jack, the spare tire, and enough space for me to work safely.
Once I made sure everything was safe and stable, I was ready to move on to the next steps in replacing the tire.

MR. TIRE INC.
2078 New York Ave, Huntington Station, NY 11746, USA
2. Using a Compact or Low-Profile Jack
When you're dealing with limited space, the tools you use are just as important as the technique. I quickly learned that a standard jack can take up too much room in tight spaces, making it difficult to lift the car. Instead, I invested in a compact or low-profile jack, which is much more suitable for situations with limited space. These jacks are smaller, lightweight, and easy to maneuver, making them ideal for cramped environments.
Here’s how I used the compact jack in a tight space:
- Place the Jack Correctly: It’s essential to place the jack in the right location under your car. Check your vehicle’s manual to find the proper lifting point. Even though I was in a tight spot, I made sure to position the jack properly to avoid damaging the car’s frame.
- Lift the Vehicle Slowly: With limited space, I made sure to lift the car slowly and cautiously. I didn’t want the vehicle to shift unexpectedly. Once the tire was slightly off the ground, I made sure to check the stability of the car before proceeding.
By using a low-profile jack, I was able to lift the car without needing much room, which made all the difference in this tight situation.
3. Removing the Flat Tire in Tight Spaces
With the car lifted and stable, I was ready to remove the flat tire. This process, while straightforward, can be challenging when you're working with limited space. I found that positioning myself and the tools was critical in making the tire removal as smooth as possible.
- Loosen the Lug Nuts Before Lifting: Before I started lifting the car, I loosened the lug nuts just enough to break the seal. This prevents unnecessary strain on the jack once the car is lifted. I used a tire iron, and since the space was tight, I made sure I wasn’t pressing against anything while doing this.
- Remove the Lug Nuts and Tire: After lifting the car, I removed the loosened lug nuts. I kept them in a safe place, like my car’s cup holder, so they wouldn’t roll away. In a tight space, it’s easy to lose track of small things like these, which can cause a hassle later on.
- Store the Flat Tire Carefully: After removing the flat, I made sure to place it carefully beside the car. I didn’t want it to roll away or be in the way of any other tasks. Since space was tight, I placed it in an area where I could still access the new tire without difficulty.
Removing the flat tire can seem tricky, but with a little patience and a systematic approach, it’s entirely doable even when space is limited.
4. Installing the New Tire in Tight Spaces
Once the flat tire was off, the next challenge was installing the new tire. I always make sure that the spare tire is in good condition before starting the replacement process. Installing the new tire can be particularly tricky in cramped spaces, but here’s what worked for me:
- Align the Tire with the Hub: Position the new tire so that it aligns properly with the bolt holes. I made sure that the spare tire was sitting flush against the hub to prevent any issues with the installation.
- Hand-Tighten the Lug Nuts: Before tightening them fully, I hand-tightened the lug nuts to hold the tire in place. This ensured that the tire was stable while I tightened the nuts more securely with the wrench.
- Tighten the Lug Nuts in a Star Pattern: Once the tire was in place, I used a wrench to tighten the lug nuts. I tightened them in a star pattern to ensure that the pressure was evenly distributed, preventing the tire from being installed unevenly, which could lead to handling issues later on.
Even with limited space, I was able to install the new tire successfully by using patience and careful positioning.
5. Lowering the Car and Final Checks
After securing the new tire, the final step was lowering the car. I carefully lowered the car using the compact jack, making sure everything was stable. Once the car was back on the ground, I used the wrench to do a final check and ensured all the lug nuts were tightly secured.
- Double-Check Everything: I always double-check the lug nuts and tire to ensure everything is properly tightened. A quick check at this stage can prevent future issues like a loose tire or uneven wear.
- Store Your Tools and Flat Tire: Lastly, I made sure to store my tools and flat tire safely in the trunk or another secure area. In tight spaces, it’s easy to forget about small items, so I made sure everything was accounted for before driving away.
Successfully replacing a flat tire, even with limited space, is entirely possible with the right equipment and a careful approach. If you ever find yourself in a situation where you need professional help or feel uncomfortable handling it yourself, don’t hesitate to call a reliable towing service like Rescue & Towing. They can assist you quickly, even in tight spaces.


