How to Replace a Cracked Car Bumper – A Step-by-Step Guide
If you're like me, you've probably experienced that sinking feeling when you notice a crack in your car’s bumper. Whether it’s from a minor fender bender, a parking mishap, or just wear and tear, a cracked bumper is a common problem that can affect the look and functionality of your vehicle. After dealing with a cracked bumper on my own car, I learned that replacing it isn’t as difficult as it might seem. In fact, with the right tools and a little patience, you can fix it yourself. In this article, I’ll walk you through the entire process, so you can restore your car’s bumper to its former glory and save some money in the process.

Bumper & Auto of Omaha
1715 S 13th St, Omaha, NE 68108, USA
1. Assess the Damage and Determine If You Need a Full Replacement
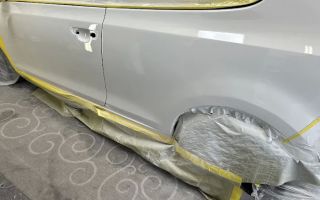
The first step in replacing a cracked car bumper is to assess the extent of the damage. A small crack might be repairable, but if the crack is deep or extends across the entire bumper, a full replacement is likely necessary. In my case, I had a deep crack that was affecting the structure of the bumper, so I knew I had to replace the entire part. Take a close look at your bumper and check for any sharp edges, holes, or areas where the bumper is no longer securely attached to the car. If the damage is severe, it's best to replace the bumper completely.
Sam's Club Tire & Battery
3600 O'Neill Dr, Jackson, MI 49202, USA
1.1 When to Repair Instead of Replace
If the damage is superficial and limited to a small crack or scuff, you might consider using bumper repair kits that fill in the cracks and help restore the bumper’s appearance. These kits are ideal for minor cosmetic issues but may not be effective for structural damage. I would recommend using a repair kit if the crack doesn’t compromise the bumper’s ability to protect your car or if it’s only a cosmetic concern.
2. Gather the Necessary Tools and Materials
Replacing a bumper requires some basic tools. The process can be straightforward as long as you have the right equipment. Here’s a list of the tools I used when I replaced my car's bumper:
- Socket wrench set
- Plastic trim removal tool
- Phillips and flathead screwdrivers
- Replacement bumper (matching the model and year of your car)
- New clips or fasteners (if necessary)
- Gloves and safety glasses
Before you start, make sure you have a replacement bumper that fits your vehicle's make and model. You can either buy the part from your car’s manufacturer or opt for aftermarket parts that offer similar quality. If you’re unsure of the exact part, I recommend checking your car’s manual or asking an auto parts store for assistance.
3. Remove the Old Bumper
Once you have all the necessary tools, it’s time to remove the damaged bumper. The first step is to ensure that your car is parked on a flat surface and the engine is turned off. I also made sure to wear safety glasses and gloves to protect myself during the process. Here's the breakdown of what I did:
- Remove any screws or fasteners holding the bumper in place. You’ll likely find screws under the bumper and around the edges where it connects to the car body.
- Use a plastic trim removal tool to carefully pry away any clips or trim pieces that may be securing the bumper.
- Detach the bumper from any electrical connections (such as sensors or lights) that might be attached to it.
- Carefully pull the bumper away from the vehicle, making sure not to damage any surrounding body panels.
In my case, the process took about 30 minutes, and I found that using the trim removal tool made the job much easier, preventing damage to the clips and fasteners.
4. Install the New Bumper
Once the old bumper is removed, it’s time to install the new one. Here’s what I did:
- Start by aligning the new bumper with the mounting points on the car’s frame. Make sure it fits securely and that all holes line up with the clips or screws.
- If the bumper has sensors, lights, or other attachments, make sure to connect them to the new bumper before fully securing it.
- Once everything is lined up, use a socket wrench to secure the screws and clips in place. Be sure to tighten them properly without over-tightening, which could strip the threads.
- Check that the bumper is firmly attached to the vehicle and that there are no loose parts or rattling.
Installing the new bumper took me about 45 minutes, and I made sure to follow the manufacturer’s instructions to avoid any mistakes. The result was a perfectly aligned and secure bumper, just like the original one.
5. Test the New Bumper
After installing the new bumper, it’s important to test it to make sure everything is working correctly. For example, check the functionality of any sensors or lights that were connected to the bumper. I turned on my car to make sure that the reverse sensors were functioning properly and that all the lights were working as they should. It’s a good idea to test drive the car slowly to ensure that the bumper stays secure while driving. If you notice any issues, like rattling or a loose fit, you may need to adjust the alignment or tighten the screws further.
6. Cost of Replacing a Car Bumper
The cost of replacing a car bumper can vary greatly depending on the make and model of your car, as well as whether you choose OEM (original equipment manufacturer) parts or aftermarket parts. On average, I found that replacing a bumper can cost anywhere from $300 to $1,500, including parts and labor if you choose to have a professional install it. Doing the job yourself, however, can save you a significant amount of money, as you’re only paying for the bumper part and not the labor cost.
6.1 Saving Money on Replacement
If you're on a budget, one way to save is by purchasing an aftermarket bumper. These can be significantly cheaper than OEM parts while still offering good quality. Additionally, I suggest looking for discounts or deals from local auto parts stores or online retailers. You may also want to check if your car insurance covers bumper repair or replacement, especially if the damage was caused by an accident.