- 1-why-replace-car-radiator
- 2-preparation-and-tools-needed
- 3-step-by-step-replacement-process
- 4-common-issues-during-radiator-replacement
- 5-professional-help-and-resources
1. Understanding When and Why You Need to Replace a Car Radiator
The radiator is a crucial component of your vehicle’s cooling system, responsible for regulating the engine temperature and preventing overheating. Over time, radiators can develop leaks, corrosion, or become clogged, which reduces their efficiency and may cause serious engine damage if ignored. Recognizing the signs that indicate a radiator needs replacement—such as persistent overheating, coolant leaks under the car, or steam coming from the engine bay—is vital to maintaining your vehicle’s health.
Replacing a car radiator can seem daunting, but understanding its function helps highlight why timely replacement saves money and hassle in the long run. I remember a friend whose car broke down on a highway because a leaking radiator overheated the engine. That incident led him to learn the replacement process himself, which saved a fortune on towing and repairs.

Pick Your Part - Help Yourself
1232 Blinn Ave, Wilmington, CA 90744, USA
1.1 Signs Your Radiator Needs Replacement
Pay attention to these warning signs to avoid sudden failures:
- Engine frequently overheats
- Visible coolant leaks or puddles under the car
- Rust or corrosion on the radiator surface
- Coolant levels dropping without apparent reason
- Sludge or discoloration in the coolant
1.2 Risks of Delaying Replacement
Ignoring radiator problems can lead to engine overheating, warped heads, or even total engine failure, costing thousands in repairs. Therefore, knowing how to replace a car radiator or when to seek professional help is crucial.

Professional Auto Care
3226, 2316 Atlantic Ave #1, Brooklyn, NY 11233, USA
2. Preparation and Tools Needed for Radiator Replacement
Before diving into the replacement process, proper preparation is essential to ensure safety and efficiency. Here’s a breakdown of what you’ll need:
2.1 Essential Tools and Materials
- New radiator compatible with your car model
- Coolant or antifreeze recommended by the manufacturer
- Basic hand tools: screwdrivers, pliers, socket set
- Drain pan to collect old coolant
- Protective gloves and safety glasses
- Rags or towels for cleanup
- Jack and stands if needed for easier access
2.2 Safety Precautions
Always work on a cool engine to prevent burns from hot coolant. Dispose of old coolant responsibly as it’s toxic to the environment. Wearing gloves and goggles protects against splashes and sharp edges inside the engine bay.
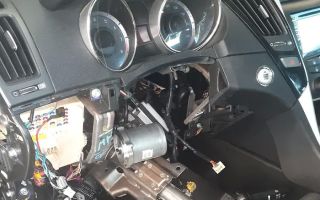
3. Step-by-Step Guide to Replacing a Car Radiator
Replacing your radiator involves several detailed steps that should be followed carefully:
3.1 Draining the Old Coolant
Start by placing a drain pan underneath the radiator drain plug. Open the plug to release the old coolant completely. This step prevents spills and prepares the system for the new radiator.
3.2 Removing the Radiator Hoses and Components
Loosen the clamps on the upper and lower radiator hoses and gently detach them. Disconnect any electrical connectors for cooling fans or sensors attached to the radiator.
3.3 Taking Out the Old Radiator
Remove the bolts or brackets holding the radiator in place. Carefully lift the radiator out, avoiding damage to nearby components. If stuck, double-check for missed connections.
3.4 Installing the New Radiator
Position the new radiator in place, secure it with bolts or brackets, and reconnect hoses and electrical connectors. Ensure clamps are tight to prevent leaks.
3.5 Refilling the Cooling System
Refill with the recommended coolant mixture, making sure to bleed the system of any air pockets which can cause overheating.
3.6 Testing the Installation
Start the engine and let it reach operating temperature while monitoring for leaks and proper temperature gauge readings. Check hose connections again to confirm no coolant escapes.
4. Troubleshooting Common Issues During Radiator Replacement
Replacing a car radiator isn’t always straightforward. Here are typical problems and how to address them:
4.1 Stubborn Hose Clamps or Rusted Bolts
Old clamps and bolts may resist removal. Applying penetrating oil and letting it soak can help loosen them. Use proper tools to avoid stripping.
4.2 Air Pockets Causing Overheating
If the engine overheats after replacement, air trapped in the cooling system might be the cause. Bleed the system using the vehicle’s bleed valve or by running the engine with the radiator cap off until bubbles stop.
4.3 Coolant Leaks After Installation
Leaks usually stem from loose hose clamps or improperly seated hoses. Double-check all connections and tighten clamps as necessary. Inspect the radiator for any damage if leaks persist.
5. When to Seek Professional Help and Where to Find Reliable Services
Although replacing a radiator can be a rewarding DIY project, sometimes professional expertise is necessary. Complex cooling systems, specialized tools, or time constraints can make hiring a pro the best choice.
5.1 Indicators You Should Call a Professional
- Difficulty accessing the radiator due to vehicle design
- Persistent leaks after multiple attempts
- Signs of additional engine damage
- Lack of proper tools or workspace
5.2 Finding Quality Products and Services
For the best radiator replacements and towing or rescue assistance, check out Rescue & Towing, where you can find trusted professionals and reliable parts tailored to your vehicle’s needs. Their expertise ensures your car’s cooling system is restored efficiently and safely.
Whether you decide to tackle the radiator replacement yourself or seek professional services, understanding the process and being prepared makes a significant difference. With the right approach, you can keep your engine running smoothly and avoid costly repairs down the road.