How to Replace a Blown Head Gasket in Your Car – A Step-by-Step Guide
Have you ever found yourself stranded on the side of the road, with smoke billowing from under your car’s hood and no clue why your engine seems to be overheating? That’s exactly what happened to me a few years ago, and little did I know at the time, I was facing the dreaded issue of a blown head gasket. It’s one of those car problems that sounds way more complicated than it actually is, but believe me, once I understood what was going on, I was determined to tackle it myself. Replacing a blown head gasket may sound daunting, but with the right tools, a little patience, and some guidance, it’s a task that’s absolutely doable. Here’s my detailed experience on how to replace a blown head gasket in your car, step-by-step.

Pick Your Part - Help Yourself
1232 Blinn Ave, Wilmington, CA 90744, USA
1. Understanding a Blown Head Gasket
Before diving into the repair, it’s crucial to understand what exactly a blown head gasket is. Simply put, the head gasket sits between the engine block and the cylinder head in your car’s engine. It’s a seal that keeps coolant and engine oil from mixing and also seals the combustion chambers. When this gasket blows, it can cause a variety of issues, ranging from engine overheating to coolant leakage. For me, the first symptom was a sudden spike in engine temperature. I also noticed white smoke coming from the exhaust, which was a red flag. It wasn’t long before my engine started losing power, and I realized that the gasket had failed.
Some of the other symptoms I noticed included:
- Coolant Loss: I found myself topping up the coolant more often than usual, which was odd. A blown head gasket can cause coolant to leak into the engine or combustion chamber.
- Engine Misfires: My engine started running roughly, with an occasional misfire, which led me to suspect something deeper than just a bad spark plug.
- White Smoke: As I mentioned earlier, I saw white smoke coming from the exhaust, a classic sign that coolant was leaking into the combustion chamber.
- Milky Oil: Checking my oil dipstick revealed a creamy, milky substance on it, which was a sign that coolant had mixed with the oil.
2. Gathering the Tools You’ll Need
Replacing a head gasket isn’t a small job, but it’s entirely doable with the right tools. Here’s what I gathered before I started:
- Socket Wrench Set: A variety of sockets, extensions, and ratchets will be needed to remove various bolts and parts.
- Torque Wrench: This is essential to ensure you torque the cylinder head bolts to the correct specifications.
- Gasket Scraper: To scrape off any remnants of the old gasket.
- Engine Degreaser: You’ll need to clean the engine parts before reassembling everything.
- Head Gasket Set: Make sure to buy the exact head gasket for your car model and year.
- Coolant and Oil: You’ll need new coolant and oil for refilling the system.
- Timing Tools: These are needed to ensure that the engine timing is correct after reassembly.
3. Draining the Fluids
The first thing I did when tackling the repair was to drain all the fluids from the engine, including the coolant and oil. This is essential because you don’t want any coolant or oil spilling into the engine while you work on it. I recommend giving the engine some time to cool down before starting the job to avoid burns from hot fluids.
I placed a drain pan under the car and removed the drain plugs for both the coolant and oil. This took some time, but it’s necessary to avoid contamination during the repair process. Once all the fluids were drained, I covered the open holes to prevent dirt from getting inside the engine.

Pick Your Part - Greer
13054 E Wade Hampton Blvd, Greer, SC 29651, USA
4. Removing the Components
Next, I began removing the various components around the head gasket. This process involved detaching the intake manifold, exhaust manifold, valve covers, and any other parts blocking access to the cylinder head. Be prepared for a bit of disassembly here. I found that taking detailed notes or photos of where everything goes was very helpful in making reassembly much easier later on.
- Remove the Intake and Exhaust Manifold: These need to be removed to access the cylinder head. I used a socket wrench and worked carefully to avoid damaging any components.
- Disconnect the Timing Chain/Belt: This was one of the more challenging parts of the process. I used timing tools to keep everything in place while I removed the timing components.
- Disconnect the Valve Covers: I had to remove the valve covers to expose the cylinder head bolts, so they could be unbolted.
5. Removing the Cylinder Head
With all the surrounding components removed, I finally reached the cylinder head bolts. Using the appropriate size socket, I carefully unbolted the cylinder head, working in a criss-cross pattern to avoid warping the head. This was the most labor-intensive part of the process, and I made sure to keep track of each bolt’s position and order to make reassembly easier.
Once the cylinder head was free, I carefully lifted it off the engine block. I had to be cautious during this step to avoid damaging the cylinder head or the engine block itself.
6. Cleaning the Surfaces
After removing the old gasket, it was crucial to clean the surfaces on both the engine block and the cylinder head. I used a gasket scraper to remove any old gasket material, taking care not to scratch the surfaces. I also cleaned off any carbon buildup or debris with engine degreaser. It’s important to have a clean, smooth surface for the new gasket to ensure a good seal.
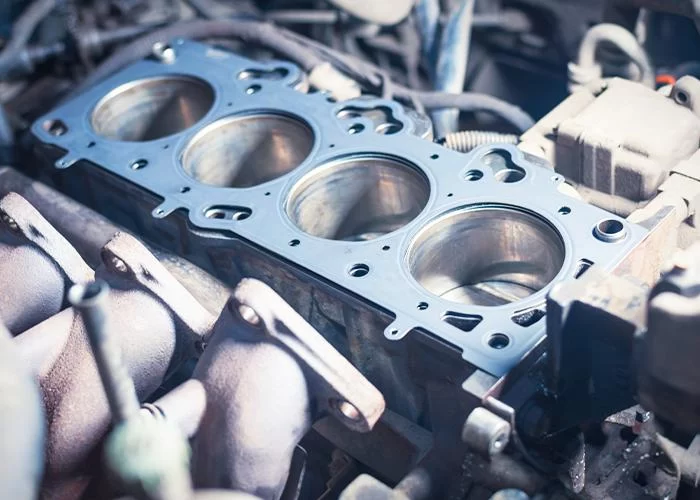
7. Installing the New Gasket
Once everything was cleaned up, it was time to install the new head gasket. I placed the gasket carefully on the engine block, ensuring that it was properly aligned. This step is critical because an improperly installed gasket could lead to leaks or a failed repair. After positioning the gasket, I gently lowered the cylinder head back into place, ensuring it sat evenly.
8. Reassembling the Components
Reassembling the components was essentially the reverse of disassembly. I replaced the valve covers, connected the timing components, and bolted the intake and exhaust manifolds back in place. I made sure that all bolts were tightened to the specified torque using a torque wrench, which helped ensure the head gasket seated properly and the cylinder head was secure.
9. Refilling the Fluids
Once the engine was reassembled, I refilled the coolant and oil. I made sure to check the levels carefully to ensure everything was topped off, and I double-checked for any leaks before starting the car.
10. Testing the Repair
Finally, I started the car to test the repair. At first, I kept an eye on the engine temperature, looking for any signs of overheating. I also checked the exhaust for any smoke and listened closely for any unusual sounds. Fortunately, everything seemed to be running smoothly! After a short test drive, I was relieved to see that the car was performing just like it used to.
Replacing a blown head gasket isn’t a simple task, but it’s one that’s entirely achievable with the right tools, knowledge, and patience. If you’re in over your head or just don’t have the time to tackle the job yourself, don’t hesitate to reach out to professionals like Rescue & Towing for assistance.
In the end, handling this kind of repair gave me a deeper appreciation for the intricate mechanics of a car engine and saved me a significant amount of money that I would’ve otherwise spent on professional repairs. If you’re dealing with a blown head gasket, just remember—take it step by step, and don’t rush the process!