How to Properly Install a New Car Battery After Jumpstarting It
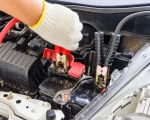
After my car battery died the other day, I found myself in a familiar, yet frustrating situation. My car refused to start, and I realized I had left the lights on overnight. Fortunately, I was able to jumpstart it with a neighbor’s help. While jumpstarting the car got me back on the road, I knew that replacing the battery was the next step in making sure I wouldn’t be stranded again. Here's what I learned through my experience about how to properly install a new car battery after jumpstarting it.

NTB-National Tire & Battery
6315 Prentiss School Dr, Canal Winchester, OH 43110, USA
1. Why Replacing Your Car Battery is Important
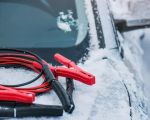
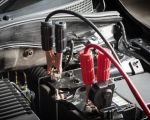
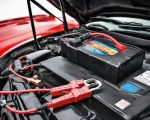
When you jumpstart a car, you're essentially giving it a temporary boost, allowing the engine to start so that the alternator can recharge the battery. However, this is just a short-term fix. Jumpstarting won’t solve the underlying issue if the battery is worn out or faulty. I realized this the hard way when, a few days later, my car’s electrical system started acting up again. It was clear that my battery needed to be replaced, and I needed to get it done properly to avoid further issues.

Pep Boys
1200 W Washington Blvd, Los Angeles, CA 90007, USA
1.1 Common Signs Your Car Battery Needs Replacement
Before jumping into how to install a new battery, it's crucial to know when it's time for a replacement. Here are a few signs I noticed that indicated it was time:
- Dim or flickering headlights: If your headlights dim when you press on the brake or when you idle, it may be a sign of a weak battery.
- Engine cranks slowly: A sluggish start can be a sign that the battery is losing its charge capacity.
- Battery warning light: This one’s pretty straightforward. If the battery light on your dashboard is on, it’s a strong indicator that the battery is failing.
2. Tools and Materials You’ll Need
Installing a new car battery isn't a complicated task, but there are a few essential tools you’ll need to make sure it’s done correctly. From my experience, here’s a list of the things you should gather:
- New car battery: Make sure the battery you choose is the correct size and type for your car. You can find this information in the owner’s manual or by asking an auto parts store.
- Wrenches and socket set: These are used to loosen and tighten the battery terminals. Typically, a 10mm wrench will do the trick for most vehicles.
- Rubber gloves: While not strictly necessary, gloves will keep your hands clean and protect you from accidental battery acid exposure.
- Safety glasses: These are essential to protect your eyes from any potential battery acid splashes or sparks.
- Baking soda and water: This is great for cleaning any corrosion around the battery terminals.
- Old rag or towel: You’ll need this for wiping down the battery and surrounding areas.
3. Safety First: Precautions to Take
Before diving into the actual battery installation process, I can’t emphasize enough how important safety is. Here’s what I did to ensure everything went smoothly and safely:
3.1 Disconnecting the Negative Terminal First
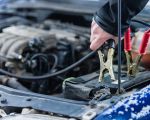
Always start by disconnecting the negative terminal (the black one) before the positive terminal. This is critical for safety. I learned this the hard way when a spark flew while I was working near the battery, and it was because I didn’t disconnect the negative terminal first. This step prevents any electrical short-circuiting that can happen if the wrench touches the vehicle’s metal frame while working with the battery.
3.2 Wearing Protective Gear
Even though it’s not often mentioned, I highly recommend wearing protective gloves and glasses. Car batteries can leak acid, and while it’s not common, it’s better to be safe than sorry. By wearing gloves and glasses, I was able to avoid any accidents and feel much more comfortable during the installation.
3.3 Working in a Well-Ventilated Area
Car batteries can emit hydrogen gas, which is highly flammable. So, I made sure I was working in an open space or in a well-ventilated garage to reduce any potential risk of explosion or fire. This is a simple precaution that should never be overlooked.
4. Step-by-Step Guide to Installing the New Battery
Once I was ready, I followed these steps to remove the old battery and install the new one. It’s a straightforward process that takes about 30 minutes, but don’t rush through it. Here’s a detailed guide based on what I did:
4.1 Step 1: Turn Off Your Car
This might sound like a no-brainer, but you’d be surprised how many people forget this. Before doing anything, I turned off the ignition and made sure all the electrical accessories, such as the radio and lights, were also turned off.
4.2 Step 2: Disconnect the Old Battery
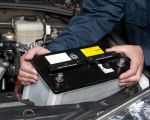
Using a wrench, I disconnected the negative (black) terminal first. After that, I moved on to the positive (red) terminal. I then carefully removed the battery hold-down clamp or bracket, which was securing the battery in place. Once the clamps and brackets were removed, I lifted out the old battery carefully—batteries can be heavy!
4.3 Step 3: Clean the Battery Tray
Before placing the new battery in the tray, I made sure to clean the tray. I used a baking soda and water solution to neutralize any corrosion around the battery tray and terminals. Then, I wiped everything down with an old rag to ensure there were no contaminants left.
4.4 Step 4: Insert the New Battery
Now, it was time for the new battery! I placed it into the tray, making sure the positive and negative terminals were in the correct positions (positive to positive, negative to negative). This is crucial to avoid any electrical mishaps later on.
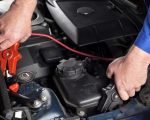
4.5 Step 5: Reconnect the Terminals
First, I connected the positive (red) terminal, tightening the nut with my wrench. After that, I connected the negative (black) terminal, again ensuring the connection was tight but not overly tight, which could damage the terminal. At this point, I made sure there was no corrosion on the terminals or cables, as this could interfere with the connection.
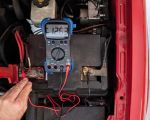
4.6 Step 6: Secure the Battery and Test
With everything connected, I tightened the battery hold-down clamp to secure the battery in place. I then started the car to check that the new battery was working correctly. It started up immediately, and I noticed the headlights were brighter and the dashboard lights worked properly. I knew I had done everything right!
5. Troubleshooting Potential Issues
Even though the installation was straightforward, I encountered a few minor issues that were easily resolved. Here are some tips to troubleshoot common problems:
5.1 Car Doesn’t Start
If your car doesn’t start after installing the new battery, check the connections again. It’s possible that the terminals are too loose. Also, make sure the battery is the correct size for your car. If everything seems fine, it might be worth checking the alternator, as a faulty alternator could cause battery issues.
5.2 Dim Headlights
Dim headlights can be a sign of a poor battery connection. Check the cables for any corrosion or damage. If the cables are fine, you may need to check if the alternator is charging the battery properly.
6. When to Call for Professional Help
In some situations, such as if you’re unsure about the installation process or encounter complex electrical issues, it’s best to call in a professional. I was lucky enough to have the tools and knowledge to install the battery myself, but if you’re not confident, you can always contact a towing company like Rescue & Towing for assistance. They can offer expert help, whether it’s installing the battery or diagnosing other electrical issues with your car.
In the end, installing a new car battery after a jumpstart isn’t as complicated as it might seem, but it does require some patience and attention to detail. By following these steps and taking the necessary precautions, I was able to save time and money while ensuring my car was running smoothly once again.