Understanding Car Radiator Leaks
When your car starts showing signs of overheating, it could be due to a leaking radiator. A radiator is an essential component of your vehicle's cooling system, responsible for preventing the engine from overheating. If left untreated, a radiator leak can lead to severe engine damage, costly repairs, and even total engine failure. In this guide, we'll explore the common causes of radiator leaks, how to identify them, and step-by-step instructions on fixing them yourself.
Acme Auto Radiator Incorporation
49 Carleton Ave, Islip Terrace, NY 11752, USA
What Causes a Radiator to Leak?
Radiator leaks can occur for several reasons, including age, physical damage, or corrosion. Over time, the rubber hoses connected to your radiator may deteriorate, causing leaks. Additionally, if the radiator is subjected to impact (such as hitting a curb or debris), it may crack, resulting in fluid loss. Corrosion is another major contributor to leaks, especially in older vehicles where rust can weaken the radiator walls. Understanding the cause of the leak is key to determining the best repair approach.

AutoZone Auto Parts
14031 Francisquito Ave, Baldwin Park, CA 91706, USA
Signs of a Leaking Radiator
How do you know if your radiator is leaking? Here are some common signs:
- Overheating engine: The most obvious sign of a radiator issue is when your engine temperature rises above normal levels, often indicated by the temperature gauge moving into the red zone.
- Coolant puddles: If you notice green, orange, or pink liquid under your car after it’s parked, it may be coolant leaking from the radiator.
- Discolored coolant: If you notice rust-colored or muddy coolant in the overflow tank or radiator cap, it’s a sign of corrosion inside the system.
- Sweet odor: A sweet, syrup-like smell can indicate leaking coolant, which often has a distinct scent due to its chemical composition.
How to Diagnose a Leaking Radiator
Before diving into repairs, it’s essential to diagnose the issue properly. Start by visually inspecting the radiator and hoses for any obvious signs of damage or leaks. Be sure to check the radiator cap and the seams for signs of wear or corrosion. Additionally, pressure testing the radiator system can reveal even the smallest leaks. A mechanic or auto parts store can perform a pressure test if you're unsure about the leak’s location. If you're comfortable with DIY repairs, a pressure test kit can be purchased online or at your local auto supply store.
DIY Steps to Fix a Leaking Radiator
If you've confirmed that your radiator is leaking and you want to fix it yourself, here’s a step-by-step guide:
1. Gather Your Tools and Materials
Before starting, make sure you have the following tools and materials:
- Radiator sealant or epoxy
- New hose clamps (if necessary)
- Wrench or screwdriver
- Coolant
- Bucket or container to catch the coolant
- Gloves and safety glasses
2. Drain the Coolant
Start by draining the coolant from the radiator. Place a bucket or container under the radiator drain valve and open it to release the fluid. Be cautious of hot coolant to avoid burns.
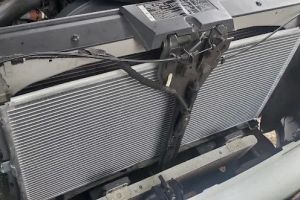
3. Locate the Leak
With the system drained, inspect the radiator for visible cracks or holes. If the leak is from a hose, check the clamps and the hose for cracks or tears. A radiator sealant can be effective for small cracks or leaks, but significant damage may require replacing the radiator or the affected hose.
4. Apply Sealant (If Applicable)
If you’ve found a small crack and wish to use a temporary fix, apply radiator sealant as directed by the product instructions. This will seal small leaks but should not be considered a permanent solution. Ensure you follow the directions carefully for best results.
5. Replace the Damaged Part
If the damage is too extensive for a sealant to fix, you may need to replace the affected part. This could be a radiator hose or the entire radiator. Replacing a hose involves loosening the hose clamps, removing the old hose, and fitting the new one. If replacing the entire radiator, this may require more advanced mechanical skills, so it’s advisable to seek professional help for this repair.
6. Refill the Coolant
After applying the sealant or replacing the damaged part, refill the system with fresh coolant. Make sure to check for any leaks while the engine is running to ensure everything is sealed properly.
When to Seek Professional Help
While some radiator leaks can be fixed with DIY methods, others may require professional attention. If the radiator is severely damaged or if you’re unsure about handling the repair yourself, it’s best to take your vehicle to a mechanic. Professional auto repair shops can also perform a thorough inspection of your cooling system, identifying other potential issues that may need attention.
Preventing Future Radiator Leaks
Once you've repaired the leak, it's essential to maintain the health of your car’s cooling system. Regularly check the coolant level, flush the radiator every two years or as recommended by your vehicle's manual, and inspect the hoses for signs of wear. By keeping up with maintenance, you can prevent future leaks and ensure your radiator stays in good working order.
In conclusion, fixing a leaking radiator is an essential repair for any car owner. With the right tools and knowledge, you can handle minor leaks on your own. However, if you're dealing with a major issue or are unsure of the repair process, don't hesitate to consult a professional mechanic. Keeping your cooling system in tip-top shape will help you avoid engine overheating and keep your car running smoothly for years to come.