How to Fix a Damaged Car Radiator Hose
As a car owner, few things are as frustrating as realizing that your car's cooling system isn't working properly. One of the most common issues I’ve encountered is a damaged radiator hose. This issue can cause the engine to overheat, leading to serious long-term damage if left untreated. After dealing with this problem myself, I’ve learned a lot about how to handle it. If you’re wondering how to fix a damaged car radiator hose, I’m here to guide you through it step-by-step. Trust me, this DIY repair is doable with a little patience and the right tools.
Acme Auto Radiator Incorporation
49 Carleton Ave, Islip Terrace, NY 11752, USA
1. Understanding the Radiator Hose
The radiator hose is a crucial component of your car’s cooling system. It transports coolant between the engine and the radiator, helping to regulate the engine temperature. Over time, radiator hoses can become cracked, worn, or even burst. I experienced this firsthand when I noticed steam coming from the engine bay during a drive. The damaged hose was leaking coolant, which can quickly lead to overheating if not fixed promptly.

AutoZone Auto Parts
14031 Francisquito Ave, Baldwin Park, CA 91706, USA
1.1 Why Radiator Hose Damage Occurs
There are several reasons why a radiator hose may get damaged. Exposure to extreme temperatures, constant wear and tear, or even the buildup of pressure can weaken the hose. I’ve found that older cars are more prone to this issue, especially if they’ve never had their hoses replaced. Rubber hoses can deteriorate over time due to the heat and pressure of the engine, so it’s essential to check them regularly to prevent costly repairs.
2. Identifying a Damaged Radiator Hose
Before attempting any repairs, it’s essential to properly diagnose the problem. A damaged radiator hose is often easy to spot. I noticed signs of coolant leaking on the driveway, and a closer inspection of the hose showed visible cracks. You might also see signs of bulging or feel a soft or spongy texture when you press the hose. If you find any of these signs, it’s time to fix or replace the hose.
2.1 Common Symptoms of a Damaged Radiator Hose
Some of the symptoms that indicate a damaged radiator hose include:
- Engine overheating
- Low coolant levels
- Visible coolant leaks under the car
- Steam coming from the engine bay
If you experience any of these symptoms, it's important to address the issue immediately before it leads to more severe engine damage.
3. Tools You Will Need
Fixing a damaged radiator hose isn’t too complicated, but you will need the right tools. Fortunately, most of these tools are relatively inexpensive and easy to find. Here’s what I used for my repair:
- Replacement radiator hose
- Radiator hose clamps
- Screwdriver or wrench (to remove the clamps)
- Coolant (to refill the system)
- Gloves (to protect your hands from hot surfaces)
- Bucket or drain pan (to catch coolant)
Having these tools on hand made the process smooth and straightforward.
4. Step-by-Step Guide to Fixing a Damaged Radiator Hose
Now that you have the tools, it's time to start the repair. Here’s the step-by-step guide based on my personal experience:
4.1 Step 1: Let the Engine Cool
Before doing any work, make sure the engine has cooled down completely. I learned this the hard way by trying to start the repair right after driving. The hose and coolant system can get extremely hot, so it’s crucial to let the engine cool for at least 30 minutes. This will prevent burns and make the job safer.
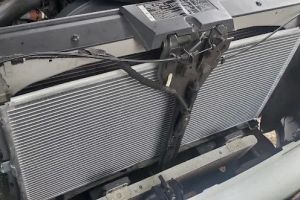
4.2 Step 2: Locate the Damaged Hose
The next step is to locate the damaged hose. In my case, the crack was on the lower radiator hose, which is usually easier to access. I lifted the car with a jack to make it easier to get under the vehicle. Be sure to identify whether the hose is cracked, leaking, or completely disconnected. This will help you decide if it needs a simple fix or a complete replacement.
4.3 Step 3: Drain the Coolant
Before removing the damaged hose, it’s essential to drain the coolant. I placed a bucket underneath the radiator drain valve and used a wrench to open the valve. Make sure you have a large enough container to catch all the coolant. This step is crucial because you don’t want to spill hot coolant all over the engine or your work area. Once the coolant has drained, close the valve and proceed to the next step.
4.4 Step 4: Remove the Damaged Hose
Using a screwdriver or wrench, remove the clamps that are holding the damaged hose in place. Once the clamps are loose, carefully pull the hose off the radiator and engine connection points. I found that some hoses are more stubborn than others, so a little wiggling may be required to loosen the hose. Be patient during this step to avoid damaging any surrounding components.
4.5 Step 5: Install the New Hose
Now, take the replacement hose and slide it onto the connection points. Secure the hose with the new clamps, making sure the hose is firmly in place. I made sure that the hose was positioned correctly and that there were no twists or kinks in it. Proper alignment will help the hose perform optimally and prevent future issues.
4.6 Step 6: Refill the Coolant
Once the new hose is installed, it’s time to refill the cooling system with fresh coolant. I used a 50/50 mix of coolant and water, but be sure to follow the manufacturer's instructions on what type of coolant to use. Pour the coolant slowly into the radiator and check for any leaks as you go. I also recommend checking the coolant level after starting the car to make sure everything is functioning properly.
5. Testing the Repair
After completing the repair, I started the car and let the engine run for a few minutes to check for any signs of leaks. It's essential to keep an eye on the new hose to ensure it’s securely in place and that there are no coolant leaks. You should also monitor the engine temperature to make sure the radiator is working effectively. If the engine runs at normal temperature without overheating, your repair is successful!
5.1 Regular Maintenance Tips
To avoid future issues with your radiator hose, it’s important to conduct regular maintenance. I check my hoses during oil changes and look for any signs of wear, cracks, or leaks. Replacing hoses every few years is a good practice to prevent sudden failures. Regularly topping off coolant and keeping an eye on the engine temperature can also help prevent problems down the road.