Fixing a Damaged Car Radiator Hose: A Step-by-Step Guide
Dealing with a damaged radiator hose can feel like a nightmare, especially if you’re far from home or stuck in the middle of a busy workday. I’ll share how I managed to fix my car’s damaged radiator hose and how you can do it too. By the end of this guide, you’ll be confident enough to fix a radiator hose on your own, saving both time and money.

Firestone Complete Auto Care
1933 N Placentia Ave, Fullerton, CA 92831, USA
Why is Your Car’s Radiator Hose So Important?
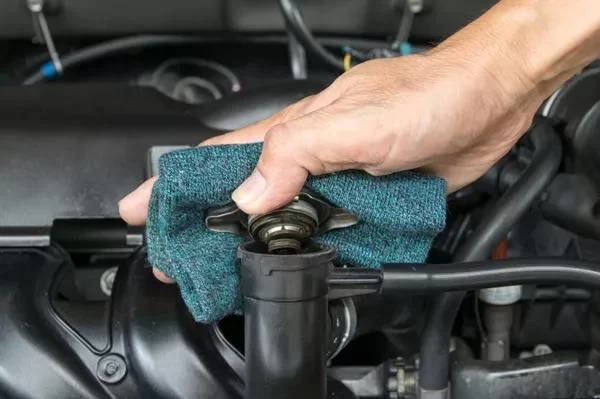
The radiator hose is a crucial part of your car’s cooling system. It transports coolant between the engine and the radiator to prevent overheating. When the radiator hose becomes damaged or worn out, your car can overheat, leading to costly engine damage. Understanding how your radiator hose works can help you spot problems early and prevent more serious issues down the line.

Complete Auto Service of Ann Arbor
2890 Jackson Ave, Ann Arbor, MI 48103, USA
Common Causes of Radiator Hose Damage
Several factors can lead to a damaged radiator hose. For example, extreme temperatures, physical wear and tear, or poor-quality hoses can all cause leaks. Over time, the rubber in the hose breaks down due to the heat from the engine and coolant. Even small cracks can eventually lead to major leaks. It’s essential to be aware of common warning signs of hose damage, such as coolant leaks under the car or the engine temperature gauge running too high.
Signs of a Damaged Radiator Hose
Recognizing the signs of a damaged radiator hose early is key to preventing serious damage to your engine. Here are a few signs to watch out for:
- Leaking coolant under the car
- Engine overheating
- Sudden drop in coolant levels
- Strange noises or smells coming from the engine
If you notice any of these symptoms, it’s time to check your radiator hose for leaks or cracks.
How to Fix a Damaged Radiator Hose
Don’t panic if you find yourself with a damaged radiator hose. I’ll walk you through the process of fixing it yourself, so you can get your car back on the road quickly.
Step 1: Gather Your Tools and Materials
Before you start the repair, make sure you have everything you need. Here’s a list of items I used:
- New radiator hose (if replacement is necessary)
- Coolant
- Hose clamps
- Scissors or a utility knife
- Bucket or container to catch coolant
- Gloves and safety glasses
If you just need to repair the hose instead of replacing it, you can also use duct tape or hose repair tape as a temporary fix (though replacement is always the best option in the long run). But don’t forget your gloves, as you’ll be working with coolant, which can be harmful to your skin.
Step 2: Locate the Damaged Hose
Depending on the make and model of your car, the radiator hose can be located in a few different spots. Typically, you’ll find it between the radiator and the engine. If you’re unsure, refer to your car’s manual or look up a diagram online for your specific vehicle. If you have trouble locating it, checking the area for leaking coolant can help you pinpoint the damaged hose.
Step 3: Drain the Coolant
To avoid any spills and make the repair easier, you’ll need to drain some of the coolant from your car. Place a container underneath the radiator’s drain valve and open the valve to release the coolant. Be sure to store the coolant in a safe place, as it can be reused later. Once you’ve drained enough coolant, you’re ready to move on.
Step 4: Remove the Damaged Hose
Using the scissors or utility knife, carefully cut away the damaged part of the radiator hose. If the hose is secured with hose clamps, use a screwdriver to loosen them and slide them off. Once the damaged section is removed, check the area for any other potential issues, such as cracks or dirt, before installing the new hose.
Step 5: Install the New Hose
Take your new radiator hose and carefully fit it into place. Slide the hose clamps over the ends of the hose and tighten them securely. It’s important not to overtighten the clamps, as this can cause the hose to crack. Ensure that the hose is positioned properly, and the clamps are tight enough to prevent any leaks.
Step 6: Refill with Coolant
After installing the new hose, it’s time to refill the radiator with coolant. Slowly pour the coolant back into the radiator, ensuring you don’t spill it. Once the radiator is full, start the car and let it run for a few minutes to ensure that the hose is functioning correctly and no leaks are present. Check the engine temperature and coolant levels to make sure everything is operating smoothly.
Step 7: Test Drive
Take your car for a short test drive to ensure the repair was successful. Keep an eye on the engine temperature gauge and watch for any signs of coolant leakage. If all goes well, you’ve successfully fixed your radiator hose!
When to Seek Professional Help
While fixing a damaged radiator hose is something that many car owners can handle themselves, there are times when it’s best to call in the professionals. If you’re unsure about your ability to repair the hose, or if the damage is more severe than just a small crack, it’s worth seeking help. Professionals can assess the issue and ensure that the repair is done correctly to avoid further damage to your car.
Final Thoughts
Fixing a damaged radiator hose doesn’t have to be a daunting task. With the right tools and a little know-how, you can save money on repairs and keep your car running smoothly. Just remember to stay safe, follow the steps carefully, and don’t hesitate to call a professional if you’re in doubt. Whether it’s a temporary fix or a full replacement, knowing how to handle this issue will give you peace of mind when it comes to your car’s maintenance.