How to Fix a Damaged Car Radiator Hose
When you're out on the road, the last thing you want is for your car to overheat due to a damaged radiator hose. As someone who’s had to deal with this issue firsthand during a road trip, I know how inconvenient it can be when your radiator hose starts leaking or shows signs of wear. A damaged hose can lead to engine overheating, which in turn can cause severe engine damage if not addressed immediately. Fortunately, fixing a damaged radiator hose is a manageable task if you know the right steps to take. In this guide, I’ll walk you through the process of identifying, troubleshooting, and repairing a damaged car radiator hose.
Acme Auto Radiator Incorporation
49 Carleton Ave, Islip Terrace, NY 11752, USA
1. Understanding the Importance of Your Car's Radiator Hose
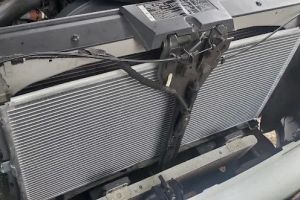
The radiator hose is an essential component of your vehicle’s cooling system. It transports coolant between the engine and the radiator, ensuring that the engine stays at an optimal temperature. Without this vital hose, your car’s engine would quickly overheat, leading to potential engine failure. From my personal experience, when the radiator hose on my old car started leaking during a summer road trip, the engine temperature spiked rapidly, and I had to pull over. Thankfully, I was able to make a temporary repair, but it taught me just how important it is to keep an eye on your hoses and maintain them properly.

AutoZone Auto Parts
14031 Francisquito Ave, Baldwin Park, CA 91706, USA
1.1 Common Issues with Radiator Hoses
Radiator hoses are subject to wear and tear over time due to heat exposure, pressure, and friction. The most common issues include:
- Cracks and Leaks: Due to heat and age, the rubber hose may develop cracks or splits, causing coolant to leak out.
- Bulges: Over time, the hose can become swollen or bulging due to excessive pressure or weak spots in the rubber.
- Loose Connections: If the hose isn't properly secured to the radiator or engine, coolant can leak through the joints, especially during driving.
2. How to Identify a Damaged Radiator Hose
Recognizing when your radiator hose is damaged can help prevent further damage to your engine. Here are some common signs of a damaged or failing radiator hose:
2.1 Overheating Engine
If your engine is consistently overheating or the temperature gauge shows that it's running hotter than usual, it may be a sign that your radiator hose is damaged. I’ve experienced this when a crack in the hose allowed coolant to escape, leading to a slow but steady rise in engine temperature. If your car is overheating, it’s essential to check the hose and cooling system as soon as possible.
2.2 Coolant Leaks
One of the most obvious signs of a damaged radiator hose is coolant leakage. After noticing a puddle of coolant under my car, I investigated and found a small crack in the radiator hose. Coolant leaks can often be seen around the hose or at the connection points where the hose meets the radiator and engine. If left unattended, coolant leaks can lead to complete coolant loss, which can result in engine failure.
2.3 Visible Damage
Sometimes, the damage to the radiator hose is visible to the naked eye. Look for cracks, bulges, or worn-out areas on the hose. The hose may also feel soft or brittle if it's deteriorating. If you see any of these issues, it’s time to address the damage before it leads to bigger problems.
3. Tools and Materials Needed for Radiator Hose Repair
Before you begin fixing your damaged radiator hose, make sure you have the right tools and materials on hand. Here's what you’ll need:
- New Radiator Hose: Depending on the damage, you might need to replace the entire hose. Make sure to get a hose that matches your vehicle’s make and model.
- Wrenches or Socket Set: These will be necessary to loosen the clamps that hold the hose in place.
- Coolant: Have some extra coolant on hand to refill your system once the repair is complete.
- Rags or Towels: To clean up any coolant that may spill during the repair process.
- Water (for testing): To test the system after the repair and ensure there are no further leaks.
4. Step-by-Step Guide to Repairing a Radiator Hose
Once you’ve identified the issue with your radiator hose, it’s time to fix it. Here’s a step-by-step guide to help you repair the hose yourself:
4.1 Step 1: Turn Off the Engine and Let it Cool
Before you do anything, make sure that the engine is turned off and has had time to cool down. Working on a hot engine can be dangerous, and it could lead to burns or injury. I made this mistake on my first attempt, trying to fix the hose before allowing the engine to cool—needless to say, it was uncomfortable and unsafe. Let the engine cool down for at least 30 minutes before proceeding.
4.2 Step 2: Locate the Damaged Hose
Once the engine is cool, locate the damaged radiator hose. The hose connects the radiator to the engine, so you can trace it from either side. Check for any visible damage, such as cracks, bulges, or leaks. Once you’ve located the problem area, you’ll need to remove the old hose.
4.3 Step 3: Remove the Old Hose
Use a wrench or socket set to loosen the hose clamps on both ends of the damaged hose. Once the clamps are loosened, gently pull the hose off. Be careful not to damage any surrounding parts. If the hose is stuck, you might need to use a little more force, but avoid using excessive force, as it can damage the radiator or engine connections.
4.4 Step 4: Install the New Hose
Take the new radiator hose and carefully attach it to the same positions where the old hose was. Make sure the hose is seated correctly on both the radiator and engine connection points. Tighten the clamps to secure the hose in place. Ensure that the hose is secure but not too tight, as this could cause damage to the hose material.
4.5 Step 5: Refill the Coolant System
Once the new hose is installed, it’s time to refill your vehicle’s cooling system with fresh coolant. Carefully pour the coolant into the radiator or reservoir, making sure not to spill. I recommend using a funnel to avoid making a mess. After filling, check for any leaks around the new hose.
4.6 Step 6: Test the System
After you’ve refilled the coolant system, start the engine and let it run for a few minutes. Check the temperature gauge to ensure that the engine is running at a safe temperature. Keep an eye on the new hose to ensure there are no leaks. If everything seems good, take your car for a short drive to make sure it’s working properly. I always recommend doing a test drive after any car repair to ensure that everything is functioning correctly.
5. Preventing Future Radiator Hose Damage
To avoid future issues with your radiator hose, it’s important to regularly inspect the hose and the entire cooling system. Look for signs of wear and tear, and replace hoses before they become damaged. I also recommend keeping your coolant at the proper level and using the correct type of coolant for your vehicle. By performing regular maintenance, you can extend the life of your radiator hose and avoid costly repairs down the road.