How to Fix a Car with a Leaking Brake Fluid: A Step-by-Step Guide
There are few things more alarming than stepping on your car's brake pedal and feeling it sink straight to the floor. If you've ever experienced this, you know it’s usually a sign of one thing: brake fluid loss. As a car owner, I know how critical it is to address brake issues quickly. Brake fluid leaks, in particular, can be a serious safety concern, and they must be fixed promptly. In this article, I’m going to take you through the steps I personally use to identify and fix a brake fluid leak—so you can keep your car safe and reliable on the road.

Brake Masters
24411 Main St, Santa Clarita, CA 91321, USA
1. Identifying the Leak: Where to Look for Brake Fluid Leaks
Before we get into the repair process, it’s crucial to first pinpoint the source of the brake fluid leak. This might seem like a daunting task, but with a little patience, you can track it down yourself.

Little D's Muffler & Brakes
2970 S Winchester Blvd, Campbell, CA 95008, USA
1.1 Inspecting the Brake Lines
The brake lines are one of the most common culprits when it comes to fluid leaks. Over time, the metal lines can become corroded or damaged from road debris. This corrosion can cause the fluid to leak out, which leads to a loss of hydraulic pressure, compromising your brakes. To inspect the brake lines, follow these steps:
- Park your car on a flat, level surface and engage the parking brake.
- Lift the car using a jack and place it securely on jack stands.
- Locate the brake lines, which are usually found running along the undercarriage of the car. They will be thin, metallic, and connected to the brake components.
- Examine the lines closely for signs of damage, corrosion, or wet spots. If you spot any of these issues, it’s likely that you’ve found the source of the leak.
1.2 Checking the Brake Fluid Reservoir
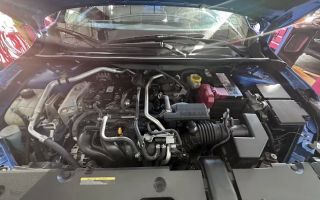
Another potential source of a brake fluid leak is the brake fluid reservoir itself. If this container becomes cracked or if the cap is improperly sealed, fluid can leak out. You can easily check the brake fluid reservoir by lifting the hood and locating the transparent reservoir near the back of the engine bay. If the fluid level is lower than usual, it’s a clear indication that something is leaking.
1.3 Examining the Master Cylinder
If there’s no obvious leak along the brake lines or fluid reservoir, the next place to check is the master cylinder. The master cylinder is responsible for creating the hydraulic pressure needed to engage your car’s brakes. If the seals inside it fail, brake fluid can leak from the cylinder. This is a bit more difficult to diagnose, but if the other two areas are in good condition, the master cylinder should be your next target.
2. How to Fix a Leaking Brake Line
If you’ve identified that the brake line is leaking, don't panic. Repairing it can be done with the right tools and some know-how. I’ll guide you through the process.
2.1 Gather the Necessary Tools and Materials
To repair a leaking brake line, you’ll need a few specific tools. Here’s a list of everything you should have on hand:
- Brake fluid (DOT 3, DOT 4, or DOT 5.1 depending on your car’s requirements)
- Brake line repair kit (includes replacement line, fittings, and a tubing cutter)
- Wrenches (for removing brake line fittings)
- Jack and jack stands
- Brake line bender (optional, for bending the new line if necessary)
- Brake fluid bleeder kit (if necessary)
2.2 Removing the Damaged Brake Line
The first step in fixing the brake line is to remove the damaged section. Here's how you do it:
- Lift the car and secure it with jack stands.
- Locate the damaged section of the brake line and use your wrenches to loosen the fittings connecting the line to the rest of the braking system.
- Use the tubing cutter to cut the damaged brake line. Be sure to cut a clean, straight line for the best seal later on.
2.3 Installing the New Brake Line
Once the damaged brake line is removed, it's time to install the new line:
- Measure the length of the new brake line to match the one you removed.
- If the line needs bending, use a brake line bender to make the appropriate curves.
- Attach the new brake line fittings to both ends of the line and tighten them using your wrenches. Be careful not to overtighten and damage the threads.
- Ensure the new line is securely fastened and doesn’t rub against any other components.
2.4 Bleeding the Brakes
After replacing the brake line, you will need to bleed the brakes to remove any air from the braking system. This is essential to restore proper hydraulic pressure. You can use a brake fluid bleeder kit for this step, which allows you to bleed the brakes with minimal effort. Start from the brake farthest from the master cylinder and work your way closer to ensure all air is removed. Keep an eye on the brake fluid reservoir and top it off as necessary during the process.
3. Fixing Leaks in the Brake Fluid Reservoir and Master Cylinder
If your brake fluid leak is coming from the reservoir or master cylinder, the process is a little different. Fortunately, both can be repaired or replaced without too much hassle.
3.1 Replacing the Brake Fluid Reservoir
In some cases, a cracked or damaged brake fluid reservoir will need to be replaced. Here’s how to do it:
- Lift the hood and locate the brake fluid reservoir. Remove the cap and drain the old fluid.
- Disconnect the reservoir from the master cylinder and the fluid lines attached to it.
- Install the new reservoir, reattach the lines, and refill it with fresh brake fluid.
- Check for any leaks around the new reservoir and ensure that the cap is tightly secured.
3.2 Rebuilding or Replacing the Master Cylinder
If the master cylinder is leaking, you have two options: rebuilding the existing cylinder or replacing it entirely. Rebuilding is a more affordable option, but it requires a certain level of skill and access to parts. If you choose to rebuild, you’ll need a rebuild kit that includes new seals and components. However, if you’re not comfortable doing this yourself, replacing the entire master cylinder might be the better option. Here’s what to do:
- Locate the master cylinder and remove the brake lines attached to it.
- Unbolt the master cylinder from the firewall and remove it.
- Install the new master cylinder by reversing the removal process.
- Refill the brake fluid and bleed the system to remove any air.
4. Testing Your Work
Once you’ve completed the repairs, it's crucial to test your brakes before driving your car. Start by checking the brake fluid level and ensuring there are no signs of leaks. When you press the brake pedal, it should feel firm and responsive, not soft or spongy. Drive your car slowly in a safe area and test the brakes to make sure they’re functioning properly.
If you’re unsure about any of these steps or if the problem persists after your repair, don’t hesitate to call a professional. The last thing you want is to drive a car with faulty brakes. For assistance, I highly recommend contacting a trusted towing or repair service like Rescue & Towing for help.