How to Fix a Car with a Flat Tire
It’s happened to all of us at some point. You’re cruising down the road, and suddenly, you feel a wobble or hear a strange noise. Before you know it, you’ve got a flat tire on your hands. It’s one of those inconvenient situations that, while frustrating, are usually easy to fix if you know what to do. As someone who’s dealt with my fair share of flat tires, I can tell you it’s not as daunting as it may seem. Whether you’re dealing with a simple puncture or a complete blowout, knowing how to handle a flat tire can save you time, money, and frustration. Here’s everything I’ve learned about fixing a car with a flat tire, and trust me, you’ll be back on the road in no time.

MR. TIRE INC.
2078 New York Ave, Huntington Station, NY 11746, USA
1. Assessing the Situation
Before jumping into the fix, take a moment to assess the situation. Don’t just start changing the tire immediately—there are a few important things to check first.

MR. TIRE INC.
2078 New York Ave, Huntington Station, NY 11746, USA
1.1 Determine the Severity of the Damage
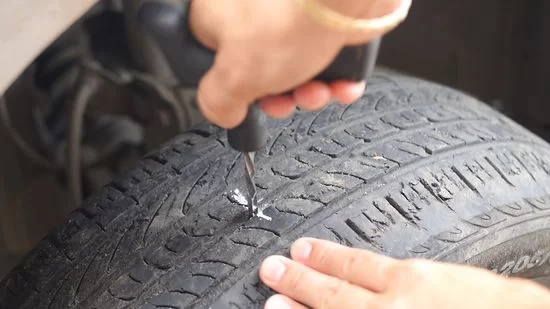
Not every flat tire is the same. Sometimes, it’s a slow leak, while other times, you might have a blowout. The severity of the damage will determine whether you can fix it on the spot or if you need to call for roadside assistance. I’ve had both experiences—once, I had a tiny nail stuck in the tire, which was a quick fix, but another time, I had a full blowout that required a tow. To determine the type of damage, carefully examine the tire. If you spot a nail or screw stuck in the tire tread, that could be an easy fix. However, if you see a large tear or a completely deflated tire with no visible puncture, it’s likely a blowout that can’t be repaired on the spot.
1.2 Ensure Safety First
Safety should always be your top priority. If you’re on the side of the road, make sure you pull over to a safe spot away from traffic. Turn on your hazard lights and place warning triangles or flares around your vehicle, if you have them, to alert other drivers. I once had a flat tire on a busy highway, and I made the mistake of not setting up enough safety measures. Fortunately, nothing happened, but it was a lesson learned the hard way. Always prioritize your safety before attempting any repairs.
2. Gathering the Necessary Tools
Once you've assessed the damage and made sure you're safe, it’s time to gather the tools you'll need to fix the flat tire. In my experience, it’s always best to be prepared ahead of time. This will save you a lot of stress when the unexpected happens.
2.1 What You’ll Need
To fix a flat tire, here’s a list of basic tools you’ll need to have in your car:
- Spare tire: This is probably the most important item. Make sure your spare tire is in good condition and properly inflated.
- Jack: A car jack is necessary for lifting the vehicle to remove the flat tire.
- Lug wrench: This tool is used to remove the lug nuts holding the tire in place. It’s crucial that the lug wrench is the right size for your car’s lug nuts.
- Tire pressure gauge: To ensure the spare tire is inflated to the proper pressure once installed.
- Tire repair kit (optional): If the damage is minor, such as a nail puncture, a tire repair kit can help temporarily patch the tire until you can get it professionally repaired.
2.2 Storing Tools Properly
Once you have all the necessary tools, make sure they are stored in an accessible place within your car. I’ve had to dig through my trunk several times to find my tools, and it’s never fun when you’re in a rush. I recommend storing them in the trunk in a dedicated spot so you can grab them quickly when needed. Additionally, check periodically to ensure your spare tire and tools are in good condition. I’ve been caught off guard with a flat tire, only to realize my spare was underinflated. Routine checks can help avoid these surprises.
3. Changing the Flat Tire
Now that you’ve assessed the situation and gathered the necessary tools, let’s walk through the process of changing a flat tire step by step.
3.1 Loosen the Lug Nuts
Before you lift the car with the jack, you’ll need to loosen the lug nuts holding the tire in place. Place the lug wrench on the lug nuts and turn them counterclockwise. Don’t remove them completely yet—just loosen them slightly. If you’ve never done this before, it can be difficult to get enough leverage. I’ve used my body weight to loosen stubborn lug nuts, but be careful not to strip them. If you're having trouble, consider using a breaker bar, which is a longer tool that gives you extra torque.
3.2 Jack Up the Car
Once the lug nuts are loosened, it’s time to jack up the car. Place the jack under the vehicle’s jacking point, which is typically located near the wheels—check your car’s manual if you’re unsure. Slowly turn the jack handle to raise the car until the flat tire is off the ground. I once jacked up my car without paying attention, and the car became unstable, causing the jack to slip. Always double-check the jack placement to avoid accidents.
3.3 Remove the Flat Tire
Now that the car is lifted, remove the lug nuts completely and take off the flat tire. Place the lug nuts in a safe spot so you don’t lose them. Gently pull the flat tire off the wheel bolts. If it's stuck, give it a gentle tap with your hand or foot to loosen it. I’ve had tires that are a little stubborn, but patience is key.
3.4 Install the Spare Tire
Once the flat tire is off, it’s time to install the spare. Carefully align the spare tire with the wheel bolts and slide it into place. Once it’s on, hand-tighten the lug nuts onto the bolts. Don’t tighten them completely just yet. I’ve found it’s easier to make sure the tire is aligned properly when you don’t tighten the nuts all the way at first.
3.5 Lower the Car and Tighten the Lug Nuts
After the spare tire is in place, slowly lower the car using the jack. Once the car is back on the ground, it’s time to tighten the lug nuts completely. I use a crisscross pattern when tightening the lug nuts to ensure even pressure across the tire. Tighten each nut as much as you can—this is one of the most important steps. You don’t want the spare tire to come loose while you’re driving.
3.6 Check Tire Pressure
Before driving away, it’s essential to check the tire pressure on the spare. Use a tire pressure gauge to ensure it’s at the proper PSI. I once forgot to check the tire pressure, which led to a bumpy ride until I realized the spare was underinflated. Proper tire pressure ensures better handling and fuel efficiency.
4. After the Fix
Now that you’ve replaced the flat tire, there are a few things to keep in mind.
4.1 Get the Flat Tire Repaired
While the spare tire can get you back on the road, it’s important to get the flat tire repaired or replaced as soon as possible. Many tire shops offer quick repairs for small punctures, and replacing a tire that’s severely damaged is always a good idea for safety reasons. In my experience, I’ve had to replace tires that I thought were repairable, but getting it fixed sooner rather than later can prevent more expensive damage down the road.
4.2 Check Your Spare Tire Regularly
Finally, don’t forget to check your spare tire’s pressure regularly to ensure it’s ready to go when you need it. I’ve seen people who had a flat tire, only to discover their spare was flat too. Keeping it properly inflated can save you a lot of time and hassle.

