It was a warm afternoon when I noticed the growing puddle of oil under my car. At first, it was just a small spot, but as the days passed, the puddle got larger. I was already familiar with minor leaks here and there, but this one was different—it wasn’t stopping. My car was leaking oil at a rate I couldn’t ignore anymore, and I knew I had to do something about it before it caused major engine damage or left me stranded. After dealing with several car issues in the past, I realized that oil leaks are pretty common, but they can quickly turn into a serious problem if left unaddressed. In this article, I’ll take you through my experience diagnosing and fixing a car that won’t stop leaking oil. Whether you're dealing with a small drip or a constant leak, I’ve got you covered with practical steps and advice.
1. Understanding Why Cars Leak Oil
Before jumping into the fix, I had to understand what was going on inside my car. Oil leaks usually occur when oil from the engine escapes through a worn, cracked, or improperly sealed part. This could be anything from a valve cover gasket to a damaged oil pan. Since my car had high mileage, it made sense that over time, parts like seals and gaskets could have degraded or become loose, allowing oil to seep through. Most oil leaks are caused by one or a combination of the following:
- Worn-out seals or gaskets
- Loose oil drain plug or oil filter
- Cracked oil pan or engine block
- Faulty valve cover or timing cover gaskets
- High pressure inside the engine (due to old, overfilled, or dirty oil)
Once I figured out that the oil leak could be coming from several potential sources, I knew the first step was diagnosing the exact cause. I needed to get to the bottom of the issue so I could fix it once and for all.
2. Diagnosing the Source of the Oil Leak
Before I could fix the oil leak, I had to identify where it was coming from. There are a few ways to pinpoint the source of an oil leak, and the more I knew about my car’s design, the easier it was to check for potential culprits:
- Check the Oil Filter: I knew that the oil filter is one of the first places I should check because it’s often the culprit behind leaks. Over time, the filter may become loose, or its seal might degrade, causing oil to leak. I also made sure to check that the filter was properly installed and hadn’t been cross-threaded when it was last replaced.
- Inspect the Oil Drain Plug: The oil drain plug is another common place where leaks happen. If the plug is over-tightened, it could cause the threads to strip, allowing oil to leak out. Alternatively, a worn-out washer or gasket around the plug might allow oil to seep out. Since I had recently changed my oil, this was one of the first places I checked for leaks.
- Look at the Valve Cover Gasket: This is another common area for leaks in older cars. The valve cover gasket seals the area where the valve covers meet the engine. If it’s cracked or worn out, oil will leak from here and drip down the side of the engine. I carefully inspected the gasket to see if it showed signs of wear, cracks, or deformation.
- Examine the Oil Pan: The oil pan is at the bottom of the engine and holds the oil. Over time, it can develop cracks or the gasket can wear out, leading to a slow oil leak. I made sure to inspect the oil pan thoroughly for any visible cracks, damage, or corrosion. If the pan had any issues, I’d need to replace it or the gasket.
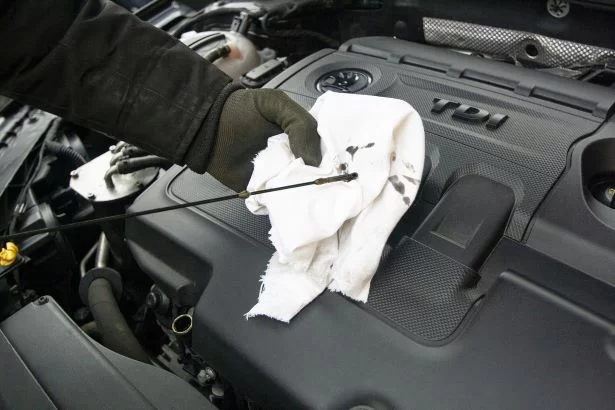
- Check for High Oil Pressure: In some cases, high oil pressure due to old, thickened, or overfilled oil can cause leaks. I checked my oil level and consistency to ensure it was within the recommended range and that the oil wasn’t too thick or dirty. If my oil pressure gauge was showing unusually high pressure, it could be a sign of an issue inside the engine, requiring professional inspection.
3. Preparing to Fix the Leak
Once I identified the source of the leak, I had to gather the right tools and materials to fix it. The repair process can vary depending on what’s causing the leak, but generally speaking, here are the steps I followed:
- Tools and Materials: To fix the oil leak, I needed a few basic tools. I made sure I had a wrench set, socket set, screwdrivers, a new gasket or seal (if necessary), an oil filter wrench (if the filter was involved), and some clean rags for wiping off oil. Depending on the severity of the leak, I might need a new oil pan or valve cover gasket.
- Safety Gear: Working with oil means I needed to be careful. I wore gloves to avoid direct contact with oil, and I made sure to have some safety glasses on to protect my eyes from any splashes. I also made sure the car was parked on a flat surface and that the engine was completely cool before I started working.
- Consider the Oil Type: While I was fixing the leak, I also paid attention to the type of oil I was using. I made sure I was using the correct oil for my car’s make and model, as using the wrong viscosity could exacerbate the problem. I checked the owner’s manual for the right oil specifications and made sure the oil I was using wasn’t too old or contaminated.
4. Steps to Fix Common Oil Leaks
Now that I was ready to get my hands dirty, I followed these steps to fix the oil leak:
Step 1: Tighten or Replace the Oil Drain Plug
I started by addressing the oil drain plug. If it was loose, I tightened it using the proper wrench. If the plug was stripped or the washer was worn out, I replaced the washer and resealed the plug. Tightening it too much could lead to a cracked pan, so I made sure not to overtighten it.
Step 2: Replace the Oil Filter
Next, I turned my attention to the oil filter. If the filter wasn’t installed properly, or if its gasket had failed, I removed the old filter and replaced it with a new one. I made sure to lube the new filter’s gasket with a little oil before installing it to ensure a proper seal. I tightened it according to the manufacturer’s specifications.
Step 3: Replace Worn Gaskets
If the valve cover or oil pan gasket was the problem, I removed the affected part (usually by unscrewing bolts or removing a cover). I cleaned the area thoroughly, removed any old gasket material, and installed the new gasket. I made sure everything was properly aligned before tightening the bolts to the correct torque specifications.
Step 4: Clean the Area
After making all the necessary repairs, I cleaned the area thoroughly with a degreaser to remove any excess oil. This step was important not only to prevent oil from attracting dirt but also to help me identify any future leaks. I started the car and let it run for a few minutes, then checked for any signs of new leaks.
5. When to Seek Professional Help
Although I managed to fix the leak myself, there are times when a car’s oil leak requires more advanced repairs. If the oil leak is coming from a critical engine part like the timing chain cover or crankshaft seal, it might require professional expertise. I also knew that if I couldn’t locate the source of the leak or if the leak was severe, it was time to take the car to a mechanic. In such cases, I could always call on services like Rescue & Towing to tow my car to a trusted shop for further inspection and repair.
6. Preventing Future Oil Leaks
After fixing the oil leak, I made sure to stay on top of my car’s maintenance schedule. Regular oil changes and timely replacements of seals and gaskets would help me prevent future leaks. I also kept an eye on the oil level and checked for any unusual engine noises or performance issues, as these could be early signs of another problem. By staying proactive, I could keep my car running smoothly for longer.
Fixing an oil leak might seem intimidating at first, but with a little knowledge and the right tools, it’s a repair that many DIYers can tackle themselves. If you’re unsure or need assistance, remember that services like Rescue & Towing can provide support and expert advice when you need it most.