How to Change Brake Pads on Your Own: A Step-by-Step Guide for DIYers
Have you ever found yourself in need of changing your car’s brake pads but unsure of where to start? You’re not alone! I once faced the same dilemma when I realized that my car was starting to make that unmistakable screeching sound every time I hit the brakes. Instead of driving myself to a mechanic, I decided to try my hand at changing the brake pads on my own. It turned out to be a satisfying and rewarding experience—and one that saved me quite a bit of money.
In this guide, I’ll take you through everything you need to know to change your brake pads like a pro. Whether you’re a seasoned DIYer or just starting out, you’ll find these steps easy to follow and understand. So let’s dive into the world of brake pad replacement!

Victory Lane Quick Oil Change (Milford)
1235 E Commerce St, Milford, MI 48381, USA
1. Gather Your Tools and Materials
The first thing you’ll need to do is gather the necessary tools and materials for the job. Trust me, having everything ready before you start will save you a lot of time and frustration. Here’s a list of items you’ll need:
- A jack and jack stands
- A lug wrench
- A socket set
- A c-clamp or brake pad spreader
- New brake pads
- Brake fluid (if necessary)
- Anti-seize lubricant
- Brake cleaner
- Safety glasses and gloves
Once you’ve gathered these tools, you’ll be well on your way to changing your brake pads safely and effectively.

Pick Your Part - Help Yourself
1232 Blinn Ave, Wilmington, CA 90744, USA
2. Lift the Car and Remove the Wheels
Before you can access the brake pads, you need to lift the car. Start by parking the car on a flat surface, engaging the parking brake, and loosening the lug nuts slightly. Use the jack to lift the car and place it securely on the jack stands. Never rely on the jack alone for support—it’s crucial for your safety to use the jack stands as well.
Once the car is elevated, remove the lug nuts completely and take off the wheels. With the wheels out of the way, you’ll have a clear view of the brake system and can start removing the old brake pads.
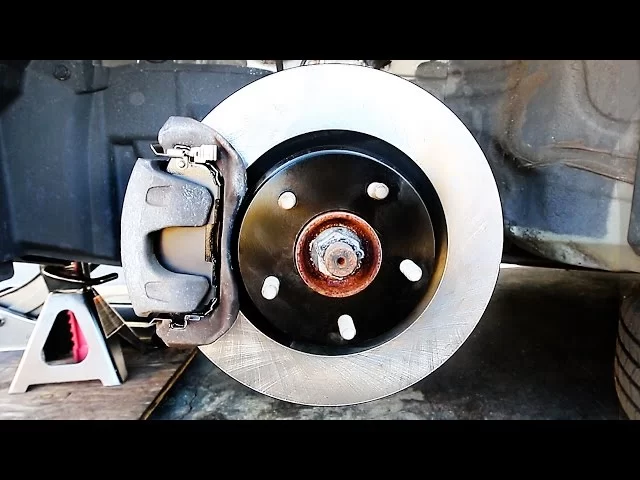
3. Inspect the Brake Components
Before proceeding, it’s a good idea to take a look at the overall condition of the brake components. You should check for any signs of wear on the rotors, calipers, and brake lines. If the rotors are scored or damaged, you’ll need to have them resurfaced or replaced. Make sure there’s no excessive wear on the calipers either. If everything looks good, you’re ready to move on to the next step.
4. Remove the Old Brake Pads
The next step is to remove the old brake pads. First, you’ll need to unscrew the caliper bolts that hold the brake caliper in place. This will give you access to the brake pads. Once the caliper is removed, take out the old pads. You may need to use a little force to loosen them, but be careful not to damage any surrounding components.
When removing the brake pads, take note of how they are positioned—this will help you install the new ones correctly. If you’re replacing the rotors as well, now is a good time to remove them.
5. Install the New Brake Pads
Now it’s time for the fun part: installing the new brake pads. First, take a moment to clean the brake components using brake cleaner. This will remove any dust, grime, or debris that could interfere with the new pads. Apply a light layer of anti-seize lubricant to the back of the new pads to reduce noise and ensure smooth operation.
Carefully slide the new brake pads into the caliper bracket. Make sure they’re aligned properly and securely in place. If you’re replacing the rotors, install them at this stage as well. Once everything is in place, reattach the caliper and tighten the caliper bolts.
6. Reassemble the Brakes and Reinstall the Wheels
Now that the new pads are in place, it’s time to reassemble everything. Make sure the caliper is properly secured, and don’t forget to check the brake fluid level. If necessary, top it off with the appropriate type of brake fluid. Next, reinstall the wheels and tighten the lug nuts securely using a lug wrench. Be sure to follow the proper torque specifications for your vehicle.
7. Lower the Car and Test the Brakes
Once the wheels are back on, carefully lower the car using the jack. Once the car is on the ground, torque the lug nuts again to ensure they’re properly tightened. It’s now time to test the brakes! Before driving on the road, take a few minutes to gently pump the brake pedal. This helps to seat the new pads and ensure proper braking performance.
If you notice any issues during the test, such as unusual noises or vibrations, it’s important to address them immediately. Sometimes, you may need to take the car for a short test drive to fully break in the new pads.
8. Troubleshooting Common Issues
In case you run into any problems during the process, here are a few common issues and solutions:
- Noisy brakes: If your brakes are making squealing noises, check if the pads were installed properly or if they are too thin. Also, ensure the anti-seize lubricant was applied correctly.
- Soft brake pedal: This may indicate air in the brake lines or low brake fluid. Bleed the brakes and top off the fluid if needed.
- Brake fade: If your brakes feel weak or unresponsive, you may need to replace the brake fluid or check for problems with the master cylinder.
As you can see, changing your own brake pads is a straightforward process that anyone with a little mechanical know-how can do. With the right tools and a bit of patience, you can save money and take pride in maintaining your vehicle. Don’t be afraid to give it a try yourself!