DIY Guide to Changing a Car Battery
There’s no worse feeling than when you turn the key in your car, and the engine doesn’t start. You check your dashboard, and the battery light is on. Panic sets in. For many, the first thought is, "How much will this cost me to fix?" But in reality, replacing a dead car battery is a simple DIY task that you can do at home with just a few basic tools. When I faced this issue for the first time, I realized that replacing a car battery wasn’t nearly as intimidating as it seemed. In this guide, I’ll walk you through each step to help you change your car battery safely and efficiently. By the end, you’ll feel confident enough to handle this issue yourself, saving you both time and money.

NTB-National Tire & Battery
6315 Prentiss School Dr, Canal Winchester, OH 43110, USA
1. Why Change Your Car Battery?
Before diving into the steps, let’s take a moment to understand why changing a car battery is something you should consider doing yourself. Car batteries typically last between 3 to 5 years, depending on factors such as climate, driving habits, and the type of battery you have. Over time, the battery’s charge capacity decreases, leading to issues like slow starting, electrical malfunctions, or a complete failure. This can happen suddenly, but there are signs that you might need to replace your battery, such as dim headlights or problems starting the car.
One of the key reasons I decided to change my battery on my own was the cost of a mechanic's visit. I’ve always been into DIY projects, and this was one I felt comfortable tackling. Plus, once you’ve done it once, you’re empowered to handle future battery issues independently. Changing the car battery is a simple task that requires only basic mechanical skills, and I’ll show you how to do it step-by-step.

Pep Boys
1200 W Washington Blvd, Los Angeles, CA 90007, USA
2. What You’ll Need
Before starting the job, it’s crucial to have all the necessary tools and equipment. Trust me, trying to start the job without the right tools is a recipe for frustration. Here's a quick list of everything you’ll need:
- A new car battery (make sure it’s the right type for your car model)
- Wrenches or socket set
- Battery terminal cleaning brush (optional, but helpful)
- Gloves to protect your hands from acid
- Screwdriver (if necessary for securing the battery in place)
- Safety glasses to protect your eyes
- Battery terminal protectors (optional)
- A multimeter (optional for testing the new battery’s charge)
After gathering the required tools, it’s important to find a well-ventilated area where you can work comfortably. Make sure the engine is off, and the car is parked in a stable position, preferably on level ground. I once had the misfortune of trying to change my car battery on an incline, which made the task way harder than it needed to be. A solid flat surface is key to ensuring everything goes smoothly.
3. Safety First: Precautions to Take
Before proceeding, it's essential to take some safety precautions. Car batteries contain sulfuric acid, which can be harmful, and handling them incorrectly could result in injury. That’s why I always wear gloves and safety glasses when changing a battery. Additionally, it’s critical to remove any jewelry, like rings or bracelets, as they can create a short circuit when they come in contact with the battery terminals. Lastly, make sure to keep any open flames away from the work area because hydrogen gas is emitted from the battery during the process, which is highly flammable.
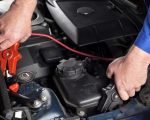
4. Disconnecting the Old Battery
Now that we’ve prepared for safety, it’s time to remove the old battery. Start by disconnecting the negative terminal first. This is the most important step in ensuring that you don’t accidentally cause a short circuit. If you’re unfamiliar with battery connections, the negative terminal is usually marked with a minus sign (–) or has a black cable. I remember when I first tried to do this, I forgot to disconnect the negative terminal first, which led to a spark. It’s easy to avoid this mistake if you follow the right sequence.
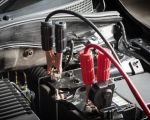
Once the negative terminal is disconnected, proceed to the positive terminal. This terminal is typically marked with a plus sign (+) or has a red cable. Using your wrench or socket set, loosen the nuts on both terminals and carefully remove the cables. I recommend moving the cables away from the battery to avoid accidental contact during the replacement process.
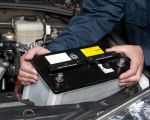
5. Removing the Old Battery
At this point, the battery cables are disconnected, and we’re ready to remove the battery itself. Many car batteries are secured in place with a metal bracket or strap. Use a screwdriver or wrench to remove any fasteners holding the battery in place. Once you’ve removed the bracket, gently lift the battery out of the car. Batteries are heavy, so make sure to use proper lifting techniques to avoid injury. The last thing you want is to hurt your back while trying to change your battery.
After removing the old battery, it’s a good idea to clean the battery tray and the terminals with a terminal cleaner or a mixture of baking soda and water. This will remove any corrosion that might have built up, which could interfere with the performance of your new battery.
6. Installing the New Battery
Now that the old battery is out, it’s time to install the new one. Carefully place the new battery into the tray, making sure the terminals are positioned in the same orientation as the old battery. The positive terminal should be on the left, and the negative terminal on the right, but double-check to ensure that everything matches your car's setup.
Once the battery is in place, secure it with the bracket or strap you removed earlier. Tighten the fasteners firmly, but avoid overtightening, as this could damage the battery or the car’s components. After securing the battery, it’s time to reconnect the terminals. Start with the positive terminal first and tighten it securely. Then, connect the negative terminal. Again, make sure everything is tight but not overdone. I learned this the hard way when I initially over-tightened a terminal, causing the cable to break. So, it’s important to apply moderate force.
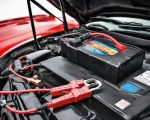
7. Testing the New Battery
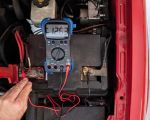
Once the battery is in place and the terminals are secured, you should test the new battery to ensure everything is working correctly. Turn on your car and check the dashboard for any warning lights, especially the battery light. If the light goes off, that’s a good sign that the new battery is functioning properly. I always recommend using a multimeter to check the voltage of the battery as well, just to be sure. A healthy car battery should measure around 12.6 volts or slightly higher when the car is off.
8. Wrapping Up the Job
Once you’ve confirmed the battery is working correctly, there are a few final steps. I like to place some terminal protectors on the battery terminals to help prevent corrosion in the future. This is a small but essential step to ensure the longevity of your new battery. Additionally, make sure to dispose of the old battery properly by taking it to a recycling center or an auto parts store. Most places that sell car batteries will accept your old one for recycling, and it’s important to do so responsibly to protect the environment.
After completing these steps, your car should be running smoothly again. I’ve successfully replaced my own car batteries several times, and I feel confident in my ability to do it again if necessary. If you ever feel uncomfortable with the process, don’t hesitate to call a professional for assistance. However, by following this guide, you should be able to save time and money by handling the task yourself.
If you find yourself in need of further assistance, whether for a battery jump-start or towing services, check out Rescue & Towing for professional help. They can offer quick assistance and reliable services whenever you need them. Visit their website here to learn more.