I’ve been in the situation where my car battery has died, and I needed to replace it, but I wasn’t sure whether I should disconnect the battery before starting the replacement process. At first, it seemed like a no-brainer—after all, I was replacing the battery, so surely it would be safe to just swap out the old one and pop in the new one, right? However, as I dug deeper into the process, I realized that disconnecting the battery before replacing it was actually one of the most important steps to ensure a smooth and safe battery replacement.

NTB-National Tire & Battery
6315 Prentiss School Dr, Canal Winchester, OH 43110, USA
1. The Importance of Disconnecting the Battery Before Replacing It
Disconnecting the battery is not just a precaution; it’s a step that helps ensure both your safety and the safety of your vehicle’s electronic components. Here are the main reasons why disconnecting the battery is crucial:

Pep Boys
1200 W Washington Blvd, Los Angeles, CA 90007, USA
1.1 Preventing Electric Shocks
One of the most obvious reasons to disconnect the battery before replacing it is to avoid the risk of an electric shock. Even though your car battery is a 12-volt battery, which isn’t likely to cause any serious harm in normal circumstances, it’s still important to handle it with care. If you were to accidentally touch a metal part of the battery or a live terminal while working on the battery, you could get shocked, which can be both painful and dangerous.
1.2 Avoiding Damage to the Car’s Electrical System
Modern vehicles are equipped with a variety of sensitive electronics that can be easily damaged by an electrical surge. These electronics include things like your car’s computer system, sensors, and even airbags. If you were to short-circuit or accidentally create a power surge when replacing the battery, it could potentially damage these expensive components. Disconnecting the battery before replacing it prevents this risk and ensures the electrical systems remain intact.
1.3 Preventing Accidental Airbag Deployment
In many vehicles, the airbag system is linked to the car's electrical system. If the battery is not disconnected, there’s a risk of accidentally triggering the airbags during the replacement process. This is something you definitely want to avoid, as it could not only injure you but also cause unnecessary damage to your car. By disconnecting the battery, you eliminate this potential danger entirely.
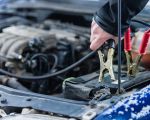
2. How to Safely Disconnect the Battery
Now that you understand why it’s so important to disconnect the battery before replacing it, let’s go over the process of doing so. Disconnecting the battery is a simple procedure, but it’s essential to follow the right steps to avoid damaging the vehicle or injuring yourself. Here’s how I go about safely disconnecting the battery:
2.1 Gather the Right Tools
The first thing I always do is gather the necessary tools for the job. Most battery replacement jobs only require a few basic tools, including a socket wrench with the appropriate size socket, gloves, and safety glasses. I also make sure I have a clean, dry towel or cloth on hand to wipe down any spilt acid or corrosion around the battery terminals.
2.2 Turn Off the Engine
Before I start working, I ensure that the engine is completely turned off and that the car is in “Park” mode (or “Neutral” if it’s a manual transmission). This step might seem obvious, but it’s always a good idea to double-check. This prevents any electrical systems from running while you’re working on the battery.
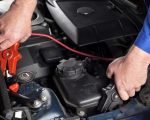
2.3 Locate the Battery and Identify the Positive and Negative Terminals
The next step is to locate the battery under the hood of the vehicle. In most cars, the battery will be clearly visible, but in some models, it may be hidden under covers or near other components. Once I’ve found the battery, I identify the positive (+) and negative (-) terminals. The positive terminal will typically be marked with a red cover or a plus sign, while the negative terminal will have a black cover or a minus sign.
2.4 Disconnect the Negative Terminal First
Once I’ve located the terminals, I start by disconnecting the negative terminal first. This is critical because if I were to disconnect the positive terminal first and accidentally touch any metal parts of the car with the wrench, it could create a short circuit and cause sparks or electrical damage. By disconnecting the negative terminal first, I reduce the risk of short-circuiting the car’s electrical system. I simply use the wrench to loosen the bolt holding the negative terminal in place, then gently lift the cable off the terminal. I make sure the cable is away from the battery and won’t accidentally touch the terminal again during the process.
2.5 Disconnect the Positive Terminal
After the negative terminal is safely disconnected, I move on to the positive terminal. The process is the same—loosen the bolt holding the terminal in place and lift the cable off the terminal. It’s essential to do this after the negative terminal to ensure there is no chance of a short circuit while working on the battery.
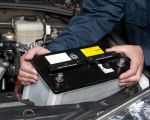
2.6 Remove the Battery
Once both terminals are disconnected, I can now safely remove the battery from its compartment. Depending on the car model, the battery might be secured with a bracket or strap. I use a socket wrench to remove any securing bolts or brackets before lifting the battery out of its compartment. Batteries can be quite heavy, so I make sure to lift with my legs, not my back, to avoid injury.
3. Replacing the Battery: Precautions and Considerations
After successfully disconnecting and removing the old battery, I’m ready to install the new one. The process is essentially the reverse of removing the old battery, but there are a few things to keep in mind to ensure the replacement goes smoothly:
3.1 Clean the Battery Terminals
Before installing the new battery, I take a moment to clean the battery terminals. Corrosion around the terminals is common, and it can interfere with the battery’s connection to the car. I use a mixture of baking soda and water to clean off any corrosion, and then I dry the terminals thoroughly with a clean cloth.
3.2 Install the New Battery
Next, I place the new battery in the same position as the old one. I make sure that the positive and negative terminals are in the correct positions (positive terminal on the positive side, negative terminal on the negative side). Once the battery is properly positioned, I secure it with any brackets or straps to ensure it doesn’t move around during driving.
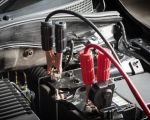
3.3 Reconnect the Terminals
Now, it’s time to reconnect the battery. I start by connecting the positive terminal first, then the negative terminal. I make sure that both terminals are securely tightened and that the cables are not loose. A loose connection can cause the battery to drain or malfunction.
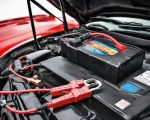
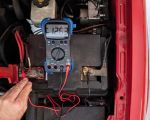
4. Testing the New Battery
After everything is reconnected, I turn the key to the “On” position and check if the car starts up properly. The engine should turn over smoothly, and all electrical systems should function correctly. If everything seems to be working as expected, I take the car for a short drive to ensure the battery is functioning correctly and the car’s electrical systems are operating normally.
If the car doesn’t start or I notice any issues with the electrical systems, I immediately check the battery connections and make sure everything is secure. If the problem persists, I recommend contacting a professional mechanic or a roadside assistance service like Rescue & Towing for help.
Replacing a car battery may seem like a simple task, but disconnecting the battery before starting the replacement process is essential for safety. By following these steps and taking the necessary precautions, you can ensure that the battery replacement goes smoothly and safely, protecting both yourself and your vehicle.