How I Fixed My Car’s Malfunctioning Sensors: A DIY Experience
It was a typical day when I noticed that my car was acting strange. The "Check Engine" light came on, and the car’s performance seemed off. The engine felt sluggish, and I could hear strange noises. At first, I thought it was something minor, but then the car began to behave erratically, especially with shifting gears. I took the car to the mechanic, and after a quick diagnosis, I was told that the issue was related to malfunctioning sensors. If you’ve ever had sensor issues in your car, you know it can be a headache. In this article, I’ll walk you through my experience with diagnosing and fixing malfunctioning sensors in my car, so you’ll know what to do if it happens to you.

J&J Auto Repair
2879 Lockbourne Rd, Columbus, OH 43207, USA
1. What Are Car Sensors and Why Do They Matter?
Car sensors are small but powerful components that help monitor and regulate the various systems in your vehicle. They collect data from different parts of the car, such as the engine, exhaust, transmission, and brakes, and send that information to the Engine Control Unit (ECU). The ECU then adjusts the car's performance based on this data. Sensors help ensure that your car runs efficiently and safely.
For example, my car had several malfunctioning sensors, including the oxygen sensor and the mass air flow (MAF) sensor. These sensors are crucial for proper engine management. When one of them malfunctions, it can lead to reduced performance, poor fuel economy, and even damage to other components. Understanding how these sensors work and how to diagnose them is key to resolving any issues quickly.

Lopez Auto Repair
1290 W Mound St, Columbus, OH 43223, USA
2. Common Symptoms of Malfunctioning Sensors
Before I started digging into the problem, I wanted to make sure I was dealing with a sensor malfunction and not something more serious. There are several telltale signs that a car sensor may be malfunctioning. I experienced a few of these symptoms myself:
2.1 The "Check Engine" Light Comes On
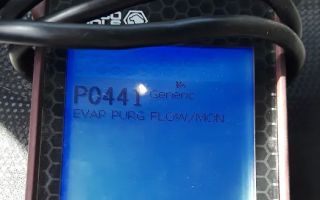
The first indication that something was wrong was the appearance of the "Check Engine" light on my dashboard. While this light can indicate a variety of issues, a malfunctioning sensor is often the culprit. When I scanned the code using an OBD-II scanner, the error codes pointed directly to the oxygen sensor and MAF sensor.
2.2 Poor Engine Performance
I also noticed that my car’s engine performance was inconsistent. Sometimes it would hesitate when I tried to accelerate, and at other times, it would struggle to maintain speed. Malfunctioning sensors can lead to improper air-fuel mixture, resulting in stuttering or jerky engine performance. If you notice your car struggling with acceleration or having a rough idle, it could be sensor-related.
2.3 Poor Fuel Economy
Another sign I noticed was a decrease in fuel efficiency. When the sensors aren’t working properly, the car can consume more fuel than usual. I saw my gas mileage drop significantly, which is often a sign of a faulty oxygen sensor or MAF sensor. These sensors directly affect how fuel is injected into the engine, and when they malfunction, they can cause the engine to burn more fuel.
3. Diagnosing Malfunctioning Sensors
Once I identified that a malfunctioning sensor was likely the issue, I needed to diagnose which sensors were involved. Here’s how I went about it:
3.1 Use an OBD-II Scanner
The first thing I did was hook up an OBD-II scanner to my car’s diagnostic port. This device reads the error codes stored in the car’s ECU. The codes that appeared on the scanner indicated problems with the oxygen sensor and MAF sensor. I was relieved that it wasn’t a more complex issue, but I knew that replacing the sensors was essential to getting my car back to optimal performance.
3.2 Visual Inspection of Sensors
After getting the error codes, I decided to visually inspect the sensors. I located both the oxygen sensor and MAF sensor in the engine bay. The MAF sensor was covered in dirt and grime, which could have affected its ability to properly measure the air intake. The oxygen sensor appeared old and worn, with some corrosion around the wiring. I knew it was time to replace both sensors.
4. How to Replace Malfunctioning Sensors
Now that I knew which sensors were malfunctioning, it was time to replace them. Replacing sensors can be a bit tricky, but with the right tools and patience, it’s a job that most car owners can tackle themselves. Here’s how I replaced the oxygen sensor and MAF sensor:
4.1 Gather the Necessary Tools and Parts
First, I gathered all the necessary tools: a socket set, pliers, gloves, a new oxygen sensor, and a new MAF sensor. I also made sure to get the right replacement parts for my car’s make and model. The oxygen sensor was easy to find at an auto parts store, but I had to double-check the specifications for the MAF sensor to ensure I got the correct part.
4.2 Replace the Oxygen Sensor
The oxygen sensor was located near the exhaust manifold. To remove it, I used a socket wrench to loosen the sensor from its mounting. Once the old sensor was removed, I installed the new one by screwing it into the mounting hole and tightening it securely. I then connected the wiring to the new sensor, making sure the connection was solid.
4.3 Replace the MAF Sensor
The MAF sensor was located near the air intake system. To replace it, I first disconnected the battery to avoid any electrical issues. Then, I used a screwdriver to remove the screws holding the sensor in place. After removing the old MAF sensor, I installed the new one and secured it with the screws. I reconnected the battery and made sure everything was tightly secured.
4.4 Clear the Error Codes
After replacing both sensors, I used the OBD-II scanner to clear the error codes from the car’s computer. Once the codes were cleared, I started the car to see if the "Check Engine" light would turn off. Fortunately, the light stayed off, and the car’s engine ran smoothly without hesitation or poor acceleration.
5. Final Steps and Testing the Repair
After replacing the malfunctioning sensors and clearing the codes, I took my car for a test drive. I monitored the engine’s performance and the fuel gauge to make sure everything was functioning correctly. The car accelerated smoothly, the idle was steady, and the fuel economy seemed to improve. I also double-checked for any signs of issues and didn’t notice any unusual behavior. The repair was a success!
6. Tips for Maintaining Your Sensors
To prevent future sensor issues, I’ve learned a few simple maintenance tips:
6.1 Regularly Clean Your MAF Sensor
I now make it a point to clean my MAF sensor every few months. This sensor can get dirty over time, and cleaning it helps prevent malfunction. I use a MAF sensor cleaner that’s safe for sensitive components like this one.
6.2 Replace Faulty Sensors Promptly
When sensors start malfunctioning, I address them immediately. Ignoring sensor issues can lead to poor engine performance and even more expensive repairs. Regularly checking and replacing sensors as needed can save you money in the long run.
Car repairs like replacing malfunctioning sensors may seem daunting, but they’re manageable with the right tools and knowledge. If you’re not comfortable doing it yourself, consider reaching out to a professional mechanic for help. And if you ever need reliable towing services, be sure to contact Rescue & Towing for the best assistance.