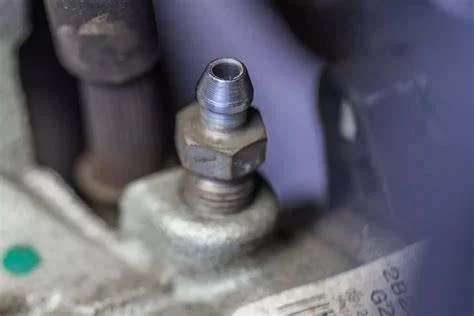
The Importance of Checking Your Brake Fluid Bleeder Screws Torque

Published on Oct 30, 2025
The Importance of Checking Your Brake Fluid Bleeder Screws Torque

1. Understanding Bleeder Screws and Their Role in Brake Systems

Your vehicle’s braking system is one of its most vital safety components, and bleeder screws play a crucial role in maintaining it. These small screws are located on each brake caliper or wheel cylinder, allowing air to be released from the brake lines when performing a brake bleed. Without proper bleeding, air bubbles can compress inside the brake fluid, leading to spongy brakes and reduced stopping power. Although they appear simple, bleeder screws are precision-engineered components that require correct torque to function properly.

Pick Your Part - Help Yourself
pick your part help yourself
Pick Your Part - Help Yourself

1232 Blinn Ave, Wilmington, CA 90744, USA

1.1 The Science Behind Brake Fluid Pressure

Brake systems rely on hydraulic pressure to transmit force from the pedal to the brake pads. Any air or leakage in this system weakens that pressure. A properly tightened bleeder screw seals the hydraulic circuit, maintaining the fluid integrity. Too loose, and fluid leaks out. Too tight, and the threads or caliper may crack, leading to costly repairs. Balancing this torque is key to safe braking performance.

Pick Your Part - Greer
lkq pick your part - greer greer sc
Pick Your Part - Greer

13054 E Wade Hampton Blvd, Greer, SC 29651, USA

1.2 Why DIY Mechanics Often Overlook Bleeder Screws

Many car owners and even novice mechanics underestimate the importance of bleeder screw torque. While oil changes and tire rotations get regular attention, small details like these screws often go unnoticed. Unfortunately, ignoring them can compromise the entire braking system. That’s why regular checks—especially after any brake service—are essential for maintaining safety and performance.

2. Why Torque Matters for Bleeder Screws

Every component in your car’s brake system is designed with a specific torque value. The bleeder screw is no exception. Applying the correct torque ensures an airtight seal without damaging the threads or caliper housing. The ideal torque for most bleeder screws ranges between 6–10 foot-pounds, depending on the vehicle and brake system type. Always refer to your car’s service manual for exact specifications.

2.1 The Risk of Under-Tightening

When a bleeder screw is too loose, it can allow brake fluid to leak out or air to enter the system. Even a small air bubble can cause uneven braking or complete brake failure under pressure. Drivers may notice a “soft” pedal feel, requiring more distance to stop. This is one of the most common yet preventable causes of brake inefficiency.

2.2 The Danger of Over-Tightening

On the other hand, over-tightening the screw can strip the threads, crack the caliper, or even cause the screw to seize. In extreme cases, the screw may break off inside the caliper, turning a simple bleed into a costly replacement job. Proper torque ensures reliability, extending both the lifespan of the component and your safety on the road.

3. Signs of Improper Torque and Potential Damage

If you suspect your brake fluid bleeder screws aren’t properly torqued, there are several warning signs to look for. The most obvious is a brake fluid leak near the caliper or drum. You might also notice your brake pedal feeling soft, spongy, or inconsistent. Additionally, uneven braking or vibration during deceleration can signal trapped air or fluid loss.

3.1 Visual and Performance Clues

During inspection, look for residue around the bleeder screw, which could indicate a slow leak. In severe cases, you may find corrosion or stripped threads. If you’ve recently bled your brakes and notice a change in performance, the torque may need adjusting. A professional mechanic—or a reliable service like Rescue & Towing—can inspect the issue and restore proper balance to your brake system.

3.2 The Long-Term Impact of Neglect

Ignoring these symptoms can lead to severe brake degradation. Leaking fluid lowers the system’s pressure and can contaminate brake pads, reducing friction. Over time, this not only affects stopping power but can also lead to complete hydraulic failure. Regular maintenance prevents such outcomes and ensures your car stays road-safe year-round.

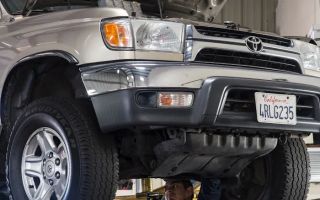
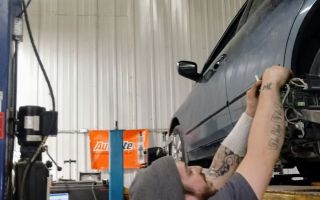
4. How to Check and Adjust Bleeder Screw Torque

Checking your bleeder screws is a relatively simple but critical maintenance task. To do it safely, you’ll need a torque wrench, a bleeder hose, and the appropriate service guide for your vehicle. Begin by ensuring the brake system is cool to avoid burns from hot components. Then, gently tighten the screw to the manufacturer’s specified torque—no more, no less.

4.1 Step-by-Step Brake Torque Procedure

1. Clean the area around the bleeder screw to remove dirt and debris.
2. Use the correct wrench size to prevent rounding the screw head.
3. Tighten using a calibrated torque wrench to the specified value.
4. Check for leaks by pressing the brake pedal and inspecting the screw area.
5. If needed, re-torque carefully, ensuring a snug fit without excessive force.

4.2 Recommended Tools and Best Practices

Invest in a high-quality torque wrench and brake bleeder kit for precise results. Many professionals use digital torque wrenches for accuracy. When performing the procedure, avoid contamination—always use clean brake fluid and equipment. For drivers who prefer professional service, Rescue & Towing offers expert brake inspections and maintenance solutions tailored to your vehicle’s needs.

5. Real-Life Cases: When Loose Bleeder Screws Lead to Brake Failure

There have been numerous real-world cases where improperly torqued bleeder screws led to brake failure. One notable incident involved a commuter whose brakes suddenly failed on a steep highway descent. Investigation revealed a slow leak from a loose bleeder screw that had gone unnoticed for weeks. Fortunately, quick thinking and downshifting prevented a major accident—but it served as a stark reminder of how small oversights can lead to life-threatening situations.

5.1 Lessons from Professional Mechanics

Professional auto technicians often emphasize that “tight is not always right.” Proper torque, not brute force, is the goal. A simple routine check during oil changes or tire rotations can catch these problems early. Many shops now include bleeder screw inspection as part of their safety checklist, ensuring every component functions as intended.

6. Maintenance Tips and Professional Advice

Consistent maintenance is key to preventing brake issues. Regularly check fluid levels, bleed brakes annually, and inspect bleeder screws every 6–12 months. Use high-quality brake fluid and components to avoid corrosion or premature wear. If you live in an area with harsh winters, salt exposure can accelerate rust around bleeder screws—routine cleaning and lubrication are essential.

6.1 Expert Recommendations from Rescue & Towing

At Rescue & Towing, we recommend checking bleeder screw torque anytime you perform brake maintenance or hear unusual noises during braking. Our experts stress the importance of preventive care rather than reactive repairs. With the right tools and regular inspections, you can extend the lifespan of your braking system and avoid costly emergencies.

7. Ensuring Long-Term Brake System Safety

Your car’s braking system is its most important safety mechanism. Taking time to check and maintain bleeder screw torque might seem minor, but it directly impacts your ability to stop safely and confidently. Small steps like these can prevent major failures down the road. Whether you’re a weekend DIYer or prefer professional service, make proper torque checks a regular part of your vehicle’s care routine—and trust the experts at Rescue & Towing to help keep your ride safe, smooth, and reliable every mile.

Auto Repair Shops Near Me

Recommended

Important Information You Should Know from Your Car's Owner Manual

Important Information You Should Know from Your Car's Owner Manual

Apr 29, 2026
How to Determine if Your Car Battery Needs Replacing – A Comprehensive Guide

How to Determine if Your Car Battery Needs Replacing – A Comprehensive Guide

Learn how to test your car battery and determine if it needs replacing. This guide covers the symptoms, tools, and steps you need to ensure your vehicle runs smoothly.How to Detect if Your Car Battery Needs ReplacingI’ve always believed that the reliability of your car depends not just on the engine but also on the often-overlooked battery. After all, if your car battery isn’t working properly, nothing else in the car can function, right? Whether it’s been months or years since you last thought about your car battery, it’s important to know how to test and determine if it needs replacing. I’ve gone through this process myself and, in this article, I’ll share what I’ve learned about car batteries, how to test their health, and how to replace them when necessary.1. Understanding the Role of a Car BatteryBefore diving into how to test your car battery, let’s first understand what exactly the battery does. A car battery is responsible for providing the electrical power needed to start your engine. It also powers your car’s electrical system when the engine is off. As you can imagine, the car battery is an essential component. When it starts to wear down, you’ll notice the effects immediately, with the car having difficulty starting or the electrical system malfunctioning.1.1 How Long Do Car Batteries Last?On average, a car battery lasts about three to five years, depending on the make and model of your car, your driving habits, and the climate you live in. However, several factors can influence the lifespan of a car battery. For example, extreme temperatures (either very hot or very cold) can shorten battery life. High temperatures tend to cause the battery’s fluid to evaporate, while freezing temperatures can make the battery work harder to start the car.2. Signs Your Car Battery Needs ReplacingWhen your car battery is nearing the end of its life, there are several signs you can look out for. I’ve had my fair share of dead batteries, and trust me, it’s always better to catch the symptoms early.2.1 The Car Struggles to StartOne of the first signs of a failing car battery is difficulty starting the car. If you turn the key and the engine cranks slowly, or if the car takes longer than usual to start, it could be a sign that your battery is losing power. This is often caused by corrosion on the battery terminals, weakening the connection, or the battery simply not holding a charge.2.2 The Dashboard Lights Are DimAnother sign of a weak battery is dim dashboard lights. If your headlights or interior lights are dimming or flickering, especially when you press on the brakes or rev the engine, the battery may not be able to provide enough power for the electrical systems in the car.2.3 The Battery Warning Light AppearsMost modern cars are equipped with a battery warning light on the dashboard. If this light turns on, it’s a direct indication that something is wrong with your car’s electrical system. While it doesn’t always mean your battery needs replacing, it’s often a warning that your alternator or battery is malfunctioning.2.4 The Battery Smells or LeaksIf you notice a strange smell coming from the battery area or if there’s any leakage, it’s time to pay attention. A leaking or swollen battery can be a sign that it’s overcharging or deteriorating. I’ve experienced this once, and I couldn’t ignore the smell of rotten eggs coming from the engine bay. It’s a clear indication that the battery is no longer safe to use.3. How to Test Your Car BatteryIf you suspect that your battery might need to be replaced, the next step is to test its voltage. You can take your car to a mechanic, but there are also ways you can test the battery yourself, saving both time and money.3.1 Using a MultimeterA multimeter is a tool that measures the voltage of your car battery. To use it, you simply connect the positive (red) probe to the positive terminal on the battery and the negative (black) probe to the negative terminal. A healthy, fully charged car battery should read between 12.4 and 12.7 volts. If the reading is lower than 12.4 volts, it may indicate that the battery is weak or has been overused.3.2 Load TestingFor a more accurate assessment, a load test is an effective way to determine whether the battery can hold a charge under stress. This test is often best done at a repair shop, but you can also purchase a load tester to do it yourself. The load test applies a simulated load to the battery to see how it reacts. If the battery’s voltage drops significantly during the test, it’s time to replace it.3.3 Check the Battery’s AgeMost car batteries have a label indicating the manufacturing date. If your battery is approaching the three-year mark or older, it’s worth keeping an eye on its performance. Even if the battery isn’t showing signs of failure yet, it’s good practice to start considering a replacement around this time.4. Replacing the BatteryIf your tests show that the battery is no longer functioning properly, it’s time to replace it. While I’ve done it myself in the past, I always recommend making sure you buy a high-quality battery that matches your car’s specifications.4.1 Choose the Right BatteryWhen purchasing a new battery, it’s important to select one that matches your car’s make, model, and engine size. Not all batteries are created equal, so be sure to check the specifications in your owner’s manual. A reputable battery retailer will help you find the right match.4.2 Install the New BatteryReplacing a car battery isn’t as hard as it seems, but it’s essential to follow safety precautions. Always wear gloves and safety glasses. When removing the old battery, start with the negative terminal to avoid short-circuiting. Install the new battery in the reverse order: positive terminal first, followed by the negative.4.3 Dispose of the Old BatteryRemember to dispose of your old battery properly. Many auto parts stores and service centers will take your old battery for recycling when you purchase a new one.5. When to Seek Professional HelpIf you’re unsure about testing or replacing your battery yourself, or if your car continues to have issues despite a new battery, it’s time to seek professional assistance. A certified mechanic will be able to assess the problem thoroughly, checking both the battery and the alternator.If you’re in need of roadside assistance or a battery jump-start, consider visiting services like Rescue & Towing, which can provide quick and reliable help when you need it most.

Apr 29, 2026
Addressing Vehicle Exhaust Emissions: Causes, Impact, and Solutions for a Greener Future

Addressing Vehicle Exhaust Emissions: Causes, Impact, and Solutions for a Greener Future

Learn about the causes and impacts of vehicle exhaust emissions and how to address them. This guide provides tips for reducing emissions and contributing to environmental protection.

Apr 28, 2026
How to Fix Poor Car A/C Performance: Troubleshooting and Solutions

How to Fix Poor Car A/C Performance: Troubleshooting and Solutions

Discover how to diagnose and fix common car air conditioning issues like low refrigerant, clogged filters, and A/C leaks. Learn how to keep your car's A/C running smoothly with practical tips and step-by-step solutions.

Apr 27, 2026
How to Eliminate Car Odors Effectively

How to Eliminate Car Odors Effectively

Learn the best methods to eliminate car odors and freshen your vehicle. Discover tips and tricks for removing unwanted smells from your car and keeping it fresh.How to Eliminate Car Odors EffectivelyOver the years, I’ve spent a fair amount of time inside my car—driving to work, running errands, or taking long road trips. And if there’s one thing I can tell you from experience, it’s that a car can start to develop some pretty unpleasant odors. Whether it’s the lingering smell of fast food, the musty scent of wet clothes after a rainy day, or even the overpowering smell of smoke or pets, car odors can be a major problem. So, how do you get rid of them effectively? In this article, I’ll share everything I’ve learned about eliminating car odors and keeping my vehicle smelling fresh.1. Identifying the Source of the OdorBefore you can start tackling any odor in your car, the first step is figuring out what’s causing it. Over time, I’ve learned that many smells are actually a result of common substances or situations. Here are some of the usual suspects: Food and Drink Spills: If you’ve spilled something in your car (even if it was just a small amount of coffee or crumbs), it can create a breeding ground for bacteria and mold, which lead to musty smells. Moisture and Mold: Damp carpets, wet clothing, or even a leaky window can introduce moisture into your car, creating the perfect environment for mold and mildew to grow. Pets: If you’ve transported pets in your car, their odors can easily linger in the upholstery, carpets, and air vents. Smoke: If you’re a smoker or have previously smoked in the car, the smell can become deeply embedded in the fabric and upholstery.Knowing the source of the odor will help you target your cleaning efforts more effectively. Once you’ve identified the source, it’s time to take action.2. Cleaning and Deodorizing Your Car’s InteriorCleaning your car’s interior thoroughly is one of the most effective ways to eliminate odors. Here's how I go about it:Step 1: Vacuum the Entire InteriorIt may sound simple, but vacuuming is an essential first step. Use a handheld vacuum or a hose attachment to clean every crevice—seats, floor mats, and even the upholstery. Pay extra attention to hidden spots like under the seats and between the cushions. Vacuuming not only removes dirt and debris, but it also picks up odor-causing particles like food crumbs, pet hair, and dust. I’ve found that a good vacuuming session can make a noticeable difference in reducing odors.Step 2: Shampoo and Deep Clean the UpholsteryIf the odor is embedded in the fabric or leather upholstery, it’s time to shampoo or deep clean the seats. You can use an upholstery cleaner or a leather cleaner, depending on the material. I’ve used both types of cleaners with good results, and it’s best to work in small sections to ensure the product is applied evenly. If you’re dealing with stubborn pet odors or smoke smells, a deep cleaning will help break down the odor-causing compounds in the fabric.Step 3: Clean the Floor Mats and CarpetsFloor mats and carpets are often the culprits when it comes to lingering odors. I take mine out of the car and shake them thoroughly to get rid of loose dirt, then wash them with soapy water or a specialized carpet cleaner. For deep stains or odors, I recommend using an enzymatic cleaner, which breaks down organic molecules that cause smells. Make sure the mats and carpets are fully dry before putting them back in the car to avoid mold buildup.3. Using Natural Odor EliminatorsIf cleaning alone isn’t enough, natural odor eliminators can be very effective. Here are a few tricks I’ve used to freshen up my car without resorting to chemical air fresheners:Step 1: Baking SodaBaking soda is one of the best natural deodorants around. I sprinkle some on the carpets and seats and let it sit for a few hours, or even overnight. Then, I vacuum it up, and it helps absorb any lingering smells. I’ve found this to be especially useful for pet odors and musty smells.Step 2: Activated CharcoalActivated charcoal is another great option for absorbing odors. I place small bags of activated charcoal under the seats and in the trunk. The charcoal absorbs moisture and neutralizes odors without masking them. It’s a simple and effective solution that has worked wonders for me in keeping my car smelling fresh.Step 3: White VinegarWhite vinegar is a natural disinfectant that can help eliminate odors. I mix a solution of equal parts vinegar and water in a spray bottle and lightly mist the interior surfaces. I let it sit for a few minutes before wiping it down with a clean cloth. The vinegar smell will dissipate, taking unwanted odors with it.4. Using Commercial Products and Air FreshenersSometimes, natural methods just aren’t enough to tackle really stubborn odors, and that’s when I turn to commercial products. There are plenty of options available, from air fresheners to odor-eliminating sprays. One of my favorite products is an ozone generator, which neutralizes odors by breaking down the odor molecules. This is especially effective for persistent smells like smoke or mold.Another popular option is an aerosol air freshener designed specifically for car interiors. These products come in a wide range of scents, from floral to clean linen, and they can provide a quick solution if you’re in a hurry. However, I always make sure to choose a product that neutralizes odors rather than just covering them up, as this provides a longer-lasting effect.5. Preventing Future OdorsOnce your car is odor-free, you’ll want to maintain that fresh scent. Here are some steps I’ve taken to prevent odors from returning: Regular Cleaning: I make it a habit to clean my car regularly, vacuuming the interior and wiping down surfaces every couple of weeks. Avoid Eating in the Car: I’ve learned that food crumbs and spills are the number one source of persistent smells. Whenever possible, I try to avoid eating or drinking in the car. Use a Dehumidifier: If you live in a humid area, a small dehumidifier can help reduce moisture inside your car, preventing mold and mildew from developing. Use a Quality Car Cover: If your car is parked outdoors, a breathable car cover can help protect it from environmental factors that contribute to odors.Eliminating car odors isn’t a one-time fix, but by keeping up with regular cleaning and using these tricks, I’ve been able to maintain a fresh-smelling car for much longer. If you’re still struggling with odors despite your efforts, it may be time to consult a professional or even visit a service like Rescue & Towing for advice on deeper cleaning solutions.

Apr 26, 2026
How to Avoid Using Your Phone While Driving: Tips and Safety Strategies

How to Avoid Using Your Phone While Driving: Tips and Safety Strategies

Discover effective tips and strategies to avoid using your phone while driving. Learn how to stay focused, prevent distractions, and drive safely for your own and others’ well-being.How to Avoid Using Your Phone While Driving: Tips and Safety StrategiesIt’s no secret that using a phone while driving can be incredibly dangerous. We’ve all seen it – the driver next to us swerving a bit, eyes glued to the screen, or even texting at a stoplight. But what happens when we, ourselves, find it hard to resist the temptation? I’ve been there – reaching for my phone just to check a quick message or make a call while driving. It's something I had to change, not only for my own safety but for the safety of everyone on the road. Here’s how I managed to break the habit and stay focused while driving.1. Understanding the Dangers of Using a Phone While DrivingThe first step to avoiding phone use while driving is truly understanding the risks involved. We’ve all heard about distracted driving and how dangerous it is, but it wasn’t until I really thought about the consequences that I realized how serious the situation could be. Distracted driving isn’t just about texting or talking; it encompasses anything that takes your eyes off the road or your hands off the wheel. The National Highway Traffic Safety Administration (NHTSA) reports that in 2019, 3,142 people were killed due to distracted driving. This includes everything from texting, scrolling through social media, to even taking a call. The most alarming part? It only takes a few seconds for something catastrophic to happen. A momentary lapse in concentration could result in an accident that changes lives forever.When I started thinking about this, it really hit home. That quick glance at a text or scrolling through notifications seemed harmless, but in those few seconds, I could miss a red light, a pedestrian crossing, or even another car suddenly stopping in front of me. That’s when I realized that staying focused was not just a suggestion – it was a necessity. I needed to make changes to how I approached driving.2. Setting Boundaries: Turning Off NotificationsThe first thing I did was set boundaries by turning off notifications. I knew that the moment my phone buzzed, I would be tempted to check it. And while I wasn’t necessarily checking my phone for anything urgent, the feeling of having to respond quickly became overwhelming. So, I went into my phone settings and turned off non-essential notifications. I started with social media apps and messaging platforms. Instead of constantly hearing the ping of a new message or seeing an alert for a new post, I set my phone to "Do Not Disturb" while driving. This simple action made a huge difference. Now, my phone wasn’t constantly calling for my attention.By limiting the interruptions, I was able to stay more present and focused on the road. There’s a surprising amount of freedom in knowing that I wasn’t missing out on anything, and the weight of “checking” was lifted. If it’s something important, people can wait. I also found that by being disciplined with this, I started to appreciate the quietness in the car. It became my time to think, focus, or just enjoy the drive without distractions.3. Using Technology to Help: Hands-Free FeaturesAnother strategy I employed was utilizing the hands-free features in my car. Modern cars come equipped with Bluetooth systems, which allow me to connect my phone to the car and make calls or send texts without touching my phone. At first, I was hesitant about using this feature, thinking it would still be distracting. But once I started using it, I quickly realized that it allowed me to communicate without needing to glance down at my phone. I could keep my hands on the wheel and my eyes on the road while still staying connected.For example, I used voice commands to send messages while driving. If I needed to make a call, I would ask my car’s system to dial the number for me, or even ask for directions to avoid looking at my phone screen. The key here is that my attention remained on driving, while the phone became a tool that didn’t interfere with my focus. If your car doesn’t have Bluetooth, consider using a hands-free device like a Bluetooth headset or an aftermarket car kit. These options make it much easier to avoid using your phone directly.4. Creating a Phone-Free Zone in the CarAnother tactic I used to prevent myself from reaching for my phone was creating a phone-free zone in my car. It’s easy to let the phone sit next to you, calling to you as you drive. So, I took a proactive approach by placing my phone in the glove compartment or the back seat. If the phone was out of reach, it was much easier to ignore. I also made sure that I didn’t leave it on the passenger seat or put it in a cup holder where I could easily grab it. Creating this physical barrier made it more difficult to fall into old habits.This was especially helpful during longer drives, where the temptation to check messages or scroll through social media is higher. By keeping my phone out of sight, I removed the temptation entirely. It’s a small step that requires a bit of planning, but it’s one of the most effective ways to stay focused on the road.5. Prioritizing Safety Over ConvenienceOne of the biggest shifts I had to make was prioritizing safety over convenience. It can be tempting to grab your phone when you’re sitting at a stoplight or when the road is clear, thinking “I’ll just check this quickly.” But when I realized how often I engaged in this behavior, it started to feel reckless. It was as if I was gambling with my safety. Taking those few seconds to look at a phone screen could result in losing attention at a crucial moment.Instead of seeing my phone as something that needed constant attention, I started seeing it as a tool for emergencies only. If I needed to check something, I would wait until I was parked safely. This mindset shift made all the difference in my driving habits. I became more conscious of the fact that driving is a responsibility, not a time to multitask. When I did need to check something important, I would pull over safely before doing so.6. Encouraging Others to Do the SameChanging my driving habits wasn’t just about me. It was also about encouraging my friends and family to follow the same rules. I realized that a big part of breaking the habit was making it a collective effort. I began talking to my loved ones about the dangers of using phones while driving and encouraged them to follow the same steps I took. If we were driving together, I would make sure that no one was distracted by their phone and ask others to help me stay focused as well.This collective effort created a support system. Having someone remind you to stay focused or to set their phone aside made it easier to stay disciplined. Plus, it made the entire experience feel like a shared commitment to safer driving habits, which was incredibly empowering.7. Knowing When to Seek HelpThere are times when distractions are inevitable, especially when there’s an emergency. If you find yourself in a situation where you need help or your car breaks down, it’s important to have the right resources available. For example, if you ever need assistance with towing, I highly recommend using reliable services like Rescue & Towing. They offer fast, dependable support for all kinds of roadside issues, ensuring you’re never alone when things go wrong. Having access to professional help gives peace of mind that you won’t have to worry about your phone while driving. The best thing to do is to pull over and reach out to professionals who can help you in a safe and controlled environment.In the end, avoiding phone use while driving isn’t just a matter of following the law – it’s about ensuring the safety and well-being of everyone on the road. By setting boundaries, using technology to help, and making the decision to prioritize safety, I found that it became easier and easier to stay focused on the task at hand. Every time I drive now, I feel more confident knowing I’ve taken the necessary steps to drive safely and responsibly.

Apr 25, 2026