1. Introduction to Fuel Pump Replacement
Replacing a car's fuel pump can seem like an intimidating task, especially for those who aren't familiar with car repairs. However, with the right tools, a little patience, and some know-how, it’s a repair that many car owners can handle on their own. I remember the first time I had to replace my car’s fuel pump. I had been driving my old sedan for a few years when one day it suddenly stalled on the freeway. After a quick diagnosis, I realized the fuel pump was the culprit.
Fuel pumps are essential components in the fuel system, responsible for delivering fuel from the tank to the engine. When the fuel pump fails, your car may experience issues like stalling, difficulty starting, or a noticeable lack of power. As a DIY enthusiast, I decided to tackle the replacement myself to save on repair costs and learn more about my car. This article will walk you through the steps to replace your car’s fuel pump, along with helpful tips and insights I’ve learned along the way.

Fuel 4
720 Tonnelle Ave, Jersey City, NJ 07307, USA
2. Signs That Your Fuel Pump Needs Replacement
Before diving into the replacement process, it's important to identify whether your fuel pump truly needs replacing. Over the years, I’ve learned to spot the signs of a failing fuel pump, which helped me diagnose the problem in my own car. Some common indicators of a faulty fuel pump include:
- Car stalls or has difficulty starting: If your car suddenly stalls while driving or struggles to start, it could be a sign of a failing fuel pump.
- Loss of power: A malfunctioning fuel pump can lead to a noticeable loss of power while driving, especially when accelerating.
- Whining noise from the fuel tank: If you hear a high-pitched whining sound coming from the fuel tank, it’s an indication that the pump is struggling to move fuel.
- Fuel gauge malfunctions: A faulty fuel pump may cause erratic readings on your fuel gauge, even when there’s enough fuel in the tank.
If you're experiencing any of these issues, it's worth checking the fuel pump to see if it needs replacing. In my case, once I replaced the fuel pump, the stalling and hard-starting issues were completely resolved, and my car was back to running smoothly.

Pick Your Part - Help Yourself
1232 Blinn Ave, Wilmington, CA 90744, USA
3. Tools and Equipment You'll Need
3.1. Safety Gear
Before starting any repair, it's important to ensure your safety. Replacing a fuel pump involves working with gasoline, which can be hazardous. When I replaced my fuel pump, I made sure to wear gloves and protective eyewear to avoid any accidental spills or debris getting into my eyes. Always work in a well-ventilated area, preferably with the garage door open or outside.
3.2. Tools Required
Here's a list of the essential tools you’ll need to replace your car’s fuel pump:
- Socket set: A complete socket set will help you remove bolts and screws around the fuel tank.
- Jack and jack stands: To safely lift the car and access the fuel tank, you’ll need a jack and jack stands.
- Fuel line disconnect tool: This tool will help you disconnect the fuel lines from the pump without damaging them.
- Wrenches: Some cars may require wrenches for specific fasteners.
- Replacement fuel pump: Ensure that you have the correct replacement pump that matches your car's make and model.
Make sure to check your car’s manual for any specific tools required, as certain models may have unique parts or features that require special tools.
4. Step-by-Step Guide to Replacing Your Fuel Pump
4.1. Step 1: Relieve Fuel System Pressure
The first step I took when replacing my fuel pump was to relieve the fuel system pressure. This is essential to avoid fuel spraying when you disconnect the fuel lines. To do this, I located the fuel pump relay or fuse and removed it. Then, I started the car and let it run until the engine stalled. This emptied the fuel system and relieved the pressure.
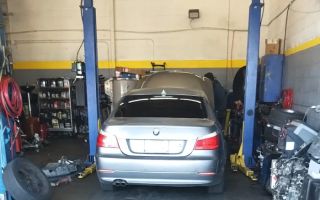
4.2. Step 2: Lift the Vehicle and Remove the Fuel Tank
Once the fuel system pressure was relieved, I used a jack to lift the car and placed it on jack stands for stability. Depending on your car’s design, you may need to remove the rear seat or access panels to reach the fuel tank. In my case, I had to remove a few screws and bolts that were holding the fuel tank in place. This took some time, but it was necessary to gain access to the fuel pump.
4.3. Step 3: Disconnect Fuel Lines and Electrical Connections
After securing the vehicle and removing the tank, I carefully disconnected the fuel lines from the pump. This required using a fuel line disconnect tool to prevent damage. Next, I unplugged the electrical connector from the fuel pump. Be sure to note where the connections go, as this will make reassembly easier once the new pump is in place.
4.4. Step 4: Remove the Old Fuel Pump
At this point, I removed the old fuel pump from its housing by unscrewing any retaining bolts or clips. In my case, the fuel pump was attached to the top of the fuel tank, so I carefully lifted it out, ensuring I didn’t spill any remaining fuel. It’s important to handle the old fuel pump gently and dispose of it properly.
4.5. Step 5: Install the New Fuel Pump
With the old pump removed, I placed the new fuel pump into the fuel tank, aligning it carefully with the housing. I reattached the retaining bolts and clips to secure it in place. After installing the new pump, I reconnected the fuel lines and electrical connections, making sure they were properly secured.
4.6. Step 6: Reassemble and Test
Once everything was reassembled, I carefully lowered the fuel tank back into place and secured it with the necessary bolts. After reconnecting the battery, I started the car to check for any leaks or issues. I was relieved to hear the engine start smoothly, and after a few minutes of running, I confirmed that the new fuel pump was working perfectly.
5. Common Issues During Fuel Pump Replacement
While replacing your fuel pump is relatively straightforward, there are a few common issues that can arise during the process. One of the challenges I encountered was dealing with stubborn fuel lines that were difficult to disconnect. I solved this by gently using the disconnect tool and ensuring I wasn’t applying too much force, as this could damage the fuel line fittings.
Another issue that can occur is misalignment of the new fuel pump. It’s crucial to make sure the new pump sits properly in the tank and is securely fastened. If it’s not installed correctly, it can lead to improper fuel flow or leaks, which could cause further damage to your car’s fuel system.
6. Conclusion: Enjoy a Smooth Ride with a New Fuel Pump
Replacing your car’s fuel pump may seem daunting, but with the right tools and a bit of patience, it’s a repair that can be completed in just a few hours. The key is to be methodical and take your time with each step, ensuring you don’t rush through any of the critical parts. After I replaced my fuel pump, I noticed an immediate improvement in my car’s performance. The stalling stopped, and I was back on the road, confident that I had completed the repair myself.
For anyone looking to save money on repair costs or simply enjoy the satisfaction of DIY auto repair, replacing the fuel pump is a great project. With a little preparation, you can tackle this job yourself and enjoy a smooth, uninterrupted ride once again.