Replacing a Faulty Oxygen Sensor: My DIY Journey and What You Need to Know
Last year, I had an issue with my car that I thought would require a costly trip to the mechanic. The “check engine” light came on, and my car’s performance seemed to suffer. It was stalling more frequently, and I noticed a drop in fuel efficiency. After some research, I learned that a faulty oxygen sensor could be the culprit. Replacing it myself saved me a lot of money, and I want to share my experience and insights on how you can do it too. If you’re dealing with a similar issue, replacing the oxygen sensor could be an effective solution, and I’ll guide you through the process step by step.

Sam's Club Tire & Battery
3600 O'Neill Dr, Jackson, MI 49202, USA
1. Understanding the Role of an Oxygen Sensor
Before diving into the process, let’s take a moment to understand the function of an oxygen sensor. The oxygen sensor in your vehicle measures the level of oxygen in the exhaust gases as they exit the engine. It sends this data to the engine control unit (ECU) to adjust the air-to-fuel ratio, which ensures that your engine runs efficiently and reduces harmful emissions.
When the oxygen sensor becomes faulty, it can send incorrect data to the ECU, causing the engine to run too rich (excess fuel) or too lean (insufficient fuel). This can lead to poor fuel economy, increased emissions, and engine performance issues. Replacing the oxygen sensor, while a bit of a challenge, is usually straightforward and can be done at home with some basic tools and patience.

Firestone Complete Auto Care
200 S California St, Ventura, CA 93001, USA
2. Symptoms of a Faulty Oxygen Sensor
Before I tackled replacing the oxygen sensor, I made sure that the sensor was actually the source of the problem. Here are some common signs that indicate your oxygen sensor may be faulty:
- Check engine light: This is the most obvious sign. If the sensor detects an issue, it will trigger the check engine light.
- Decreased fuel efficiency: A malfunctioning sensor can cause the engine to burn more fuel than necessary.
- Rough idling or stalling: If the engine is getting improper readings, it may cause irregular idling or difficulty starting the engine.
- Increased emissions: A faulty sensor can lead to increased emissions, which may cause your car to fail an emissions test.
These symptoms pointed to a faulty oxygen sensor in my case, so I decided to replace it myself rather than paying for an expensive mechanic visit. If you're experiencing any of these symptoms, it's worth investigating the oxygen sensor first before moving on to other potential issues.
3. Gathering the Necessary Tools and Parts
To replace an oxygen sensor, you don’t need a lot of fancy tools, but there are a few essentials that will make the job easier. Here’s what you’ll need:
- Replacement oxygen sensor: Make sure to buy the correct part for your vehicle’s make and model. I found my replacement sensor online by searching for the specific part number from the manufacturer.
- Oxygen sensor socket: This specialized socket has a slit on the side to accommodate the wire and makes the removal process easier.
- Ratchet wrench: You’ll need this to remove the old sensor and install the new one.
- Anti-seize compound: This is used on the threads of the new sensor to ensure it can be removed more easily in the future.
- Gloves and safety goggles: As with any auto repair, make sure to wear gloves and goggles to protect your hands and eyes.
Once you have everything, you’ll be ready to replace the oxygen sensor. It’s always a good idea to refer to your vehicle’s manual or online guides specific to your make and model, as the process can vary slightly between different cars.
4. Step-by-Step Guide to Replacing the Oxygen Sensor
Here’s the step-by-step process I followed when replacing my oxygen sensor. While the steps can vary depending on the car, this guide should give you a solid foundation:
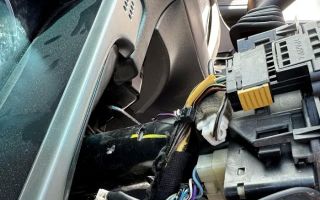
- Step 1: Locate the oxygen sensor: Most vehicles have two oxygen sensors—one before the catalytic converter (upstream) and one after it (downstream). The upstream sensor is usually the one that affects engine performance. Consult your vehicle manual to determine which sensor you need to replace.
- Step 2: Disconnect the car battery: To avoid any electrical issues, disconnect the car battery before starting any work.
- Step 3: Locate the sensor wiring: Trace the sensor’s wiring and disconnect the electrical connector. Be gentle when removing it to avoid damaging the connector or wire.
- Step 4: Remove the old sensor: Using your oxygen sensor socket and ratchet wrench, remove the faulty sensor by turning it counterclockwise. It might take a bit of force, especially if the sensor has been in place for a while, but be patient.
- Step 5: Apply anti-seize compound: Before installing the new sensor, apply a small amount of anti-seize compound to the threads. This will help prevent it from getting stuck in the future.
- Step 6: Install the new sensor: Screw the new oxygen sensor into place and tighten it using the ratchet wrench. Don’t overtighten it; just ensure it’s snug.
- Step 7: Reconnect the wiring: Plug the electrical connector back into the sensor. Make sure it’s securely connected and not loose.
- Step 8: Reconnect the battery and test the vehicle: Once everything is back in place, reconnect the car battery. Start your vehicle and monitor the dashboard for any warning lights. If the oxygen sensor is installed correctly, the check engine light should turn off.
Replacing the sensor took me about 30 minutes, and I was surprised at how easy it was. Once done, I noticed a significant improvement in my car’s performance, and the check engine light was off.
5. When to Seek Professional Help
While replacing an oxygen sensor is a straightforward DIY repair, there are times when it might be better to seek professional help. If you're unsure about any step or if your car has multiple sensors that need replacing, it’s always a good idea to consult with a mechanic. Additionally, if the issue persists after replacing the sensor, there could be an underlying problem, such as an issue with the catalytic converter or the wiring.
In my case, I was lucky enough to handle it on my own, but I’ve learned that it’s always best to consult a professional when in doubt. If you’re not comfortable working under the car or handling the parts, don’t hesitate to take it to a trusted mechanic.