How to Repair a Punctured Tire with a Tire Plug: A Step-by-Step Guide
Let’s face it: getting a punctured tire is never a pleasant experience. Whether you're in the middle of a long road trip or just heading out for a quick errand, having a flat tire can quickly turn your plans upside down. I’ve been there, and I know the frustration of realizing you have a nail or sharp object lodged in your tire. The good news is that fixing a punctured tire with a tire plug is relatively simple, and with the right tools, you can do it yourself. In this guide, I’ll walk you through the process of repairing a punctured tire using a tire plug, share some personal experiences, and give you some helpful tips to make sure you’re prepared next time you're caught off guard by a flat tire.

MR. TIRE INC.
2078 New York Ave, Huntington Station, NY 11746, USA
1. Understanding the Basics of Tire Punctures and Tire Plug Repairs
Before we dive into the actual process of plugging a tire, let’s first talk about tire punctures. A punctured tire occurs when an object, such as a nail, screw, or glass, penetrates the rubber surface of the tire, causing air to escape. When this happens, your tire pressure drops, and if not addressed, it can lead to further tire damage or even blowouts.
As I found out during my own experience, tire punctures are quite common, especially for those of us who spend a lot of time on the road. The most critical thing to remember is that a tire plug repair is suitable for small punctures in the tread area, usually no larger than 1/4 inch. If the puncture is on the sidewall or if there is significant damage to the tire, it’s best to replace the tire entirely or get professional help.
MR. TIRE INC.
2078 New York Ave, Huntington Station, NY 11746, USA
2. Why Use a Tire Plug? Is It a Reliable Solution?
Now, you might be wondering: why a tire plug? The reason is simple: tire plugs are an effective, quick, and affordable way to repair minor punctures in a tire. They’re particularly useful if you’re in a pinch and need to get back on the road quickly without waiting for professional assistance or calling for a tow. I’ll admit, when I first had to plug a tire, I was skeptical about how long the repair would last. However, after doing it a few times, I can confidently say that with the right technique, tire plugs can be very reliable and can last for the life of the tire (assuming no further damage occurs). It’s also a great short-term fix until you can replace or professionally repair the tire.
From my personal experience, tire plugs saved me on more than one occasion. The first time I used a tire plug was during a road trip through the mountains. I had picked up a nail in my tire, and I didn’t have a spare with me. I used a plug kit to repair the tire, and it lasted until I could get to a mechanic. That experience showed me that when done right, tire plugs are more than just a quick fix—they can be a long-term solution for minor punctures.
3. Tools You’ll Need to Repair a Punctured Tire with a Tire Plug
To repair a punctured tire with a tire plug, you’ll need a few essential tools. Most tire plug kits come with everything you need, but it’s always a good idea to double-check. Here’s a list of what you’ll need to get started:
- Tire Plug Kit: This kit typically includes rubber plugs, a reamer tool, a plug insertion tool, and a rubber cement (optional). I’ve used several kits, and they all work pretty much the same.
- Air Compressor or Tire Inflator: After you’ve plugged the tire, you’ll need to inflate it to the correct pressure. I always make sure I have a small portable air compressor in my trunk for situations like this.
- Gloves: You’ll be working with a potentially dirty tire, so gloves are a must to keep your hands clean and protected.
- Water or Soapy Solution: This is for checking if the tire is holding air properly after the repair. I recommend using soapy water, as it’s an easy way to spot any leaks.
- Jack and Lug Wrench (if you need to remove the tire): In some cases, you might need to remove the tire to make the repair, so it’s good to have a jack and lug wrench handy.
On a couple of occasions, I found myself needing to repair a tire in remote areas without all the tools on hand. But after having a tire plug kit stored in my car, I felt much more prepared to handle such emergencies.
4. Step-by-Step Guide to Repairing a Punctured Tire with a Tire Plug
Now that you’ve got the tools, it’s time to get to work. Here’s a detailed, step-by-step guide on how to repair a punctured tire using a tire plug:
Step 1: Find the Puncture
The first thing you’ll want to do is locate the puncture. It’s essential to make sure the hole is in the tread area and not the sidewall. If the puncture is on the sidewall, you should not attempt a plug repair and should get professional help. Once you’ve found the puncture, mark it so you know exactly where to focus your efforts.
In my case, I once had a puncture that was barely visible on the surface. After inflating the tire slightly, I sprayed it with soapy water to identify the small bubbles emerging from the hole. This helped me pinpoint the exact location of the puncture. If you don’t have soapy water, a regular spray bottle with water will suffice.
Step 2: Remove the Object Causing the Puncture
If there’s a nail, screw, or other sharp object stuck in the tire, carefully remove it with pliers or a similar tool. Be cautious—removing the object will cause air to escape, so it’s important to work quickly. I’ve learned that having a set of pliers in my emergency kit can save me time when dealing with punctures.
Step 3: Ream the Hole
Take the reamer tool from your tire plug kit and insert it into the puncture. Twist it back and forth to clean and widen the hole. This will make it easier to insert the tire plug. Don’t rush this step—it’s important to ensure the hole is properly prepared for the plug to be inserted. I’ve found that a clean hole ensures the plug fits snugly and creates a better seal.
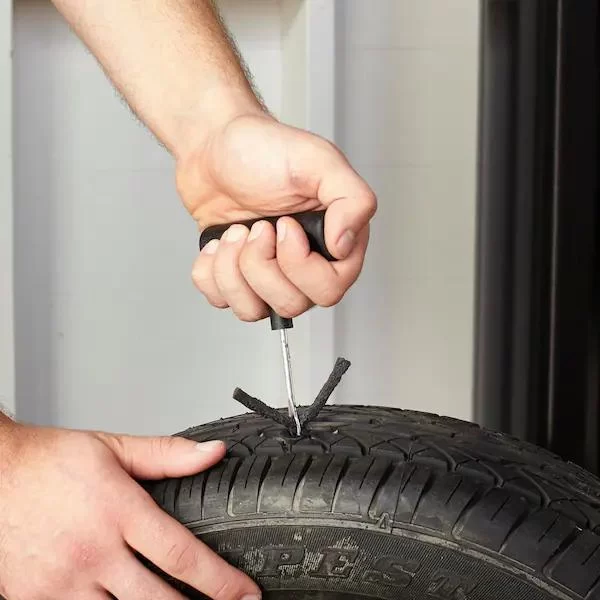
Step 4: Insert the Tire Plug
Now it’s time to insert the plug. Take one of the rubber plugs from the kit and insert it into the plug insertion tool. Gently push the plug into the puncture hole until about half of it is inside the tire. Once the plug is in place, slowly pull the insertion tool out, leaving the plug behind. I’ve found that pulling the tool out slowly and steadily prevents the plug from being pulled out along with it.
Step 5: Trim the Excess Plug
Use a sharp knife or scissors to trim off any excess plug that’s sticking out of the tire. Be careful not to cut too close to the surface of the tire. I always leave a small bit of the plug protruding, just to ensure the plug stays securely in place.
Step 6: Inflate the Tire
Once the plug is in place and trimmed, inflate the tire to the manufacturer’s recommended pressure. This is where having an air compressor comes in handy. Don’t forget to double-check the pressure to make sure it’s accurate.
Step 7: Check for Leaks
Finally, spray soapy water around the repair area and look for any bubbles. If there are no bubbles, your repair is good to go! If bubbles appear, you may need to reinsert the plug or clean out the hole a bit more. I’ve had to redo repairs a couple of times when I missed a small leak, so it’s always a good idea to check thoroughly.
5. When to Seek Professional Help
While plugging a tire can be a reliable solution for small punctures, there are times when it’s best to seek professional help. If the puncture is large, located on the sidewall, or if the tire shows signs of other damage, it’s time to consult a mechanic. In those cases, I always recommend getting a professional inspection to avoid the risk of driving on a compromised tire.
If you’re in need of immediate help, don’t hesitate to contact a towing or roadside assistance service like Rescue & Towing. They offer quick, efficient services, including tire repairs, to get you back on the road safely.