- #understanding-vinyl-seat-scratches - common-causes - why-cleaning-matters
- #preparation-and-tools - cleaning-supplies - safety-tips-before-starting
- #step-by-step-cleaning-process - removing-dirt - buffing-and-repairing-scratches
- #deep-repair-techniques - filler-application - color-restoration
- #maintenance-tips - keeping-vinyl-seats-clean - preventing-future-damage
- #real-driver-stories - restoration-success - lessons-learned
- #rescue-and-towing-support - expert-advice - professional-upholstery-help
1. Understanding Vinyl Seat Scratches
1.1 Common causes of scratches on vinyl seats
Vinyl seats are known for their durability, but they’re not indestructible. Over time, sharp objects like keys, zippers, pet claws, or even jeans’ rivets can leave visible scratches. Sun exposure and dryness can also make the vinyl brittle, making it easier to damage. Understanding what caused the scratch helps determine whether cleaning alone will work or if a repair is needed.

Pick Your Part - Help Yourself
1232 Blinn Ave, Wilmington, CA 90744, USA
1.2 Why cleaning is the first and most important step
Before repairing any scratches, cleaning is essential. Dirt, oils, and residue can interfere with repair materials and worsen the damage if rubbed in. A clean surface allows the treatment to bond better and ensures the finish looks smooth. Think of cleaning as the “foundation” for a lasting fix that restores your car’s professional look.

Pick Your Part - Greer
13054 E Wade Hampton Blvd, Greer, SC 29651, USA
2. Preparation and Tools You’ll Need
2.1 Essential cleaning supplies
Gather a few simple materials before you begin. You’ll need mild soap or automotive interior cleaner, microfiber cloths, warm water, a soft brush, and a vinyl conditioner. For deeper scratches, consider having a vinyl repair kit on hand. Avoid harsh chemicals like bleach or alcohol—they can discolor or dry out the surface.
2.2 Safety and preparation tips
Work in a well-ventilated area, preferably out of direct sunlight. Heat can cause cleaning solutions to dry too quickly, leaving streaks or uneven results. Test your cleaner on a small hidden area first to ensure it won’t damage the vinyl. Always wear gloves if using repair chemicals or conditioners.
3. Step-by-Step Cleaning and Scratch Removal
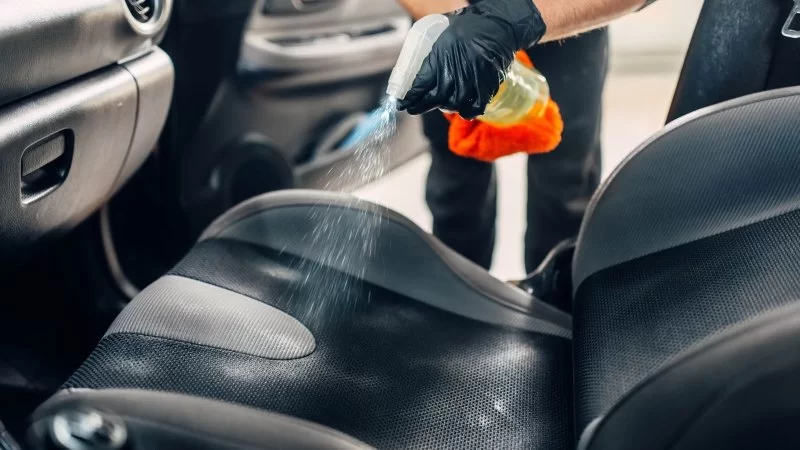
3.1 Removing surface dirt and debris
Start by vacuuming the seat to remove loose dirt and debris. Mix a few drops of mild soap in warm water, dip your cloth, and gently wipe the scratched area in circular motions. Avoid pressing too hard—you want to lift grime, not grind it deeper into the vinyl. Once clean, use a dry microfiber towel to remove excess moisture.
3.2 Buffing out light scratches
For small, shallow scratches, a bit of vinyl conditioner may be all you need. Apply a small amount to a soft cloth and gently rub it into the damaged area. The conditioner helps hydrate the vinyl, reducing the visibility of fine lines. For slightly deeper marks, use a heat gun or hair dryer on low setting to warm the area, then massage the vinyl to help it relax and regain shape.
4. Deep Repair for Severe Scratches
4.1 Using vinyl filler for deep gouges
If the scratch has exposed the underlayer or created a visible gouge, use a vinyl repair kit. Clean the area thoroughly, then apply a small amount of filler using a plastic spatula. Smooth it evenly and let it cure according to the instructions. Once dry, lightly sand with fine-grit sandpaper until flush with the surrounding surface.
4.2 Restoring the seat color and texture
To complete the repair, apply matching color compound from your kit. Many automotive stores offer color-matching vinyl paints that blend seamlessly with factory finishes. Use light layers and allow each to dry before applying the next. Finish with a vinyl protectant to restore sheen and provide UV protection, helping your repair last longer.
5. Maintenance and Prevention
5.1 Keeping your seats spotless
Regular cleaning is the key to keeping vinyl seats looking new. Wipe them down weekly using a damp microfiber cloth and mild cleaner. Avoid using oily or silicone-based products—they can attract dust and cause build-up over time. Conditioning once every few months helps maintain flexibility and prevents cracking.
5.2 Preventing scratches before they start
Consider adding seat covers if you frequently transport pets or heavy equipment. Keep sharp objects like tools and keys away from your seats. Parking in shaded areas or using sunshades can protect the vinyl from UV damage, reducing brittleness and discoloration. If a scratch does occur, address it promptly—delaying repairs can cause the damage to deepen.
6. Real Driver Stories
6.1 A DIY success story
One driver from Austin shared how a pair of work boots left long scratches on his car’s vinyl seats. Instead of paying hundreds for reupholstery, he used a vinyl repair kit and conditioner to fix it himself. “It took patience,” he said, “but the results were incredible—the seats looked almost new again.” His story proves that careful cleaning and repair can deliver professional-level results at home.
6.2 Lessons from frequent travelers
Another customer noted that long road trips often bring unexpected wear and tear. “After years on the road, small scratches started showing up everywhere,” she explained. Regular upkeep, quick cleaning after each trip, and periodic conditioning became her secret to maintaining a showroom-like interior without costly detailing services.
7. How 【Rescue & Towing 】 Can Help
7.1 Professional guidance for tough cases
When scratches are too deep for DIY methods, Rescue & Towing can connect you with trusted upholstery specialists who handle vinyl restoration professionally. Their team ensures your car’s interior retains both comfort and aesthetic appeal without overpaying for unnecessary replacements.
7.2 More than just repair — total vehicle care
Rescue & Towing also offers emergency services and automotive maintenance assistance. Whether it’s towing, minor repairs, or interior restoration referrals, their goal is to keep your car safe, clean, and road-ready. For drivers who value both reliability and style, partnering with experts who care about the details makes all the difference.