How to Use a Car Jack to Fix a Flat Tire: A Step-by-Step Guide
Imagine you're driving down a quiet road, enjoying the drive, and suddenly you hear the dreaded thump of a flat tire. Your heart sinks as you realize you're now facing the task of changing it. While this can be a stressful situation, having the right tools and knowing how to use them can make all the difference. One of the most crucial tools in this process is the car jack. Today, I’ll guide you through how to properly use a car jack to fix a flat tire, ensuring that you can handle the situation like a pro the next time you find yourself in this predicament.

MR. TIRE INC.
2078 New York Ave, Huntington Station, NY 11746, USA
1. Preparing for the Tire Change
Before you even think about lifting your car with a jack, there are some important steps to take to ensure your safety and a smooth tire change process. First, make sure you're in a safe location. If you're on the side of the road, try to pull over as far as possible and turn on your hazard lights. This alerts other drivers that you're dealing with an emergency, reducing the chances of accidents.
Next, engage the parking brake to prevent the car from moving while you're working. It's also a good idea to place something behind the opposite tire for extra security. For example, if you're changing the front tire, place a heavy object behind the rear tire. This will help prevent the car from rolling backward.
MR. TIRE INC.
2078 New York Ave, Huntington Station, NY 11746, USA
2. Gathering Your Tools
Now that you're safely parked, it's time to gather the necessary tools for the job. You'll need:
- A car jack
- A spare tire
- A lug wrench
- A wheel chock (optional but recommended)
- A flashlight (if you're working at night)
Before starting, ensure that all these tools are in good condition and within reach. For instance, make sure the car jack is functional and that the lug wrench fits the lug nuts properly. This can save you a lot of frustration when you're in the middle of the tire change.
3. Loosening the Lug Nuts
With the tools in hand, the next step is to loosen the lug nuts before you lift the car. You might think you need to jack up the car first, but it’s actually easier and safer to loosen the lug nuts while the tire is still on the ground. This prevents the wheel from spinning while you're trying to loosen them.
Using the lug wrench, turn the lug nuts counterclockwise. You might need to apply some force, so don't be afraid to use your body weight. It’s important to loosen them, but don’t remove them completely just yet—just break the seal by turning them about a quarter to half turn.
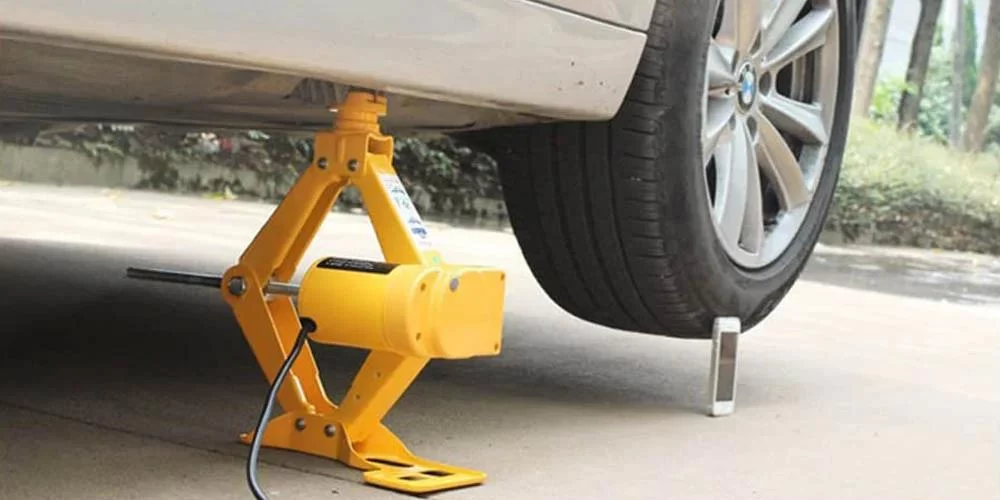
4. Lifting the Car with the Jack
Now comes the moment when the car actually gets lifted off the ground. Place the jack under the car’s jacking point. Every vehicle has a specific spot where the jack should be positioned—refer to your owner’s manual to find this spot. Most cars have a reinforced frame or a small metal notch where the jack can be safely placed.
Once the jack is properly positioned, start lifting the car by turning the jack handle. Keep an eye on the car to ensure it’s rising evenly. Don’t stop until the flat tire is off the ground—this is crucial to ensuring that you can easily remove the tire and replace it with the spare.
5. Removing the Flat Tire
With the car elevated, it’s time to remove the lug nuts and take off the flat tire. Finish unscrewing the lug nuts by hand. Be sure to keep them in a safe place—you’ll need them when you're putting the new tire on. Once all the lug nuts are removed, gently pull the flat tire off the car. Sometimes, it might need a little wiggle to break loose from the hub, but it should come off with minimal effort.
6. Installing the Spare Tire
Now that the old tire is off, grab your spare and line it up with the wheel hub. Push the spare onto the wheel bolts. Once the tire is on, hand-tighten the lug nuts onto the bolts. It’s important not to tighten them too much just yet—this comes after the car is lowered back to the ground.
7. Lowering the Car and Tightening the Lug Nuts
Now that the spare tire is in place, it’s time to lower the car back down to the ground. Slowly and carefully lower the jack by turning the handle in the opposite direction. As the car touches the ground, remove the jack and then proceed to tighten the lug nuts with your lug wrench. Tighten each nut in a crisscross pattern to ensure that the tire is secured evenly. Give each one a final tight turn to make sure everything is secure.
8. Double Checking and Packing Up
Once you’ve tightened the lug nuts, double check everything. Make sure the spare tire is properly secured, and the lug nuts are tight. You can now pack away your tools and drive off—just remember to check the air pressure in your spare tire when you can. Spare tires tend to lose air faster than regular tires, so it’s always best to keep an eye on it.
And there you have it! Changing a flat tire might seem daunting at first, but with the right tools and a clear understanding of the process, you’ll be able to handle it confidently. It’s one of those skills that everyone should have in their toolkit—especially if you spend a lot of time on the road.
At some point, we’ve all been caught off guard by a flat tire, and knowing how to change it yourself can save you time, money, and stress. Keep your car jack, spare tire, and other tools in good condition, and you’ll be ready for any roadside emergency. If you're not comfortable doing it yourself, don't hesitate to call a professional for help. But, knowing the process gives you a great sense of control the next time you're faced with a flat tire.